DIY ESP32 Video Doorbell Locks Out Big Brother

There’s no question that being able to see who’s at your front door from your computer or mobile device is convenient, which is why the market is currently flooded with video doorbells. Unfortunately, it’s not always clear who else has access to the images these devices capture. Organizations such as the Electronic Frontier Foundation have argued that by installing one of these Internet-connected cameras on their front door, consumers are unwittingly contributing to a mass surveillance system that could easily be turned against them.

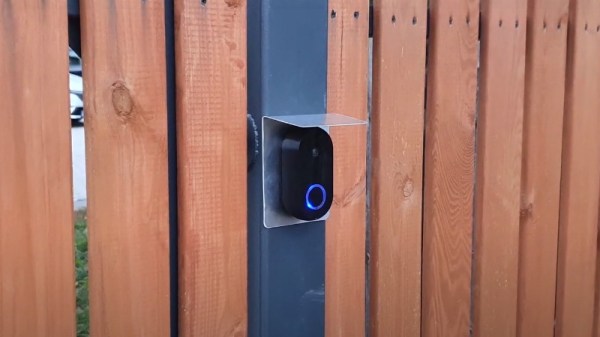
Luckily, there’s a solution. As [Sebastian] shows in his latest project, you can build your own video doorbell that replicates the features of the commercial offerings while ensuring you’re the only one who has access to the data by leveraging open source, community developed projects such as ESPHome and Home Assistant. At the same time, modern manufacturing techniques like desktop 3D printing and low-cost PCB fabrication mean your DIY doorbell doesn’t have to look like you made it yourself.
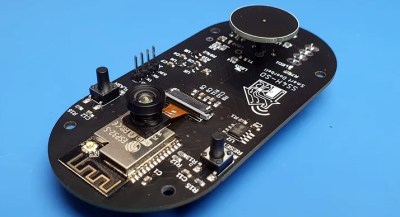
The project starts with a custom PCB that combines the ESP32, a camera module, a capacitive touch sensor, a relay to optionally trigger an electronic door lock, and a DC-DC converter that will let you power the device from a wide range of input voltages. The board even has a spot where you can solder on an additional 8 MB of external PSRAM for the ESP32, which will enable the chip to capture higher resolution video.

The electronics are housed in a minimalistic 3D printed enclosure that would fit right in alongside similar gadgets from the likes of Ring and Arlo; especially if you have access to a CNC and can cut the front panel out of acrylic. The lighted touch sensor looks phenomenal, and really gives the device a professional feel. That said, it doesn’t look like the case would last very long if exposed to harsh weather and there are some obvious physical security issues with this approach. But to be fair, we’ve seen the same problem with commercial hardware.

Naturally with a project like this, the hardware is only half of the story. It takes a considerable amount of software poking and prodding to get things like mobile device notifications working, and as a special added annoyance, the process is different depending on which MegaCorp produced the OS your gadget is running. [Sebastian] has documented the bulk of the process in the video after the break, but the finer points will likely need some adjustment depending on how you want to set things up.

This is an exceptionally impressive project for sure, but if the whole slick futuristic look isn’t your style, you could always opt to go with the DIY video door bell that looks like it came from an alternate reality version of 1986.

Continue reading “DIY ESP32 Video Doorbell Locks Out Big Brother”

The Easiest Way To Put Your Doorbell On The Internet

Thanks to low-cost WiFi enabled microcontrollers such as the ESP8266 and ESP32, it’s never been a better time to roll your own smart home system. But that doesn’t mean it isn’t daunting for new players. If you’re looking for an easy first project, putting your old school doorbell on the Internet of Things is a great start, but even here there’s some debate about how to proceed.

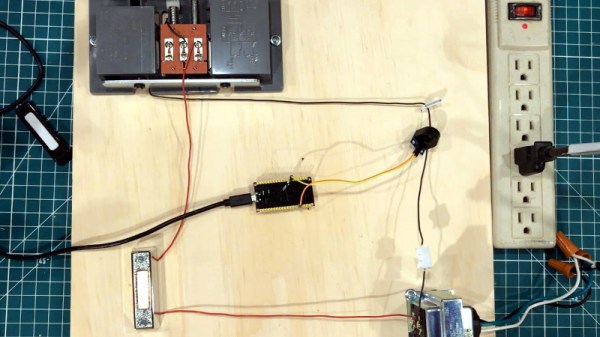
Most people stumble when they get to the point where they have to connect their low-voltage microcontroller up to the relatively beefy transformer that drives a standard doorbell. We’ve seen a number of clever methods to make this connection safely, but this tip from [AnotherMaker] is probably the easiest and safest way you’re likely to come across.

His solution only requires an inductive current sensor, which can be had for less than $1 from the usual overseas suppliers. One leg of the doorbell circuit is passed through the center of this sensor, and the sensor itself is connected up to your microcontroller of choice (here, and ESP32). The rest is software, which [AnotherMaker] explains in the video after the break. With the addition of a little debounce code, your microcontroller can reliably determine when somebody is out there jabbing the bell button; what you do with this information after that is up to you.

If you’re worried this method is too easy you could always try it with an optocoupler, or maybe convert the low-voltage AC to something your microcontroller can handle.

Continue reading “The Easiest Way To Put Your Doorbell On The Internet”

Video Doorbell Focuses On Quality, Aesthetic

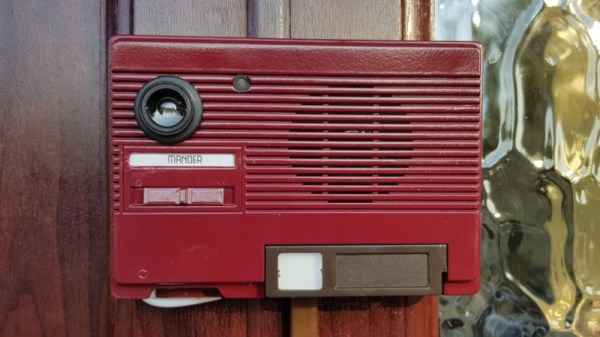
One of the most popular futurist tropes of the 20th century was the video intercom. Once this technology was ready, it would clearly become a mainstay of modern living overnight. Our lived reality is however somewhat different. For [MisterM], that simply wouldn’t do, so he set about producing a retro-themed video doorbell that is sure to be the envy of the neighbourhood.

Not one to settle for second best, [MisterM] wanted to focus on quality in video and sound. A Microsoft LifeCam 3000HD handles video and audio capture, with a Raspberry Pi 3B+ providing plenty of grunt to run the show. The Pimoroni pHAT BEAT add-on provides audio output. It’s all integrated into a 1980s vintage intercom, which is painted a deep shade of maroon for an extra classy look. Further parts are integrated into a classic Sony tape deck, with LEDs shining out from under the cassette door for added visual appeal.

The doorbell works by making calls to Google Duo, which allows the user to answer the door from anywhere in the house, or indeed – anywhere with an Internet connection! [MisterM] reports this has already proved useful for communicating with couriers delivering packages to the house. There’s also a standard wireless doorbell and chime integrated into the unit which alerts those within the house in the usual way.

It’s a project that is both highly functional and looks particularly swish. Integrating new brains into old-school enclosures is a great way to give your project a cool look. These aircraft surplus clocks are a great example. Video after the break.

Continue reading “Video Doorbell Focuses On Quality, Aesthetic”

Wireless Doorbell Rings A Real Bell

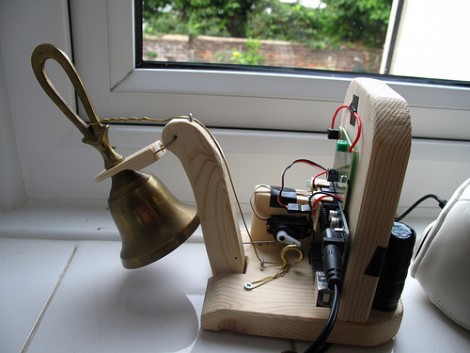
Tired of hearing that flat sounding wireless doorbell when visitors happen to come by? Don’t get rid of it, improve it by adding a real bell. This hack rigs up a small hand bell to the wireless doorbell receiver. It was prototyped using LEGO pieces to shake the sound out of the bell, but the finished version uses a servo motor on a wooden frame. An Arduino monitors the wireless receiver, driving the servo when a transmission from the front door button is received.

Traditionally door bells have actually been chimes that are struck with solenoids. We appreciate this rendition because it adds an element of kinetic art to the home, laying bare the functional hardware instead of hiding it in a box. Don’t miss the demonstration after the break.

Continue reading “Wireless Doorbell Rings A Real Bell”

Antique Phone Doorbell

doorbell

[Bryan] sent in this cool doorbell he made out of an antique phone. After seeing similar phones for $150 to $399, he picked one up on ebay for $10. After some cleaning and polishing, it was looking fantastic, but fairly useless. At this point, he broke it open and started hacking to turn it into a wireless doorbell. He picked up a cheap wireless doorbell and proceeded to gut it. The transmitter side got an aesthetic overhaul, a big fancy button and nice LED in a 50’s style  were added. The receiver side got hacked up as well. It was incapable of pushing the required voltage to ring the phone’s bell, so he had to do some searching for a better circuit. Since his knowledge of electronics was limited, he was looking for something that could be plugged in and work without much modification. Eventually, he found the Silvercom AG1170-s5. At $7, he swiped it up quick. It may be a bit of overkill, but he’s using an arduino to trigger the whole thing when it receives the signal. You can download the Arduino sketch on the site.