Helmet Decal Charger Keeps Them Ready To Glow

When firefighters are battling a blaze, it’s difficult for them to find each other in the smoky darkness. To help stand out they wear glow-in-the-dark decals on their helmets, but since they spend so much of their down time stowed away in a dark locker, they don’t always have a chance to charge up.

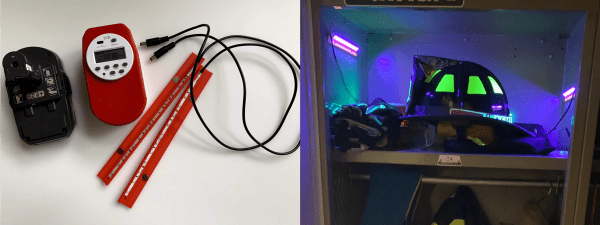
[Bin Sun]’s firefighter friend inspired them to build a portable charging system that can stuff those helmet decals full of photons in a matter of minutes. Although phosphorescent materials will charge in any light, they charge the fastest with ultraviolet light. This uses a pair of UV LED strips controlled by an off-the-shelf programmable timer, and powered with an 18-volt drill battery stepped down to 12 V. The timer makes it easy for [Bin Sun]’s friend to schedule charge times around their shifts, so the battery lasts as long as possible while keeping the decals ready to glow.

We love that [Bin Sun] seems to have thought of everything. The light strips are nestled into 3D-printed holders that also house small magnets. This makes it easy to position the lights on either side of the locker so both the front and back decals soak up the light.

Phosphorescent materials are great as a reusable display medium, especially when they’re designed to look like Nixie tubes.

Mobile Power From Cordless Tool Batteries

For years, [Michael Davis] has been using a large lead-acid battery to power the electronic components of his custom Dobsonian telescope; but that doesn’t mean he particularly enjoyed it. The battery was heavy, and you always had to be mindful of the wires connecting it to the scope. Looking to improve on the situation somewhat, he decided to build an adapter for Ryobi cordless tool batteries.

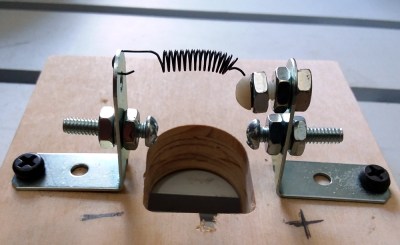
[Michael] had already seen similar 3D printed adapters, but decided to make his the traditional way. Well, sort of. He used a CNC router to cut out the distinctive shape required to accept the 18 V lithium-ion battery pack, but the rest was assembled from hardware store parts.

Bent mending plates with nuts and bolts were used to create adjustable contacts, and a spring added to the top ensures that there’s always a bit of tension in the system so it makes a good electrical contact. This setup makes for a very robust connector, and as [Michael] points out, the bolts make a convenient place to attach your wires.

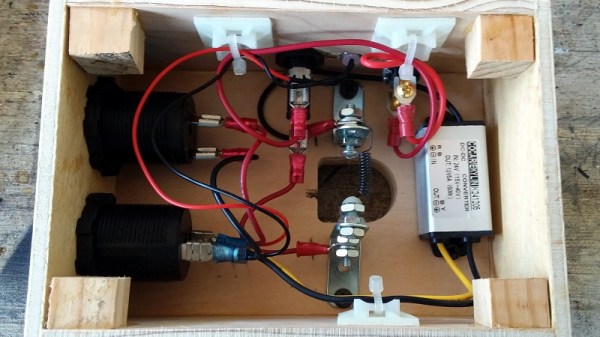
With the logistics of physically connecting to the Ryobi batteries sorted out, the next step was turning that into useful power for the telescope. A stable 12 V is produced by way of a compact DC-DC converter, and a toggle switch and fuse connect it to a pair of automotive-style power sockets. Everything is held inside of a wooden box that’s far smaller and lighter than the lead-acid monster it replaced, meaning it can get mounted directly to the telescope rather than laying on the ground.

If you want to build a similar adapter, the 3D printing route will potentially save you some time and effort. But we have to admit that the heavy-duty connection [Michael] has rigged up here looks quite stout. If you’ve got an application where the battery could be knocked around or vibrated lose, this may be the way to go.

Jump Start Your Car With A Drill Battery

Sometimes, you move to a new city, and things just aren’t going your way. You’re out of cash, out of energy, and thanks to your own foolishness, your car’s battery is dead. You need to jump-start the car, but you’re feeling remarkably antisocial, and you don’t know anyone else in town you can call. What do you do?

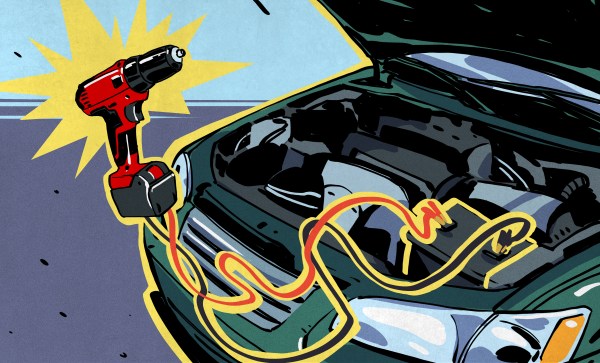
It’s not a problem, because you’re a hacker and you have a cordless drill in the back seat of your car. The average drill of today tends to run on a nice 18 volt lithium battery pack. These packs are capable of delivering large amounts of current and can take a lot of abuse. This is where they come in handy.

Typically, when jump starting a car, another working vehicle is pulled into place, and the battery connected in parallel with the dead battery of the disabled vehicle. Ideally, the working vehicle is then started to enable its alternator to provide charge to the whole system to avoid draining its own battery. At this point, the disabled vehicle can be started and its alternator can begin to recharge its own battery. After disconnecting everything, you’re good to go.

Continue reading “Jump Start Your Car With A Drill Battery”

Power Your Guitar Pedals With Drill Batteries

Guitar pedals are a great way to experiment with the sound of your instrument. However, they require electricity, and when you’re using more than a couple, it can get messy. Some will run on batteries, while others are thirstier for more current and will only work with a plugback. There are a great many solutions out there, but most people with more than a few pedals to power will end up going to some kind of mains powered solution. [Don] is here to show us that it’s not the only way.

Mains power is great for some things, but where pedals are concerned, it’s not always perfect. There are issues with noise, both from cheap power supplies and poorly designed pedals, and it means you’re always hunting for a power socket, which is limiting for buskers.

[Don] realised that the common drill battery is a compact source of clean, DC power, and decided to use that to power his rig. By slapping together a drill battery with a pre-assembled buck converter and a 3D printed adapter, he was able to build a portable power supply for his pedals. Thanks to the fact that the vast majority of pedals use 9V DC with the same input jack design, it’s a cinch to wire up. With an appropriately sized buck converter, a drill battery could supply even a hefty pedalboard for a significant period of time.

Overall, it’s a great hack that solves a problem faced by many performing musicians. We’ve seen our fair share of guitar pedals around Hackaday – perhaps you’d like to see how one makes it from concept to production?

Continue reading “Power Your Guitar Pedals With Drill Batteries”