The Mask Launcher; Like An Airbag For Your Face

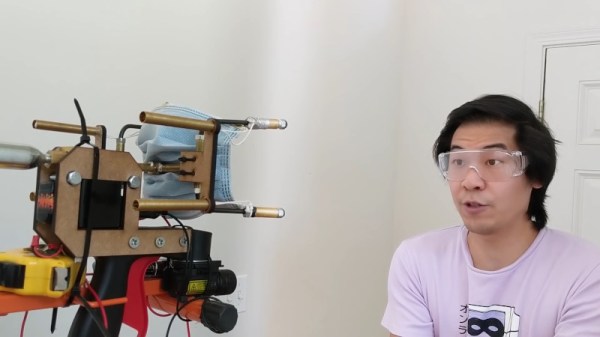
One of the most effective ways to slow the spread of pathogens like the novel coronavirus is to have individuals wear facemasks that cover the nose and mouth. They’re cheap, and highly effective at trapping potentially infectious aerosols that spread disease. Unfortunately, wearing masks has become a contentious issue, with many choosing to go without. [Allen Pan] was frustrated by this, and set out to make a launcher to quite literally shoot masks directly onto faces.

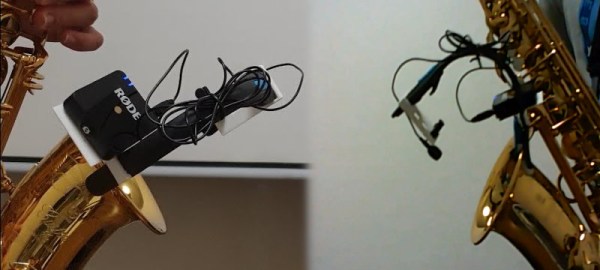
To fire the masks, Allan built a pneumatic system that gets its power from a compact CO2 canister. This is hooked up to a solenoid, which is fired by the trigger. The high-pressure CO2 then goes through a split to four separate barrels cleverly made out of brake line ([Allen] says it’s faster to get parts from the automotive supply than the home store these days). Each barrel fires a bola weight attached to one of the strings of the mask, in much the same way a net launcher works. The mask is then flung towards the face of the target, and the weights wrap around the back of the neck, tangling and ideally sticking together thanks to neodymium magnets.

Amazingly, the mask worked first time, wrapping effectively around a dummy head and covering the nose and mouth. Follow-up shots were less successful, however, but that didn’t deter [Allen] from trying the device on himself at point-blank range. Despite the risk to teeth and flesh, the launcher again fires a successful shot.

While it’s obviously never meant to be used in the real world, the mask launcher was a fun way to experiment with pneumatics and a funny way to start the conversation about effective public health measures. We’ve featured similar projects before, too. Video after the break.

Continue reading “The Mask Launcher; Like An Airbag For Your Face”

Helmet Decal Charger Keeps Them Ready To Glow

When firefighters are battling a blaze, it’s difficult for them to find each other in the smoky darkness. To help stand out they wear glow-in-the-dark decals on their helmets, but since they spend so much of their down time stowed away in a dark locker, they don’t always have a chance to charge up.

[Bin Sun]’s firefighter friend inspired them to build a portable charging system that can stuff those helmet decals full of photons in a matter of minutes. Although phosphorescent materials will charge in any light, they charge the fastest with ultraviolet light. This uses a pair of UV LED strips controlled by an off-the-shelf programmable timer, and powered with an 18-volt drill battery stepped down to 12 V. The timer makes it easy for [Bin Sun]’s friend to schedule charge times around their shifts, so the battery lasts as long as possible while keeping the decals ready to glow.

We love that [Bin Sun] seems to have thought of everything. The light strips are nestled into 3D-printed holders that also house small magnets. This makes it easy to position the lights on either side of the locker so both the front and back decals soak up the light.

Phosphorescent materials are great as a reusable display medium, especially when they’re designed to look like Nixie tubes.

Anything Becomes A Clock

Clocks are a popular project around here, and with good reason. There’s a ton of options, and there’s always a new take on ways to tell time. Clocks using lasers, words, or even ball bearings are all atypical ways of displaying time, but like a mathematician looking for a general proof of a long-understood idea this clock from [Julldozer] shows us a way to turn any object into a clock.

His build uses AA-powered clock movements that you would find on any typical wall clock, rather than reaching for his go-to solution of an Arduino and a stepper motor. The motors that drive the hands in these movements are extremely low-torque and low-power which is what allows them to last for so long with such a small power source. He uses two of them, one for hours and one for minutes, to which he attaches a custom-built lazy Suzan. The turntable needs to be extremely low-friction so as to avoid a situation where he has to change batteries every day, so after some 3D printing he has two rotating plates which can hold any object in order to tell him the current time.

While he didn’t design a clock from scratch or reinvent any other wheels, the part of this project that shines is the way he was able to utilize such a low-power motor to turn something so much heavier. This could have uses well outside the realm of timekeeping, and reminds us of this 3D-printed gear set from last year’s Hackaday prize.

Continue reading “Anything Becomes A Clock”

Vintage Ammeter Becomes Plant Moisture Gauge

It’s not uncommon to happen across vintage measurement equipment at the local flea market or garage sale. Often with an irresistible aesthetic, and built to last decades, these tools nonetheless tend to be sidelined when modern multimeters are available. [Build Comics] had just such a piece on hand, and decided to repurpose it with some modern hardware instead.

The build begins with a Hartmann & Braun 60 amp ammeter. Replete in a nice wooden box, it’s the perfect candidate for a modern refit. The device uses an indicator of the moving iron type. Intending to turn the device into a soil moisture monitor, [Build Comics] began by removing the original heavy-wound coil. In its place, a custom coil was installed instead, wound on a 3D printed bobbin using a modified sewing machine. This allows the meter to be easily driven by an Arduino with little more than a transistor on a GPIO pin. To detect moisture, a Iduino ME110 moisture probe was used. Complete with cloth-covered wire to maintain the vintage look. The original meter plate was also photographed, modified, and reprinted, to read moisture levels instead of current.

If you’re interested in these gauge restoration techniques but don’t have a green thumb, no worries. [Build Comics] used similar tricks to put together a gorgeous weather station that would look great on your desk.

Continue reading “Vintage Ammeter Becomes Plant Moisture Gauge”

Keycap Customizer Brings All Your Caps To The Board

With bright colors and often intricate designs, after the physical shape of a keyboard the most conspicuous elements are surely the keycaps. Historically dictated by the stem of the key switch it attaches to, keycaps come in a variety of sizes, colors, profiles, and designs. As they necessarily include small features with tight tolerances to fit the stem of their key switch, injection molding is the classic manufacturing technique for a keycap. But as hobbyist 3D printing matures and resin printers become more accessible, home keycap manufacturing is increasingly good option. Instead of designing each cap by hand, consider trying [rsheldiii]’s KeyV2 OpenSCAD script to create custom caps with ease.

To cover the basics, KeyV2 can generate full keycap sets with Cherry or Alps stems, in the SA, DSA, DCS profiles (and more!) for any typically sized keyboard. Generating a particular cap of arbitrary profile, position, and size is just a short chain of function calls away. But standard keycap sets aren’t the highlight of this toolset.

If you’re not an OpenSCAD aficionado yet, visit [Brian Benchoffs] great getting-started guide or our other coverage to get a feel for what the tool can do. Part of OpenSCAD’s attraction is that it is the the paragon of parametric modeling. It’s declarative part files ensure that no parameter goes undefined, which is a perfect fit for KeyV2.

The root file upon which all caps are based on has about 150 keycap parameters which can be tweaked, and that’s before more elaborate customization. Making simple “artisan” caps is a snap, as the magic of OpenSCAD means the user can perform any Boolean operations they need on top of the fully parameterized keycap. Combining an arbitrary model with a keycap is one union() away. See the README for examples.

For the prospective user of KeyV2 worried about complexity; don’t be, the documentation is a treat. Basic use to generate standard keycaps is simple, and there are plenty of commented source files and examples to make more complex usage easy. Thinking about a new keyboard? Check out our recent spike in clacky coverage.

Hammer Seeks Nail

People sometimes say “when you have a hammer, everything looks like a nail” as if that were a bad thing. Hitting up Wikipedia, they’re calling it the Law of the Instrument or Maslow’s Hammer and calling it a cognitive bias. But I like hammers…

I’m working on a new tool, a four-axis hot-wire foam cutter based roughly on this design, but built out of stuff in my basement so far. I want it primarily to turn out wings for RC airplanes so that I can play around with airfoils and construction methods and so on. But halfway through building this new “hammer”, I’m already getting funny ideas of other projects that could be built with it. Classic nail-seeking behavior.

And some of these thoughts are making me reconsider the design of my hammer. I originally wanted to build it low, because it’s not likely that I’ll ever want to cut wing sections taller than 50 mm or so. But as soon as cutting out giant letters to decorate my son’s room, or maybe parts for a boat hull enter my mind, that means a significantly taller cutter, with ensuing complications.

So here I am suffering simultaneously from Maslow’s Hammer and scope creep, but I’m not sad about either of these “ills”. Playing with a couple manual prototypes for the CNC hot-wire cutter has expanded my design vocabulary; I’ve thought of a couple cool projects that I simply wouldn’t have had the mental map for before. Having tools expands the possible ways you can build, cognitive bias or not.

One person’s scope creep is another’s “fully realizing the potential of a project”. I’m pretty sure that I’ll build a version two of this machine anyway, so maybe it’s not a big deal if the first draft were height-limited, but the process of thinking through the height problem has actually lead me to a better design even for the short cutter. (Tension provided by an external bow instead of born by the vertical CNC towers. I’ll write the project up when I’m done. But that’s not the point.)

Maybe instead of lamenting Maslow’s cognitive bias, we should be celebrating the other side of the same coin: that nails are tremendously useful, and that the simple fact of having a hammer can lead you to fully appreciate them, and in turn expand what you’re capable of. As for scope creep? As long as I get the project done over my vacation next week, all’s well, right?

Wireless Sax Mic Done On The Cheap

Sometimes, economies of scale don’t work in our favor. While guitarists and singers will find themselves well catered to by the accessories market, players of fancier, less popular instruments will often have to dig deeper in their pockets to get what they need. [Henry Goh] found himself in need of a saxophone mic. However, off-the-shelf solutions were a touch expensive, and thus he decided he could probably whip something up himself.  (Video, embedded below.)

Parts of a saxophone, for the uninitiated. The microphone should be placed a good distance from the center of the bell to pick up the best sound.

It’s a simple solution, one that we could imagine any maker quickly whipping up with junkbox parts. Not one to skimp on quality, [Henry] picked a Rode Wireless Go paired with a lavalier mic for a quality wireless microphone solution. The real problem would be mounting the device, intended to be worn on a shirt, to the right position in front of the saxophone’s bell.

To achieve this, most dedicated sax mics used a bendable arm to allow the position to be readily changed. Instead, [Henry] whipped up some mounts on the 3D printer that would allow him to mount the Rode wireless mic hardware on an bendy Energizer LED torch. The torch even comes with a clamp allowing it to be easily attached to the instrument, making fitment a cinch.

[Henry] estimates the solution saved him up to $800 SGD. The final result is cost effective, and gives quality easily good enough for amateur and community performances. As a bonus, the hack is non-destructive, meaning you can repurpose the lavalier mic for other work as needed.

We love a good hack on the cheap, and it’s something we see all the time in the music scene. This guitar build is a great example of the form.

Continue reading “Wireless Sax Mic Done On The Cheap”