Electric Imp As An Internet To RF Gateway

a-little-automation-with-the-electric-imp

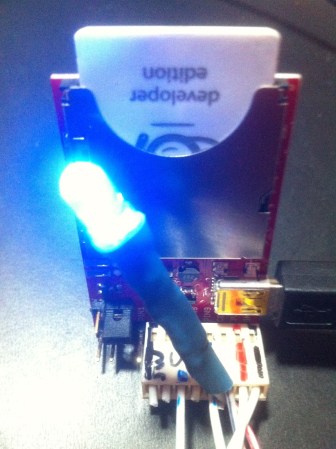
This project is a study in connecting several different families of hobby electronic hardware. The image above shows the Electric Imp side of things. It bridges its Internet connection with the RF connections of the rest of the project.

The Imp is a peculiar (intriguing?) piece of hardware. Take a look at [Brian Benchoff’s] hand’s on experience with the SD form factor hardware which is not an SD card at all. It’s an embedded system which uses light programming and a cloud-based software setup to bring wireless Internet to your projects.

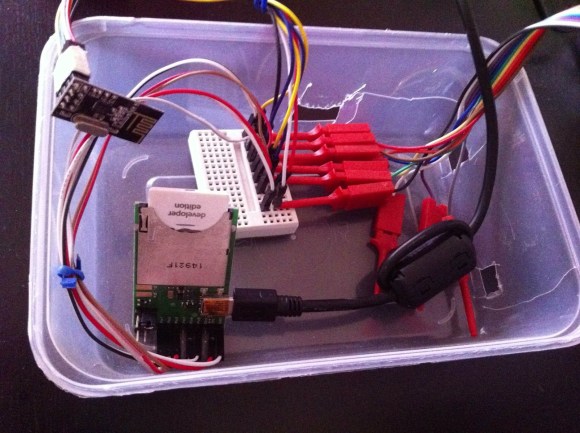
In this case [Stanley Seow] started wondering if he needed multiple Imps to connect different parts of his setup. A bit of head scratching led him to the use of nRF24L01 modules which are cheap and easy to use Radio Frequency transceiver boards. He took a partially finished driver project and brought it home to play nicely with the Imp. Now he can use the system to communicate with other components which will eventually be used for home automation. Right now his proof of concept issues wireless commands to an Arduino driving a strip of LEDs.

Building A WiFi Enabled Nixie Counter

wifi-nixie-counter

[Kevin Ballard] built this Nixie counter on the company dime. Tubes like this are getting more and more difficult to find since they’re no longer being manufactured. But when the Bossman hands you a corporate credit card those kinds of concerns take a back seat to your parts-shopping impulses. Start to finished this WiFi enabled counter took six weeks to build.

Connecting the board to the internet was very easy thanks to the Electric Imp that drives it. The difficult part comes in building a driver board and sockets for the tubes. We don’t see a lot of detail on how he’s generating the high voltage. But you can get a good feel for the tube connectors from the picture. He’s using an adapter PCB from Kosbo which breaks the tube pins out to two rows of 0.1″ pitch pin headers. The acrylic base has a port for each made of pin sockets spaced by a thick chunk of acrylic. Wiring harnesses wrap around the back side of the base to mate with the driver hardware. It’s programmed to count some type of company metric (it was funded by the corporation after all). They must be fairly successful because those numbers are flying by in the demo video.

Continue reading “Building A WiFi Enabled Nixie Counter”

Hackaday Links: Sunday, May 26th, 2013

hackaday-links-chain

The warmer months cometh and it’s time to think of this year’s Burning Man. [Matt’s] already set himself up with a sound-reactive LED project he calls the Seed of Life.

Older readers, and those who really know their hobby electronic history, will know the name Heathkit. Many readers tipped us off about their triumphant return. We’re not sure what form this reincarnation will take, but you can help shape it by participating in the survey.

Dust off that MSP430 launchpad and turn it into a composite video Pong console.

Here’s a way to use your Android phone as a computer mouse.

We’re not quite sure what this is, but turn your volume down before watching the video about a modular sythesizer hack.

[Arkadiusz Spiewak] wrote in to share some of the printing success (translated) he’s had recently with the H-bot style printer we saw a while back.

Strap an Arduino and an Electric Imp to your arm (and everyone else’s) and it’ll remember everyone you meet. You know, kind of like Google Glass but with geeky arm-wear instead of geeky headgear?

And finally, [Nerick] has just finished a thermometer project using Nixie tubes (translated).

Electric Imp Makes A Cat Door Tweet Its Activities

electric-imp-tweeting-cat-door

This Tweeting cat door uses the Electric Imp to read a sensor and report back to the server. The hardware is pretty neat. The board hosts an ARM Cortex-M3 processor and gets on your home network via WiFi. The mini-USB cable simply provides the power. Programming is done over the network. Our own [Brian Benchoff] had a chance to try the Imp out earlier in the Fall.

Monitoring a cat door is as good a reason as any to undertake a project. The hardware added to the board includes a reed switch mounted on the jamb along with a magnet on the door itself. There is also a blue LED that gives a bit of user feedback. The software isn’t quite as easy but it still wasn’t that bad. As with most web-connected projects getting all the parts to talk to each other was a bit of a chore. The Imp reports back to a server on the local network which then activates a PHP script that uses Sen.se to push out a Tweet.

[Thanks Pat]

Directing An Alarm System Straight To The Internet

[Scott] has a pretty nice alarm system at his house – it will give the operator at his alarm company enough information to determine if it’s a fire alarm, burglary, or just a cat walking in front of a sensor. [Scott] wanted to cut out the middle man and receive notifications from his alarm system on his phone. He did just that, with the help of a trusty Arduino and the very cool Electric Imp.

[Scott]’s build began with an Arduino attach to a Raspi to monitor state changes in the alarm system. Because the designers of the alarm system included a very helpful four-wire bus between the alarm panels and the part connected to the phone line, [Scott] found it fairly easy to tap into these lines and read the current alarm status.

Dedicating a Raspberry Pi to the simple task of polling a few pins and sending data out over WiFi is a bit overkill, so [Scott] picked up an Electric Imp Arduino shield to transmit data over WiFi. We’ve played around with the Imp before, and [Scott] would be hard pressed to come up with a cleaner solution to putting his alarm monitor on the Internet.

Now [Scott] has a very tidy alarm monitor that sends updates straight to his cell phone, no middle man required. A very neat build, and an excellent use of a very cool WiFi device.

Hands On With The Electric Imp

A while ago we caught wind of the Electric Imp, a very cool little device that packs an ARM microcontroller and a WiFi adapter into an SD card. We got our hands on an Imp last week, and now it’s time to show off what this little device can do. You can check out the rest of this hands on tutorial with the Electric Imp after the break.

Continue reading “Hands On With The Electric Imp”

Electric Imp Connects Projects To The Internet

If you’re planning a build that communicates wirelessly to that ‘Internet of things’ we’ve been hearing about, you might want to check out the Electric Imp. This tiny little card connects your project to the Internet without all the hassle of configuring an embedded wireless device.

Inside the Electric Imp is a good bit of hardware: an ARM CortexM3, and an 802.11b/g/n wi-fi module that will connect to your wireless network automatically. There are also a few pins left over for serial, I2C, SPI and PWM applications.

Instead of manually configuring the DNS and WPA encryption, the Electric Imp does all of this automatically. We have no idea how the Electric Imp configures itself, but we’d bet it’s something along the lines of plugging the SD card-sized Imp into a computer and piggybacking off the computer’s credentials. The Imp also uses a cloud service, but we’ll bet once Imps are out in the wild, you’ll be able to use them with your own network.

The Electric Imp card itself will sell for about $25, but there are also dev kits to turn the Imp into an Arduino-compatible board. If everything goes as planned, the Imp will be released sometime this summer; we’ll probably see a few Electric Imp projects finished before August.

EDIT: [Kevin] over at Electronic Imp wrote in and told us about the configuration process:

We have an iOS and Android app where the user enters their wireless network’s SSID and the password, then they hold the screen up to the Imp. There’s a photosensor in the Imp that picks up the phone’s flashing and configures the device optically, without the need of plugging it in to a computer, setting up a temporary network for config, or any other cumbersome mechanisms.

We’re basically looking at a much cooler version of the Timex Datalink here. Awesome.