Sega Genesis Finally Gets Long-Awaited Stock Ticker App 37 Years After Launch

Until now, if you were seated at your Sega Genesis and wanted to check your stock portfolio, you were out of luck. You had to get a smartphone, or a computer, or maybe even a television to look up stock prices and understand your financial position. Thankfully, though, Sega’s neglect of its hero platform has finally been corrected. [Mike Wolak] has given the 16-bit console the real-time stock ticker it so desperately needed. 

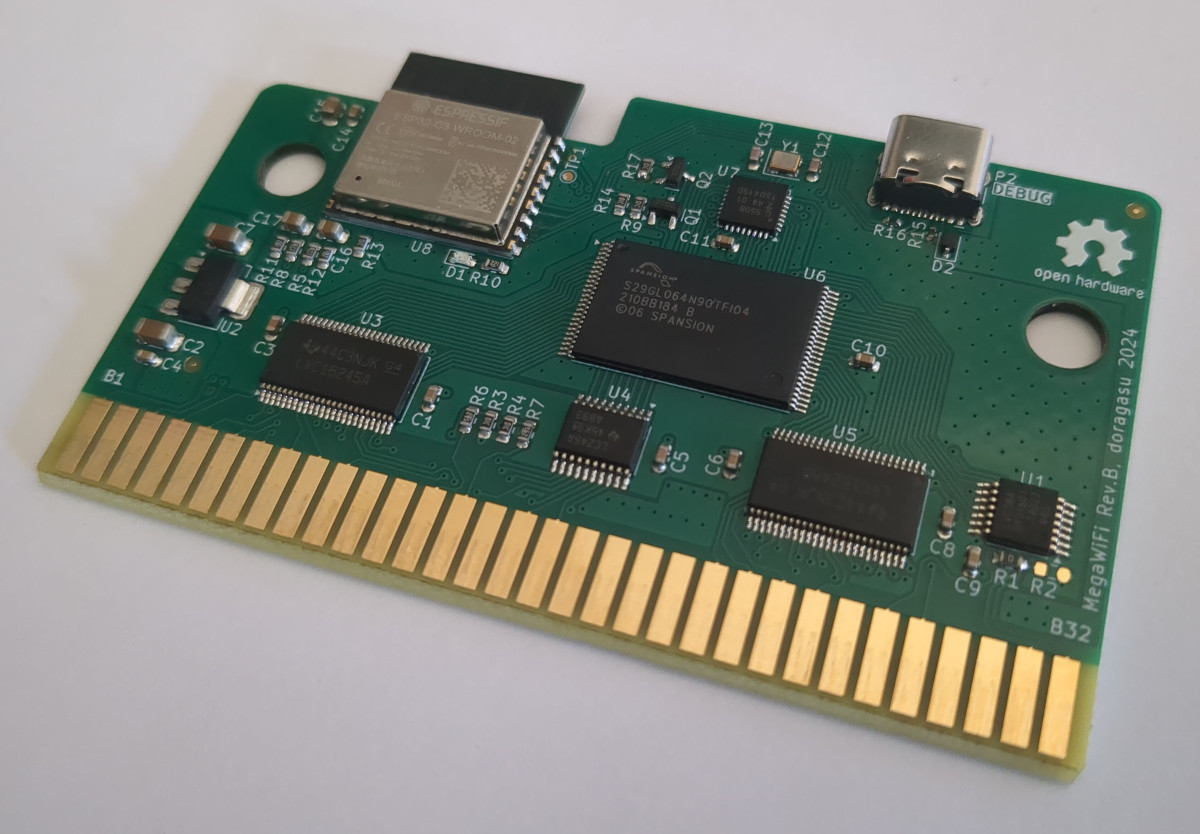
The build runs on a MegaWiFi cartridge, which uses an ESP8266 or ESP32 microcontroller to add WiFi communication to the Sega Genesis (or Mega Drive). [Mike] wrote a custom program for the platform that would query the Finnhub HTTPS API and display live stock prices via the Genesis’s Video Display Processor. It does so via a clean console-like interface that would be familiar to users of other 16-bit machines from this era, though seeing so much textual output would have been uncommon.

By default, the stock ticker is set to show prices for major tech stocks, but you can set it up to display any major symbol available in the Finnhub data stream. You can configure up to eight custom stocks and input your holdings, and the software will calculate and display your net worth in real time.

All the files are available for those eager to monitor their portfolios on a Sega, as the financial gods intended. [Mike] notes it took a little work to get this project over the line, particularly as the ESP32-C3 doesn’t support HTTPs with stock firmware. A few other hacks were needed to keep the Genesis updating the screen during HTTP queries, too.

If you have a concentrated portfolio and a spare Sega Genesis, this could be a fun retro way to keep an eye on your holdings. Alternatively, you might prefer to go the classic paper tape route.

Continue reading “Sega Genesis Finally Gets Long-Awaited Stock Ticker App 37 Years After Launch”

This LED Strip Clock Aims To Make Your Next One Easier, Too

At first glance, it may look like [Rybitski]’s 7-segment RGB LED clock is something that’s been done before, but look past the beautiful mounting. It’s not just stylishly framed; the back end is just as attentively executed. It’s got a built-in web UI, MQTT automation, so Home Assistant integration is a snap, and allows remote OTA updates, so software changes don’t require taking the thing down and plugging in a cable.

Continue reading “This LED Strip Clock Aims To Make Your Next One Easier, Too”

Modded Lightbox Makes For Attractive LED Matrix Display

If you’ve been to a wedding or a downtown coffee shop in the last 10 years, you’ve probably seen those little lightboxes that are so popular these days. They consist of letters placed on a plastic frame in front of a dim white light, and they became twee about five minutes after your hipster friend first got one. However, they can also make a neat basis for an LED display, as [Folkert van Heusden] demonstrates. 

The build is straightforward enough, using daisy chains of 32×8 LED matrix modules, two each for the three rows of the lightbox. This provides for a 24 character textual display, or a total display resolution of 64 x 24 pixels. An ESP8266 is used to command the matrixes, which are run by MAX7219 display controllers. Thanks to the microcontroller’s onboard wireless hardware, the display can be addressed in a number of ways, such as using the LedFX DDP protocol or [Folkert’s] Pixel Yeeter python library. Files are on GitHub for the curious.

Quite a few of these exist out in the wild — [Folkert] has built a variety of modded lightboxes over the years with varying internals. The benefit of the lightbox is that it effectively acts as a handy housing for LED matrixes and supporting electronics, while also providing a neat diffuser effect. The lightboxes are also readily wall mountable and generally look more like an intentional piece of signage than most things we might homebrew in the lab.

We’ve featured similar-looking builds before, like this public transit display that was hacked for custom use. If you’re building your own public information boards or other nifty LED displays, don’t hesitate to notify the tipsline!

CardFlix: NFC Cards For Kid-Friendly Streaming Magic

For most of us, the days of having to insert a disc to play our media are increasingly behind us. But if you’d like to provide your kids with the experience, you could use CardFlix.

For the electronics, [Udi] used the readily available ESP8266 D1 Mini module connected via I2C to a PN532 NFC reader. To trigger the different movies, there are over 50 cards, each with not only its unique NFC tag but also small posters that [Udi] printed showing the show and then laminated, ensuring they will survive plenty of use. The D1 Mini and NFC reader are housed in a 3D printed case, which ends up being almost smaller than the 5V DC adapter powering it, allowing it to be mounted above an outlet out of the way. The deck of movie cards is also housed in a pair of printed boxes: the larger one for the whole collection and a small one for the most often used shows. Should you want to print your own, all the design files are provided in the write-up.

The D1 Mini was programmed using ESPHome. This firmware allows it to easily connect back to Home Assistant, which does most of the heavy lifting for this project. When a card is scanned, Home Assistant can tell which TV the scanner was near, allowing this system to be used in more than one location. It also knows which card was scanned so it can play the right movie. Home Assistant also handles ensuring the TV in question is powered on, as well as figuring out what service should be called for that particular movie to be shown.

Be sure to check out some of the other projects we’ve featured that use ESPHome to automate tasks.

Continue reading “CardFlix: NFC Cards For Kid-Friendly Streaming Magic”

Building A Desk Display For Time And Weather Data

Just about every laptop, desktop, and smartphone in your life can tell you the date, time, and current weather predictions. However, sometimes it’s nice to have simple data displayed on a bespoke device. That’s what inspired [Mario] to create ESPTimeCast. 

As you might have guessed by the name, the project is designed around the ESP32 and ESP8266 microcontrollers; either one is up to the task of running the show here. Both come with Wi-Fi connectivity out of the box, which makes it easy for them to hook up to the Internet to query NTP servers for the time and weather data from OpenWeatherMap. The data is then displayed on an LED matrix display, made up of four 8×8 LED modules and driven with the aid of the MAX7219 IC. Configuration is handled over a simple web interface hosted on the device itself. All the parts are wrapped up in a 3D-printed housing that would be very fitting in any home that appreciates the magic of late 60s/early 70s decor.

Hackers love building clocks, weather stations, and other useful information displays. We’ve seen a great many examples over the years. If you’re cooking up your own neat project in this area, don’t hesitate to let us know!

An LED Sphere For Your Desk

The Las Vegas Sphere is great and all, but few of us can afford the expense to travel to out there to see it on the regular. If you’re looking for similar vibes you can access at home, you might enjoy the desk toy that [AGBarber] has designed.

The scale is small — the sphere measures just 98 mm (3.6 inches) in diameter — but that just means it’s accessible enough to be fun. The build is based around various sizes of WS2812B addressable LED rings, and contains 120 individual RGB LEDs in total. They’re wrapped up in a 3D printed housing which does a great job of diffusing the light. Transparent filament was used to print parts that light up with a richly-saturated glow with few visible hotspots. Commanding the LEDs is an ESP8266 microcontroller in the form of a Wemos D1 Mini, which provides plenty of grunt to run animations as well as great wireless connectivity options. [AGBarber] relied on their own Pixel Spork library to handle all the cool lighting effects. Files are on GitHub for the curious.

Maybe you don’t like spheres, and icosahedrons are more your speed. Well, we’ve featured those too—with 2,400 LEDs, no less.

Continue reading “An LED Sphere For Your Desk”

Shadow Clock Shows The Time On The Wall

What if you build a clock that displayed the time not just on its own, but in its shadows as well? [Lewis] from [DIY Machines] has done just that, with a nifty 3D-printed shadow clock build.

The clock itself, based on a design by [shiura], has a hollow rim inside which are the two hands which actually display the time. The hands appear to almost float inside the clock, a tricky visual effect of the design which instantly catches the eye. The trick is simple—the minute hand is physically attached to the outer rotor, which sets its position. Meanwhile, the floating hour hand pivots freely around the center of the clock, with a secret magnet within. This magnet is attracted to a complementary magnet in the hour rotor—as that rotor turns, the hour hand points at the magnets inside.

So far, it’s already a cool clock. The bonus feature is that [Lewis] realized this design could show an even larger clockface on the wall behind, merely by using its shadows. Thus, the clock features an LED light source which can project the clock’s shadows into a much larger display than the desktop timepiece itself.

As for the electronics, it’s straightforward stuff. An ESP8266 devboard runs the show, turning stepper motors and controlling addressable LEDs to make the clock do its thing. It also queries a network time server in order to ensure the displayed time is always accurate to the second.

We’ve featured some other excellent clocks over the years, like this incredible thermochromic build. Video after the break.

Continue reading “Shadow Clock Shows The Time On The Wall”