Moppy Lets You Play Your Floppy Drives

Get ready to join a band. Just follow the guide over at the Moppy project page and you’ll have your very own floppy drive instrument.

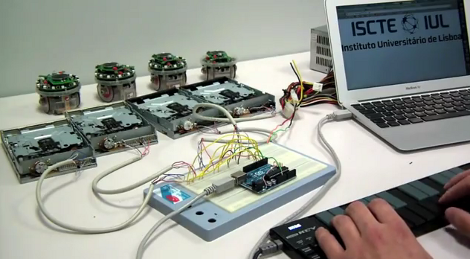
The name is a mashup between Musical and Floppy. By using an Arduino UNO as a translator, you can command an array of floppy drives with a musical keyboard (think piano). The head on each floppy drive is controlled by a stepper motor which will put out some sweet sounds if driven at just the right frequency. The lower notes tend to fair a bit better than the high range. One great example of this is the Imperial March theme as heard after the break.

Once you get the base system up and running, it’s time to think of some alternate interfaces. Sure, you can obvious things like toy keyboards. But wouldn’t it be more fun to make it fruit controlled?

Continue reading “Moppy Lets You Play Your Floppy Drives”

Floppy Drive As An Audio Sampler

Here’s a floppy drive which is being used as an audio sampler. At first glance we thought this was another offering which drives the stepper motor at a specific frequency to generate that characteristic sound at a target pitch. But that’s not what’s happening at all. The floppy is actually being used as a storage device (go figure).

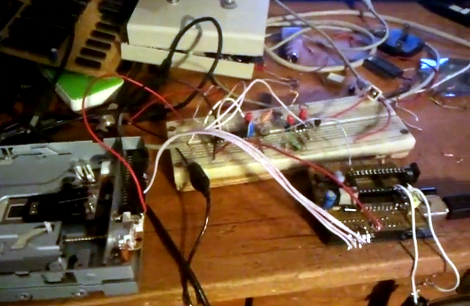
From what we can tell, it’s being used almost like an 8-track tape. A PWM signal is stored on one circular slice of the disk, then the head can be moved back to that same “track” to play back the wave form. The head doesn’t move during playback, but just keeps reading the same track of bits. To the right you can see an Arduino board. This allows for MIDI control of the track selection. [Alexis] shows off some keyboard control in the video after the break. There’s a buffer chip on the breadboard which allows the audio output to be quickly switched off as the floppy drive head is moved. This keeps garbage out of the sound until the new track can be read.

Continue reading “Floppy Drive As An Audio Sampler”

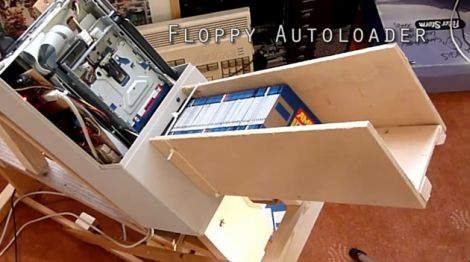
Floppy Autoloader Takes The Pain Out Of Archiving 5000 Amiga Disks

floppy-autoloader

Archiving data from old floppy disks can be a tedious process at best. Poorly labeled disks combined with slow transfer speeds put it high on the list of things we would rather not do, and it turns out that [Dweller] was of the same opinion. With an estimated 5,000 floppies in his collection, he finally decided it was time to clean house.

With no idea of what was stored where, he decided the best way to go about the process was to read all of the disks, archiving everything, saving the sorting process for later. He originally started by building a floppy autoloader out of Lego Mindstorm parts, which looked good on paper, but performed pretty poorly.

He came across an old floppy duplicator on eBay and figured that since the machine was built for handling gobs of disks, that it was the perfect base for his autoloader. He pulled the mechanical bits from the machine, incorporating them into the rig you see above. He swapped out the duplicator’s brains for an Arduino, which allows him to batch copy his disks and save a picture of each label with little effort.

He says that the system works great, making his life a lot easier (and less cluttered!)

Check out the video below to see his floppy autoloader in action.

Continue reading “Floppy Autoloader Takes The Pain Out Of Archiving 5000 Amiga Disks”

Making Sweet Floppy Drive Music With A Calculator

floppy-music-ti83-style

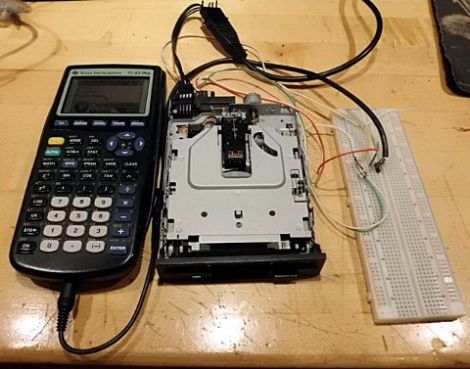
[Chris] says that he’s been pretty busy lately, leaving little opportunity for hacking. However he did manage to find a little time to put together a small project that has occupied his to-do list for a while – a floppy drive music controller.

We have seen hacks that use microcontrollers to actuate floppy drive motors before, but we can’t remember anything that used a calculator to do the job instead. While a microcontroller gives you plenty of I/O pins to play with, [Chris’] Ti-83+ only has two.

Even with the calculator’s I/O limitations, he didn’t find the task too overly difficult as he merely needed to hold a pair of the drive’s pins low, while pulsing two others. He modified a media player written for Ti calculators to output the necessary control signals, then he cranked out some tunes.

As you can see in the video below, his simple setup works quite well – not bad for just a few hours’ work.

Continue reading “Making Sweet Floppy Drive Music With A Calculator”

Emulating Oric-1 Floppy Disk Hardware

This device is called the Cumulus and it’s used to emulate the floppy disk hardware for Oric-1 and Oric Atmos computers. These 1980’s era computers included an expansion slot to which you could connect a floppy drive. That module, called a Microdisc system, also included the driver circuit which means you can’t just use a modern-day floppy drive as a replacement. [Retromaster] sidestepped the need for magnetic media all together by building an SD card interface which emulates the original module. We can tell by the use of a color screen and clean board layout that a lot of love went into the project. A CPLD implements the communications protocol used by the Microdisc system and creates all of the registers that would have been found on the original hardware. A PIC takes care of the SD card communications and the user interface.

With the exception of comforting noises, we’d bet there are few who have fond memories of using floppy disks. No wonder we’ve been seeing hacks to replace them quite a bit lately.

Classical’s Greatest Hits On Hardware’s Greatest Flops

We get a lot of tips about old hardware playing recognizable tunes. But once in a while one of these projects goes above and beyond the others and this is a shining example of great hardware music. [FunToTheHead] put together a music video (embedded after the break) that shows his custom MIDI device playing Bach’s Toccata in d minor. He left some comments that clue us into the way he did it. Most obviously, he’s using the stepper motors from four floppy drives to create precisely pitched sounds. Internally, a PIC 18F14K50 acts as a MIDI-over-USB device, taking commands for all 128 MIDI notes as well as the pitch bends associated with them. The first four channels are played directly on each drive and the other twelve are triaged among the hardware by the microprocessor. But for the results heard in the video you’ll need to code your MIDI files by hand.

Bonus points to the video editor for the Phantom’s floppy-laden appearance in the video… it’s good to laugh!

Continue reading “Classical’s Greatest Hits On Hardware’s Greatest Flops”

Stepper Directed HDTV Antenna

Credit: http://www.instructables.com/id/Computer-controlled-OTA-TV-antenna/

Broadcast TV has come a long way from adjusting the rabbit ears on top of the set just to get a fuzzy black and white picture. While nowadays there are often HD signals broadcast in most areas, it can often still be critical to redirect an antenna to get the best possible signal. By harvesting a stepper motor from an old 5 1/2″ floppy drive, and using a PC’s parallel port to control it, this adjustment can be handled automatically. Broadcast tower locations are easily found online, and once you have calibrated your stepper to face North, you are on your way to free HDTV reception.

What we would like to see is this antenna attached to a HTPC, and some kind of script to automatically direct the antenna for the best possible signal for the current channel. If anyone out there makes this happen, be sure to let us know.