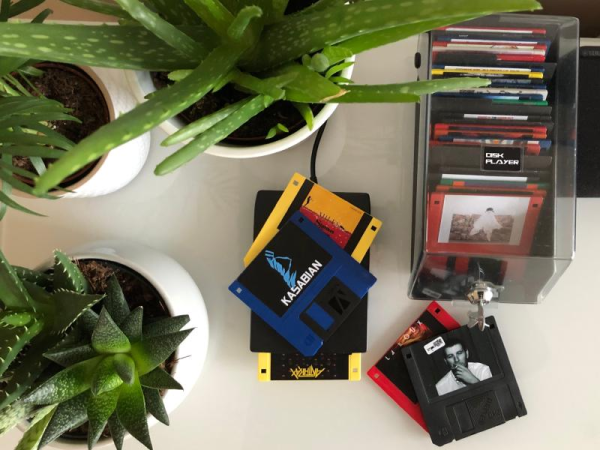
A Floppy Drive For Apple’s Pippin

The Pippin was Apple’s first and last foray into gaming consoles. At its heart, the Pippin was a strange ‘multimedia device’ with a CD-ROM, the potential for Internet access, a few neat controllers, and the guts of a very bare-bones PowerPC Macintosh. Think of a cross between a 3DO and WebTV, and you’ll get an idea of what Apple was trying to build here.

The Pippin is rare, and that means the related accessories, ranging from magneto-optical drives to floppy drives, are incredibly hard to come by. Now, one of those peripherals isn’t rare anymore; [Pierre] has cloned the (passive) PCB that allows a Macintosh floppy drive to plug directly into the Pippin.

The expansion capabilities for the Pippin are locked away inside a PCI connector strategically located on the bottom of this set-top box. The official floppy drive accessory injection molded case, a standard Mac floppy drive, and a PCB. After finding one of these rare floppy drive accessories, [Pierre] simply took a meter to all the pins, traced out the circuit, and created a PCB with a PCI connector on one end, and 20-pin connector on the other. The PCB is shared on OSH Park if you want to check this out.

Although recreating this hardware was relatively easy, testing it was not. The first test used the Floppy Emu, a neat device that allows old Macs to read disk images off an SD card. This worked beautifully, but testing it out with a real floppy drive did not. Some disks simply didn’t work, although [Pierre] is chalking that one up to a problem with the USB floppy drive and a Mac running Sierra.

Read Amiga Floppies Using An Arduino

So you spent your youth learning your craft in front of an Amiga 500+, but a quarter century later all you have left is a broken computer and a pile of floppies you can’t read any more. What’s to be done? This was the position [Rob Smith] found himself in, and since some of the commercial solutions to ripping Amiga floppies were rather expensive, he decided to have a go at making his own.

His write-up makes for a fascinating read, as he delves into the physical interface of the PC floppy drive he used, and into the timing required from the Arduino that controlled it. He faced some challenges in getting his code to be fast enough for the task, and goes into some of the optimisation techniques he employed. His code for both Arduino and Windows  is open-source, and can be downloaded from his GitHub repository. Future plans involve supporting the FDI disc format as well as ADF, and adding the ability to write discs.

We’ve shown you a lot of Amigas over the years, but perhaps of most relevance here in our archive are this Raspberry Pi floppy emulator and this floppy autoloader for archiving a disc collection.

Via Hacker News.

Emulating A Hard Drive With The Raspberry Pi

[Chris] recently moved a vintage IBM 5150 – the original PC – into his living room. While this might sound odd to people who are not part of the Hackaday readership, it actually makes a lot of sense; this PC is a great distraction-free writing workstation, vintage gaming machine, and looks really, really cool. It sat unused for a while, simply because [Chris] didn’t want to swap out piles of floppies, and he doesn’t have a hard drive or controller card for this machine. After reviewing what other retrocomputer fans have done in this situation, he emulated a hard drive with a Raspberry Pi.

The traditional solution to the ‘old PC without a hard drive’ problem is the XTIDE project. XTIDE is a controller card that translates relatively new IDE cards (or an emulated drive on another computer) as a hard drive on the vintage PC, just like a controller card would. Since a drive can be emulated by another computer, [Chris] grabbed the closest single board computer he had on hand, in this case a Raspberry Pi.

After burning an EPROM with XTIDE to drive an old network card, [Chris] set to work making the XTIDE software function on the Raspberry Pi side of things. The hardware on the modern side of the is just a Pi and a USB to RS232 adapter, set to a very low bitrate. Although the emulated drive is slow, it is relatively huge for computer of this era: 500 Megabytes of free space. It makes your head spin to think of how many vintage games and apps you can fit on that thing!

Hackaday Retro Edition: Androids And Amigas

Tiny ARM boards are everywhere, and if the Raspberry Pi is any indication, they’re mostly used for emulating old consoles and computers. With only a $30 single board computer, it’s easy to emulate an SNES, Apple II, C64, or any of the other piece of classic 80s or 90s hardware.

Understandably, there will eventually be a few projects and products that hope to capitalize on this retro trend. Few of them will go through the rigamarole of actually licensing the relevant IP. The Armiga is one of these projects. It’s an emulated Amiga 500 with 1MB of RAM packaged in what looks like a 3.5″ external floppy drive.

Inside this tiny little box is a dual core ARM for Amiga emulation. For the most part, this is just a basic Android system, but the real selling point of this system is the Armiga Project software. This is a full emulator and game browser that also includes a legal (!) copy of Kickstart 1.3. The ‘upscale’ version of the Armiga also includes a floppy disk controller and drive, should you ever want to dump all those old floppies sitting around in your attic.

This isn’t the first time we’ve heard about the Armiga. It was a crowdfunding campaign a year ago that was unsuccessful for reasons we can’t comprehend. The creators of the Armiga have forged on, and now these tiny little boxes of guru meditation have started shipping. The Beta units have sold out and there’s a waiting list for more.

Fail Of The Week: Electrically Effective Emulators Exceed Enclosure, Enrage Engineer

After a few years of on and off development, [Steve] from Big Mess ‘o Wires completed work on a floppy disk drive emulator for older Macs such as the Plus. The emu plugs into the DB-19 port on the Mac and acts just like a 3.5″ floppy, using an SD card to store the images. He’s been selling the floppy emus for about the last year, and assembled the first several scores of them himself. At some point, he enlisted a board house to make them, and as of November 2014, he’s had enclosures available in both clear acrylic and brown hardboard.

[Steve] recently ran out of emu stock, so it was time to call up the board house and get some more assembled. After waiting six weeks, they finally showed up. But in spite of [Steve]’s clear and correct instructions, all 100 boards are messed up. One resistor is missing altogether, and they transposed a part between the extension cable adapter board, connecting it directly to the emu main board. But get this: the boards still work electrically. They don’t fit in the housings, however, and the extension cables are useless. After explaining the situation, the board house agreed to cook up a new batch of boards, which [Steve] is waiting patiently to receive.


2013-09-05-Hackaday-Fail-tips-tileFail of the Week is a Hackaday column which runs every Wednesday. Help keep the fun rolling by writing about your past failures and sending us a link to the story — or sending in links to fail write ups you find in your Internet travels.

Arduino Floppy Music Shield

A Simple Floppy Music Controller

While playing music with floppy drives has been done many times over, making any device with a stepper motor play music still appeals to the hacker in all of us. [Tyler] designed an Arduino shield and a library which lets you get up and running in no time. [Tyler]’s shield includes pin headers to connect 4 floppy drives, which plug directly into the shield. The drives don’t need any modification before being used.

While you could simply wire a few floppy drives up to an Arduino with some jumpers, this breakout shield makes connecting your drives trivial. In addition to designing the shield, [Tyler] released an Arduino library to make things even easier. The library lets you simply set the frequency you want each drive to play, which saves a bit of legwork.

The floppy-controlling Arduino library is available on GitHub and a video of the controller is included after the break.

Continue reading “A Simple Floppy Music Controller”

Tearing Through Floppy Drives To Build A Small-format Dot Matrix Printer

The accuracy which [Mario] achieved in his pen plotter dot matrix printer is very remarkable. He tore through a pile of floppy drives to get the parts he wanted, and chose to go with a fine-point Sharpie marker as a print head. In the video after the break he flatters us with a printout of the Hackaday logo, but you also get a look at one problem with the build. The ink doesn’t always flow from the felt tip and he has to coax it (almost like priming a pump) with a piece of scrap paper.

He was inspired by the pen printer we featured back in June. This rendition features a printing area of 1.5×1.5 inches that can accommodate 120×120 black and white pixels. He’s not a microcontroller type of guy and is driving the printer from the parallel port of his computer.

The best printing technique puts the pen down and moves it around just a bit (helps prevent the ink flow problem we mentioned earlier) and produces images like one in the lower right. We love the 8-bit nature of the result and would use this all the time to make our own greeting cards.

Continue reading “Tearing Through Floppy Drives To Build A Small-format Dot Matrix Printer”