A Guitar From An Old Tin Box

omar-mos

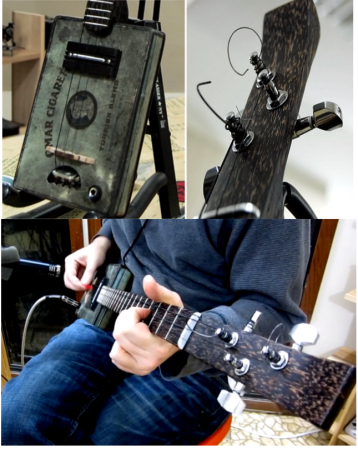
[Atdiy and Whisker], collectively known as  [The Tymkrs] have been busy honing their luthier skills. They’ve created a 10 part YouTube series about the construction of their new cigar box guitar. Instead of a cigar box though, they’ve substituted a 1920’s tin cigarette box. The Omar Cigarette company gave “Project Omar” it’s name. Like [Tymkrs] previous guitar, Omar is a three string affair. The neck was cut from Black Palm, which really shined when polished with a mixture of orange oil and beeswax. They also threw in a couple of new tricks on this build. Omar is an electric guitar, with a pickup custom wound  by [Bob Harrison]. Omar also has frets, which creates a whole new set of complications. Frets are generally installed by cutting slits in the guitar neck with a fret saw. Rather than buy a new tool, [Tymkrs] created a simple jig for their mini table saw. The jig held the guitar neck perpendicular with the saw blade. This made quick work of the many fret slits to be cut. Installed frets must also be dressed and leveled, which is a time-consuming process. 

The tin cigarette box also created a new set of problems. The thin tin proved to be a bit on the weak side when the strings were tightened down. A bit too much pressure on the box while playing would cause notes to bend, much like the tremolo or whammy bar on a standard electric guitar. [Tymkrs] were able to counteract this by adding bracing inside, and a couple of black palm braces to the back of the box.

Hum was also a problem. When [Tymkrs] first plugged in, they found they had more 60Hz mains hum than signal from their strings. Omar uses a classic single coil guitar pickup. Single coils will pick up noise from any magnetic field, including the field created by the studio electrical system. A humbucking pickup uses two coils to counteract this effect. Humbuckers also have a slightly different tone than single coils. [Tymkrs] wanted to stick with their single coil tone, so they counteracted the hum by raising the pickup closer to the strings. Higher pickups receive more signal from the strings, so this is basically a free signal to noise ratio improvement. They also grounded the entire tin box, along with Omar’s metal tail stock. The final build sounds great, as evidenced by the jam session toward the end of Video 10.

Continue reading “A Guitar From An Old Tin Box”

Improving A Cheap Guitar Pedal

pedul

If something doesn’t suit your needs, just change it. That’s a motto we live by, and it looks like [Doug] took up the same creed when he modified a cheap effects pedal.

The victim of [Doug]’s soldering iron is a Danelectro BLT Slap Echo – a tiny, cheap pedal in Danelectro’s mini ‘food named’ pedal series. Stock, this pedal’s slap back echo is set to a fixed amount of time. [Doug]’s mod changes that.

The mod consists of desoldering a single SMD resistor and replacing that with a 50k pot [Doug] had lying around. After mounting the pot between the two stock knobs, the new and improved pedal had a variable length echo. There are a few more mods possible with this pedal – changing some of the resistors on the filter for a better sound, or even connecting the rate pot to a wah-style rocker pedal for some wobbly Echoplex or Space Echo action.

You can check out [Doug]’s gallery of pics here.

Piano Repurposed As A Resonant Synth Speaker

piano-synth

[Richard] recently rediscovered some files from a hack he did back in 2004. He was experimenting with exciting piano strings via electromagnetic fields. The idea shares some elements with the self tuning piano we saw back in 2012. Piano strings, much like guitar strings, are made of steel alloys. This means they create electricity when vibrated in a magnetic field. This is the basic principle upon which electric guitar pickups are built. The idea also works in reverse. The strings will vibrate in response to a modulated electromagnetic field. Anyone who has seen an E-bow knows how this can be applied to the guitar. What about the piano?

[Richard] started with the Casio CZ-101, a classic synth in its own right. The Casio’s output was run through a Peavy 100 watt amplifier. The amplified output was then used to drive custom coils mounted on a piano. The coils had to be custom wound to ensure they would be compatible with the 4 – 8 ohm impedance expected by the amplifier. [Richard] ended up winding the coils to 28 ohms. Six of these coils in parallel put him just over the 4 ohm mark. The coils effectively turned the piano into a giant speaker for the synth. In [Richard’s] write-up (word doc link) he mentions that the strings basically act as a giant comb filter, each resonating strongly in response to frequencies in its harmonic series.

The results are rather interesting. The slow attack of the magnetic fields coupled with the synth’s patch results in a surprising variety of sound. The three examples on [Richard’s] blog vary from sounding like a power chord on a guitar to something we’d expect to find in an early horror movie. We would love to see this idea expanded upon. More efficient coils, and more coils in general would add to the effect. The coils on various string groups could also be switched in and out of the system using MIDI control, allowing for even more flexibility. Continue reading “Piano Repurposed As A Resonant Synth Speaker”

USB Ableton Foot Controller Reuses Old Keyboard

footLooper2

No, Hackaday hasn’t started advertising shoes, this is [Matlek’s] foot controller for Ableton Live.

Matlek plays guitar and needed an easy way to control Ableton Live, which he uses as a looper. Ableton normally expects keyboard input, so that’s exactly what he gave it.

An old dell keyboard was gutted down to its controller board. This exposes  the leads the keyboard uses to scan the key matrix.  From there it is simply trial and error connecting different pins together and seeing which keys are printed on the PC screen (A text editor works well for this). Only 8 characters are needed to control the looper, so [Matlek] chose digits 1-8.

Since some of the wires are going to be sharing pins, a small piece of stripboard comes in handy between the buttons and the keyboard controller. [Maltek] used basic momentary push buttons for his mini key matrix, though we think that box looks sturdy enough to support some larger stomp box style buttons.

Everything comes together inside a sturdy shoebox, which also serves to insulate the exposed keyboard PCB from shorting out.

The only major downside to the project is that the box is light enough that it slides easily on the floor when recording or triggering loops. Adding some heavy items (or dare we say, some shoes) would solve this problem. Self adhesive rubber feet on the bottom of the box would help too.

Continue reading “USB Ableton Foot Controller Reuses Old Keyboard”

ArduGuitar, An Arduino Controllable Guitar

The ArduGuitar

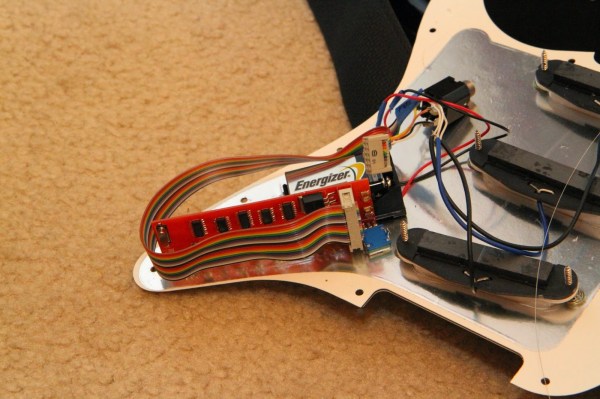
Electric guitars have several switches and potentiometers for controlling volume, tone, and which pickups are enabled. Rather than fiddling with these by hand, [Bob] built the ArduGuitar. It uses an Arduino to control the parameters over Bluetooth. This allows for musicians to configure presets, then recall them as needed, providing the exact same sound every time. It’s similar to the Guitarduino, but adds wireless control.

The internals of the ArduGuitar consist of the Arduino Micro, a BlueSMiRF from Sparkfun, and resistive opto-isolators. The resistive opto-isolators allow the Arduino to adjust resistance through an electrically isolated barrier. This prevents the Arduino from interfering with the guitar’s sound.

Some of the first Vactrols were used to create a tremolo effect in guitar amplifiers. These pulsed a incandescent lamp onto a photoresistor. Fortunately, there are now integrated solutions. PerkinElmer makes these, and they have a nice application note [PDF] on audio applications.

The final part of the design is an Android app, which provides remote control over Bluetooth. The source for everything is available on Github, and the detailed build log is available here.

Cheap Guitar Amp Repaired By Replacing The Distortion Circuit

cheap-amp-distortion-repair

It’s an understatement that [Troy] is not impressed with the distortion circuitry built into this guitar amp. He picked it up for $40 on Kijiji (basically local classified ads run by eBay) so he wasn’t afraid to get elbow deep in its inner workings to see what was going on. It only took him a few minutes to solder together the distortion circuitry that fixed it. Figuring out what needed fixing is another story.

[Troy] uses some colorful language and metaphors to illustrate his disdain for the sound of the overdrive option. He hooked it up to an oscilloscope and his trained eye immediately tells him that it’s not working as it should. After studying the PCB and working out a schematic he reworked the circuit with this pair of diodes and a resistor. It still uses a bit of filtering on the board, but does away with all of the other cruft. What remains is a cheap amp, but one that actually functions.


[Update] Vladimir’s Robot Guitar

vladGuitar2013

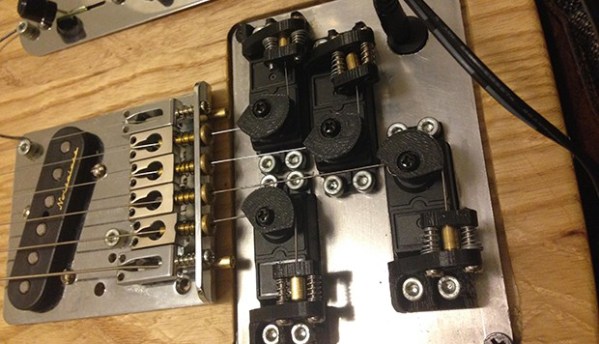
[Vladimir Demin] is somewhat of a legend for us; in his spare time he’s been mastering the automation of musical instruments. This time he’s back with upgrades to his build and four new videos. [Vladimir’s] top priority was to rework the strumming mechanism that earlier ran on solenoids. He’s improved the sound quality and reduced the clicks by swapped to stepper motors and overhauling the software.

Compared to his earlier setup, this one sounds more soulful and less automated, but [Vladimir] admits that it’s still not good enough and that he’s working on a new, brilliant implementation. Until then, take a few minutes and check out the rest of the videos below, then join us in scratching our heads in amazement: everything is built with simple hand tools.

[Vladimir] has come a long way, and it started with this Bayan (button accordion). Last year’s guitar build is also worth a look, as well as an in-depth interview.

Continue reading “[Update] Vladimir’s Robot Guitar”