The Next Generation Arduino Nano

While we certainly do love the Arduino Nano for its low-cost and versatility in projects, it’s unarguable that every tools has its gripes. For one maker in particular, there were enough complaints to merit a redesign of the entire board. While Arduino may or may not be interested in incorporating these changes into a redesign of the development board, there is certainly room for a new manufacturer to step in and improve some features.

[Kevin Timmerman] takes a look at lower-cost clones of the Nano made in China to highlight a few interesting key differences that make the clones – cheaper but still compatible with legacy systems – more attractive.

The PCB manufacturing for the Arduino Nano currently places components on both sides of the board, requiring two operations for solder paste, pick-and-place, and reflow. Naturally this increases costs, simply designing a two-layer PCB with components on top lowers the price of manufacturing.

Since the ATmega328PB was released, it has proven to be a better and cheaper MCU for manufacturing than the ATmega328P, the current MCU used by the Arduino Nano and clones. While the newer MCU is not backwards compatible like its predecessor, it has additional UART, GPIO, counters, and other features that allow users to take advantage of new libraries and peripherals.

Rather than featuring the typical voltage regulator used by Arduino boards (used to allow the board to be powered by a voltage source greater than 5V), a switching regulator allows for less energy loss but a higher component cost. A better solution than both of these would be to simply not have a voltage regulator. While this may be controversial, there are sufficient battery power sources for this design to work (4 cells of AA or AAA NiMh batteries or a mobile phone charger).

The Arduino Nano uses a bootloader for handling programming the MCU, which requires the USB to serial bridge to be disconnected from anything that could interfere with the programming. Thus, programs using the COM port on the computer must release the port, including the serial monitor. Rather than using the bootloader, ICSP (in-circuit serial programming) and DebugWire are possible alternatives that connect the ICSP pins to the CH551 development board or programming via the reset pin.

There are a number of other spec and firmware improvements suggested in the writeup, as well as comparison between the Arduino Nano, Arduino Every, and Chinese clones. It’s definitely worth a look!

These Dice Know If You’re Cheating

Fans of D&D are surely aware of the significance of a good pair of dice. What if your dice were not only stylish, but smart? For anyone who’s ever had to deal with playing board games with less than reputable siblings or friends, the electric die just might be your savior.

The dice are configured via Bluetooth, tracking rolls and stats over the course of gameplay captured by an accelerometer.

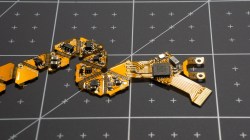
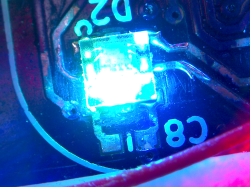
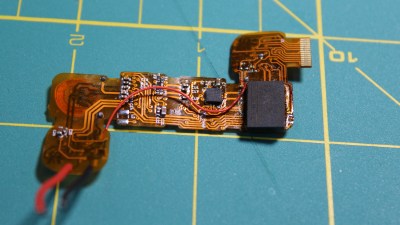
The PCB had to have a flexible surface – specifically in the shape of an unfolded icosahedron – in order to form the shape of the die which constrains the design to two layers. Each face contains an LED facing outwards to light up the number on that side. The LEDs are directly powered by a rechargeable battery, which uses a small coil for wireless inductive charging. Rather than opting for a Qi charger chipset, which regulates the maximum amount of power transmitted if the efficiency falls below a threshold, [Jean Simonet] uses a simpler charger setup using a full bridge rectifier, capacitors, and a linear regulator to create a stable 5V supply for the receiving end.

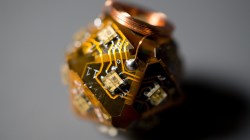
While the initial design for the die required an injection molded plastic shell, an easier solution was to simply cast the designs in resin. The electronics are placed into a dice mold and cast just as a regular die would be.

This luckily also solved the issue of needing to fit the components inside a screw-on container with a removable lid, which presented a hassle in terms of finding a battery that would fit the dimensions. The LEDs – purchased for cheap on Alibaba – are daisy chained to reduce the complexity of the routing.

One issue with the LEDs, however, is that the internal PWMs modulating the intensity remain on even at an intensity of 0, constantly drawing 21 mA (for the 21 LEDs on the die). This causes the battery to die after 2-3 hours. The solution [Simonet] used was to add a transistor to cut off power to the LEDs and to have the MCU toggle the transistor when the LEDs are turned off. Even this solution didn’t solve the entire problem since the LEDs still drain current from the data and clock lines, so those lines had to be low before going to sleep.

There were some stability issues with using a small buck converter to bring the LiPo voltage down to 3.3V, so the power regulation was done directly by the MCU instead. Switching the die off is controlled by a magnetic switch connected to a power buck converter that turns off logic when a magnet is present. This initially caused the LED control lines to become floating when power was turned off, turning the LEDs to arbitrary colors. The solution was to wire the output of the magnetic sensor to the MCU and to allow the software to handle the LEDs as well.

Maybe it’s because creator [Simonet] happens to be a game developer as well, but the early development stages of the electronic die (CAD, circuit schematics, prototyping, hand soldering components) were streamed on Twitch, adding some interactivity to even the build phase. The end result may be small, but these dice certainly have large brains!

Continue reading “These Dice Know If You’re Cheating”

Making Music From Cardboard

Fans of MaKey MaKey may find this project similar, but there’s a lot more to the Mini Automat than making music from fruit.

The idea for the Mini Automat (which is an off-shoot of the original Automat project by [Dada Machines]) is to make music accessible to anyone. The device functions as a plug and play MIDI-controller that connects to a computer, MIDI workstation (keyboards and sequencers), or DAW for input and triggers actuators on the output to create music.

The modifications make the originally Automat more hackable by making the board compatible with Arduino and Circuit Python, as well as adding in digital and analog pins for connecting to sensors, buttons, or light systems.

The team has released all schematics, firmware, and software, with only the board layouts unreleased to the public. From solenoids that push, pull, jiggle, smash, and bash at drums to surfaces that vibrate screws and beads, there’s a huge variety of household objects that can be used to make complex layered musical compositions, even for a one-person musician.


The Berlin-based team works on open source music tech hardware with the hopes of bringing environmentally and financially sustainable ideas to market.

Continue reading “Making Music From Cardboard”

Dry Your Clothes In One Minute Or Less

If you’re like most people, then washing clothes is probably a huge pain for you. Figuring out the odd number of minutes necessary to run a wash and dry cycle, trying desperately not to end up with clothes that are still wet, and worst of all having to wait so long for your clothes to be clean can be a real hassle.

One team of inventors decided to build Eleven, a dryer that dries and sanitizes clothes in a minute or less. As explained in their demo video, clothes are placed around the center tube and dried by the airflow initiated by Eleven. Fragrance and ozone is injected to prevent bacteria from causing bad smells.

The team experimented with ultrasonics and microwave-vacuum system, and ultimately decided to use a method that controls the flow of air within the fabric. A steam generator sprays the clothes with a disinfectant while a filter quarantines the chemicals to a receptacle within the device.

They also installed sensors to monitor the performance of the machine remotely, allowing users to track their clothes and the health of the machine even when they aren’t home. Something we’ve previously seen done in the DIY space.

It might not be the futuristic heat-free clothes dryer we were promised, but Eleven certainly looks like a step in the right direction.

Building A Wind Power Generator In Your Backyard

For many environmental enthusiasts, horizontal-axis wind turbines (HAWTs) — the kind that look like windmills slowly spinning in the distance — are a pretty familiar sight. Unfortunately, there are quite a few caveats that make them harder to adopt despite the fact that harvesting renewable energy sources is more sustainable than relying on natural gas and fuels that can be depleted. Since they face in one axis, they need to be able to track the wind, or else trade off the ability to maximize energy output. In turbulent and gusty conditions, as well, HAWTs face accelerated fatigue when harvesting.

The development of the vertical-axis wind turbine (VAWT) solves several of these issues. In addition, the turbines are typically closer to the ground and the gearbox replacement is simpler and more efficient. Maintenance is more accessible due to the size of the turbines, so no heavy machinery is typically necessary to access crucial components on-site. In addition, the gearbox by nature of its operation takes on less fatigue and is able to function in turbulent winds, which reduces the rate of failure.

For a simple version of a VAWT that you can build yourself, [BlueFlower] has published several mechanical drawings that detail the layout of the design. The wind power generator uses 24 magnets, copper wire fashioned into coils, and a metal plate for the main generator. The coils are arranged in a circular formation on a static plate, while the magnets are equally spaced on a moving circular plate. As the magnets pass over coils, the flux induces a current, which increases as the plates spin faster.

The blades of the generator are made from blue foam with a metal bar running through it for structure. Three of the blades are attached with triangular bars to a central rod, which also holds the spinning magnetic plate.

In [BlueFlower]’s initial trials using the VAWT for charging a battery they were able to generate a max power of 15W on boost mode and 30-70W when charging in PWM mode. Not bad for a home-made wind power generator!

There aren’t only pros to the design, however. While VAWTs may be cheaper, more mobile, and more resistant to wear and tear, there are some design features that prevent the generators from functioning as well as HAWTs at harvesting energy. The blades don’t produce torque at the same time, with some blades simply being pushed along. This produces more drag on the blades when they rotate, limiting the efficiency of the entire system. In addition, higher wind speeds are typically found at higher altitudes, so the VAWTs will perform better if installed on a towering structure. Vibration forces close to the ground can also wear out the bearings, resulting in more maintenance and costs.


Continue reading “Building A Wind Power Generator In Your Backyard”

No Need To Watch Your Tea, This Robot Does It For You

For anyone who’s ever had to make their own tea, steeping it for the right amount of time can be a pain. That’s precisely the problem that the automatic tea brewing robot solves with its painless approach to brewing tea, built by Slovenian electrical engineering student [Kristjan Berce].

You can use the robot by setting a timer on the knob, at which point the robot raises it arm for the tea bag then dips in the water every 30 seconds until the time has passed. At the end of the timer, the bag is raised clear of the cup to end the brewing. It’s a remarkably simple design that almost evokes chindogu (the Japanese art of useless inventions) if not for the fact that the robot actually serves a useful purpose.

The components for 3D printing the robot are available online, consisting of a case, a container for the Arduino-powered electronics, the lever for holding the tea, and the gear that raises the lever up and down. The device also uses an integrated Li-Ion battery with an accessible charging port and integrated BMS. A 35BYJ46 stepper motor and ULN2003 driver are used to move the 3D printed mechanism. The device uses a potentiometer for setting the steeping time between 1 and 9 minutes, and there’s even a buzzer for indicating once the tea is done brewing.

The Gerber and Arduino code files are open-source for any hackers looking to make their own tea brewers; just take care they operate with “deadly punctuality”.

Continue reading “No Need To Watch Your Tea, This Robot Does It For You”

Hackaday Prize Mentor Session: Beau Ambur

Beau Ambur can often be found hosting hardware events and offering help all around the Bay Area. Now he’s turned it into a career and travels the west coast helping hackers and creators effectively leverage Kickstarter’s platform. Beau’s mentor session covers everything from, “is this project a good fit for venture capital?” to, “is open source a good fit for my project?”.

For this year’s Hackaday Prize we’ve found experts in a wide range of fields so you can take your entries to the next level regardless of the stage the project is in. The sessions are on a first come basis so sign up now for a chance to get some valuable feedback on your entry.

Your Robot Language Coach

The first project is a Personal English Trainer by the lonely programmer. As a student he noticed a need for a more interactive and portable language learning aid. Solutions do exist on the market but they are along the lines of a pocket dictionary, instructional phone app, or a full on translator. These break the flow of thought and conversation. The lonely programmer envisioned something that you can conversationally ask for help as you’re using a new language.

As many have discovered, the best way to see if there’s a need for something is to build a minimum viable product (MVP). The snips.ai platform offered the perfect foundation to quickly test out the idea. It’s working on a few words and he wants to get it ready for more people to play with the idea. The majority of the lonely programmer’s questions centered around making the project interesting for other hackers so that it could one day turn into a product.

Bolt-On Bike Assist

Rob and Shushanik are developing a project called BikeOn. It bolts to any bicycle and converts it to an electric assist bike without tools or replacing any components. BikeOn has already won some accolades such as Editors Choice at the last 2019 Makerfaire Bay Area. Rob had a few questions on how to transition a project from the proof of concept stage to the product stage. The discussion went over using open source as a tool for product promotion as well as getting funding for taking a hardware product to market.

He also wanted to know if there was anything the team could do to have a better shot at winning the prize. There were a few good tips such as directly focusing on the five categories the judges would be looking at: Concept, Design, Production, Benchmark, and Communication. It is also important to cover the development journey. Why did you make the choices you made when designing the project?

No-Spill Trash Can Concept

Rounding out this mentor session, Jeannie and her team of highschool students demonstrate SEAL. In the area around the Granada Hills Charter High School there are winds mighty enough to blow over full trashcans. This trash travels to the ocean and disrupts local ecosystems. The team is working on a device which can detect a tipping trashcan and keep the lid from opening.

Prototyping started with Arduinos, but they’ve already escalated to designing their own PCBs. Their hope is to produce a run of fifty devices and try them out with a local commercial partner. Beau recommended they look into the Micropython ecosystem. Not only would the students get the advantage of using the STM32 chips in their board layouts (reducing the number of support components they would need), micropython would make it easier for students to jump in and help rather than having to learn the nuances of C first.

The Hackaday Prize mentoring sessions continue through the summer so don’t forget to sign up and check out the list of mentors who are here to share their knowledge and experience.

Continue reading “Hackaday Prize Mentor Session: Beau Ambur”