PokerBot Uses FPGA For Card Calculating Horsepower

Played against humans, Poker is a game as much about reading your opponent as it is about the cards you’re dealt. That doesn’t mean there aren’t certain mathematical ways to aid your decision making based on probabilities. In this vein, a group of students from Cornell’s ECE 5760 class built a pokerbot on an FPGA.

The bot uses the principle of Monte Carlo simulation to calculate the probabilities of an individual winning a hand of Limit Texas Hold’em. Calculating the entire set of possible hands is impractical, so in a Monte Carlo simulation a sample is calculated instead. By accelerating these calculations on an FPGA, the pokerbot is able to calculate 300,000 possible hands in just 150 ms, and present a probability of winning to the human player. This same calculation method is then used to make decisions for the computer players in the game, too.

The team report that the FPGA’s processing power brought a 10x speed up compared to their C++ program running on an Intel i7-6700HQ. The strong statistical calculations help to make the computer players engaging and realistic to play against.

It’s another great example of a project from Bruce Land’s classes, which are somewhat of a hotbed of development each year. Video after the break.

Continue reading “PokerBot Uses FPGA For Card Calculating Horsepower”

Reupholstering A Couch, With No Prior Experience

Upholstery is a craft that dates back far longer than many we feature on Hackaday. It requires patience, attention to detail, and a series of specialised skills. If you fancy yourself to be like a young Jack White, you might have considered trying your hand at a piece or two. [darkpine] did just that, and the results are impressive.

The couch was sourced from an online bartering platform, and was in a sad and sorry state after years of use. According to the original owner, the couch was over 100 years old and had been passed down through several generations. Last reupholstered in the 1970s, it was in dire need of repair. Wooden trim was falling off, fabric was fading, and resident cats had been sure to leave their mark.

[darkpine] set about things the right way, stripping the couch back to its bare bones. Taking careful note of the original construction, diagrams were made to ensure the springs could be retied in the correct fashion. Fresh burlap was installed, followed by foam and a layer of cotton batting. Careful attention was then paid to the fabric covering, with hand stitching used along the arms to get an absolutely perfect pattern match along the seams. With the hard part done, the wood was then restored and waxed to a glorious shine.

The final results are astounding, especially when noting that this was [darkpine]’s first ever upholstery project. We don’t see a lot of this kind of thing around here, but it’s not completely unknown.

[via Reddit]

This Two-Wheeled RC Car Is Rather Quick

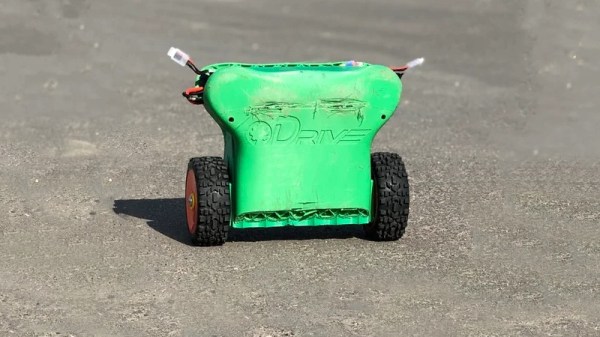
Radio control cars have always been fun, it’s true. With that said, it’s hard to deny that true speed was unlocked when lithium polymer batteries and brushless motors came to the fore. [Gear Down For What?] built himself a speedy RC car of his own design, and it’s only got two wheels to boot (Youtube link, embedded below).

The design is of the self-balancing type – if you’re thinking of an angry unmanned Segway with a point to prove, you’re in the ballpark. The brains of the machine come thanks to a Teensy 3.6, which runs the PID loops for balancing and control. An MPU6050 gyroscope & accelerometer provide the necessary sensing to enable the ‘bot to keep itself upright in varied conditions. Performance is impressive, with the car reaching speeds in excess of 40 MPH and managing to handle simple ramps and bumps with ease. It’s all wrapped up in a 3D printed frame which held up surprisingly well to many crashes into tripods and tarmac.

Such builds are not just fun; they’re an excellent way to learn useful control skills that can serve you well in industry and your own projects. You can pick up the finer details of control systems in a university engineering course, or you could give our primer a whirl. When you’ve whipped up your first awesome project, we’d love to hear about it. Video after the break.

Continue reading “This Two-Wheeled RC Car Is Rather Quick”

Building An ESP8266 Game System With MicroPython

After a seemingly endless stream of projects that see the ESP8266 open doors or report the current temperature, it can be easy to forget just how powerful the little WiFi-enabled microcontroller really is. In fact, you could argue that most hackers aren’t even scratching the surface of what the hardware is actually capable of. But that’s not the case for [Brian Wagner] and his students from the Kentucky Country Day School.

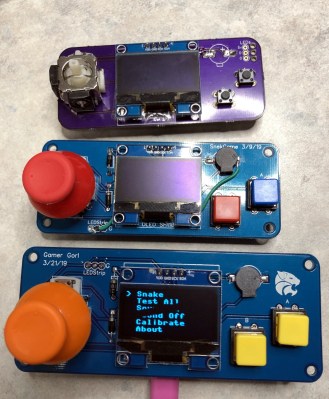
Their project, the GamerGorl, is a completely custom handheld game system running on a Wemos D1 Mini development board. The team’s PCB, which was developed over several iterations, is essentially a breakout board which allows them to easily connect up peripheral devices. Given the low total component cost of the GamerGorl and relative simplicity of its construction, it looks like a phenomenal project for older STEM students.

Beyond the ESP8266 board, the GamerGorl features a SSD1106 1.3″ OLED display, a buzzer for sound effects, two tactile buttons, and an analog joystick originally intended for an Xbox controller. Around the backside there’s a WS2812B RGB LED strip that’s at least partially for decoration, but it’s also actively used in some of the games such as the team’s take on Simon.

Even if you aren’t in the market for a portable game system, the GameGorl does provide an interesting case study for MicoPython applications on the Wemos D1 Mini. Browsing through the team’s source code as well as the helpful hints that [Brian] gives about getting the software environment up and running could be useful if you’re looking to expand your ESP8266 programming repertoire. We’d also love to see this device running the “ESP Little Game Engine” we covered recently.

Continue reading “Building An ESP8266 Game System With MicroPython”

The Raspberry Pi Portable Console You Wish You Had

A retro game console is a fun all-arounder project. You’ve got electronics, mechanical design, and software considerations. For this year’s Hackaday Prize, is going all in. The Portable Retro Game Console with 7.9-inch Display is a work of art, and everything that a retro console could be.

This build is based on the Raspberry Pi 3 A+ instead of the B model for space-saving considerations. The screen is a beautiful 7.9 inch IPS panel with 2048 x 1536 resolution. Stereo 3 W speakers pump out the tunes, and an 8000 mAh provides somewhere between 3 and 6 hours of play time.

While using a Raspberry Pi 3 for retro gaming is fun, there’s a world of oppurtunity for emulating bigger and badder consoles thanks to more powerful single board computers. The Nvidia Jetson Nano is far more powerful than the Raspberry Pi 3, and could conceivably emulate N64 and PlayStation games. The Atomic Pi, the fantastic computer that totally isn’t industrial surplus repackaged as an educational computer, already is proven to emulate N64 games. Imagine taking a portable console out of your backpack and playing Conker’s Bad Fur Day on the bus. Oh, that’s cheeky, but it is possible thanks to the amazing work of hardware creators.

Fun With Negative Resistance II: Unobtanium Russian Tunnel Diodes

In the first part of this series, we took a look at a “toy” negative-differential-resistance circuit made from two ordinary transistors. Although this circuit allows experimentation with negative-resistance devices without the need to source rare parts, its performance is severely limited. This is not the case for actual tunnel diodes, which exploit quantum tunneling effects to create a negative differential resistance characteristic. While these two-terminal devices once ruled the fastest electronic designs, their use has fallen off dramatically with the rise of other technologies. As a result, the average electronics hacker probably has never encountered one. That ends today.

Due to the efficiencies of the modern on-line marketplace, these rare beasts of the diode world are not completely unobtainable. Although new-production diodes are difficult for individuals to get their hands on, a wide range of surplus tunnel diodes can still be found on eBay for as little as $1 each in lots of ten. While you’d be better off with any number of modern technologies for new designs, exploring the properties of these odd devices can be an interesting learning experience.

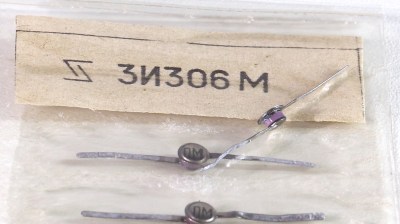
For this installment, I dug deep into my collection of semiconductor exotica for some Russian 3И306M gallium arsenide tunnel diodes that I purchased a few years ago. Let’s have a look at what you can do with just a diode — if it’s the right kind, that is.

[Note: the images are all small in the article; click them to get a full-sized version]

Continue reading “Fun With Negative Resistance II: Unobtanium Russian Tunnel Diodes”

A Better Bowden Drive For Floppy Filaments

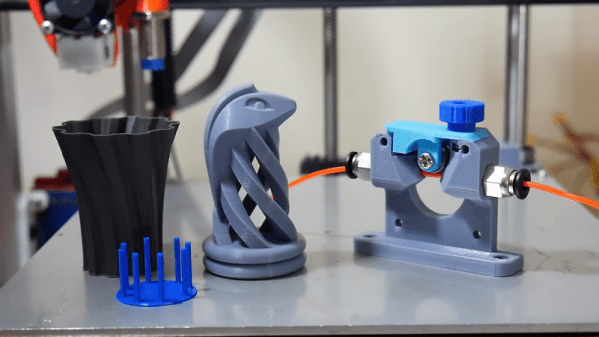
You might not think to use the word “rigid” to describe most 3D-printer filaments, but most plastic filaments are actually pretty stiff over a short length, stiff enough to be pushed into an extruder. Try the same thing with a softer plastic like TPE, though, and you might find yourself looking at this modified Bowden drive for elastomeric filaments.

The idea behind the Bowden drive favored by some 3D-printer designers is simple: clamp the filament between a motor-driven wheel and an idler to push it up a pipe into the hot end of the extruder. But with TPE and similar elastomeric filaments, [Tech2C] found that the Bowden drive on his Hypercube printer was causing jams and under-extrusion artifacts in finished prints. A careful analysis of the stock drive showed a few weaknesses, such as how much of the filament is not supported on the output side of the wheel. [Tech2C] reworked the drive to close that gap and also to move the output tube opening closer to the drive. The stock drive wheel was also replaced with a smaller diameter wheel with more aggressive knurling. Bolted to the stepper, the new drive gave remarkably improved results – a TPE vase was almost flawless with the new drive, while the old drive had blobs and artifacts galore. And a retraction test print showed no stringing at all with PLA, meaning the new drive isn’t just good for the soft stuff.

All in all, a great upgrade for this versatile and hackable little printer. We’ve seen the Hypercube before, of course – this bed height probe using SMD resistors as strain gauges connects to the other end of the Bowden drive.

Continue reading “A Better Bowden Drive For Floppy Filaments”