A Useless Tomb Of Eternal Doom

It’s officially October, and that means we can start unleashing the Halloween hacks. Take for example this restless skeleton that master automaton maker [Greg Zumwalt] has doomed to spend eternity inside of a useless box. If that wasn’t enough to wake the dead, every time some joker pushes the button, these blinky lights come on. Hey, at least there’s no opera music.

The ironic thing about useless machines is that there are a ton of ways to make them. This spooktacular Halloween-themed do-nothing box doesn’t use a microcontroller, or even a 555 — it’s purely electromechanical. When the button is pressed, two AAAs power a small gear motor that simultaneously lifts the lid, raises the dead, and twists him a quarter turn so he can close the lid and put himself back to eternal rest.

The intricately-printed skeleton doesn’t really push the button — he’s far too dead and frail for that. The gear motor also turns a dual-lobe cam that activates a pair of roller switches that handle the candles and lower Mr. Bones back into his crypt. Clear as blood? Skitter past the break for a closer look at the mechanism.

Halloween or not, we love a good useless machine around these parts. Here’s one that incorporates a real candle and who could forget this octo-switched beast?

Continue reading “A Useless Tomb Of Eternal Doom”

Electronic Candle Charges Inductively

Humans like things that look like other things. A great example are faux LED tea light candles, with a plastic “flame” and flickering orange LED to recreate the effect of their waxy brethren. [gzumwalt] wanted to take the concept a little further, however, and got down to work.

The design harvests the orange LED and flame lens from an existing LED candle, but the rest is all original. [gzumwalt] printed a full-size candle, and fitted it with inductive charging hardware and a lithium-polymer battery. A corresponding charging base is used to supply power to the candle when it’s not in use. This is all handled automatically, with neodymium magnets used to activate reed switches to turn the charger on and the LED off.

It’s a tidy build that can be easily replicated with a 3D printer and some off-the-shelf parts. It’s also less wasteful than using disposable batteries, and safer than using real candles – so if you find yourself routinely shooting candle scenes in your budget film studio, it might be worth printing up a set of these.

LED candles range from the basic to the extreme – we’ve seen builds so realistic, you can light them with a match.

This Super Realistic LED Candle Is Smoking Hot

Over the last few years, LED candles have become increasingly common; and for good reason. From a distance a decent LED candle is a pretty convincing facsimile for the real thing, providing a low flickering glow without that annoying risk of burning your house down. But there’s something to be said for the experience of a real candle; such as that puff of fragrant smoke you get when you blow one out.

Which is why [Keith] set out on an epic three year quest to build the most realistic LED candle possible, with a specific focus on the features that commercial offerings lack. So not only does it use real wax as a diffuser for the LEDs, but you’re able to “light” it with an actual match. It even ejects a realistic bit of smoke when its microphone detects you’ve blown into it. Ironically, its ability to generate smoke means it doesn’t completely remove the possibility of it setting your house on fire if left unattended, but we suppose that’s the price you pay for authenticity.

As you might have gathered by now, [Keith] is pretty serious about this stuff, and has gone to great lengths to document his candle’s long development process. If you’d care to build a similar candle, his written documentation as well as the video after the break will certainly get you on the right track. He’s even broken the design down into “milestones” of increasing complexity, so for example if you don’t care about the smoking aspect of the candle you can just skip that part of the build.

So what did [Keith] put into his ultimate LED candle? In the most basic form, the electronics consist of a Arduino Pro Mini and a chunk of RGB WS2812B strip holding six LEDs. Add in an IR sensor if you want the candle to be able to detect the presence of a match, and a microphone if you want to be able to blow into the candle to turn it off. Things only get tricky if you want to go full smoke, and let’s be honest, you want to go full smoke.

To safely produce a puff of fragrant smoke, [Keith] is using a coil of 28 gauge wire wrapped around the wick of a “Tiki Torch”, and a beefy enough power supply and MOSFET to get it nice and hot. The wick is injected with his own blend of vegetable glycerin and aromatic oil, and when the coil is fired up it produces an impressive amount of light gray smoke that carries the scent of whatever oil you add. Even if you’re not currently on the hunt for the ultimate electronic candle, it’s a neat little implementation that could be used come Halloween.

You might be surprised to learn that LED candles are a rather popular project within the hacking community. From the exceptionally simple to the exceedingly complex, we’ve seen an impressive array of electronic candles over the years. Perfect for setting the mood when listening to the smooth sounds of the latest Hackaday podcast episode. Continue reading “This Super Realistic LED Candle Is Smoking Hot”

Lighting Up A Very Wiry Candle

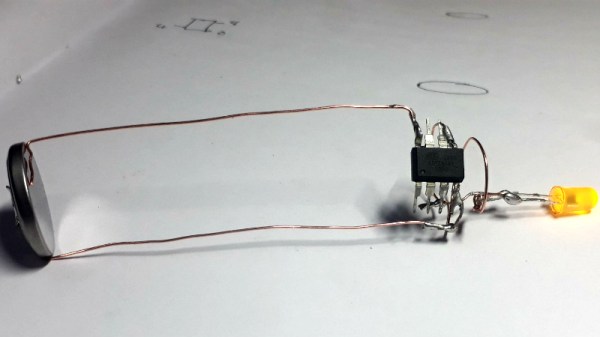
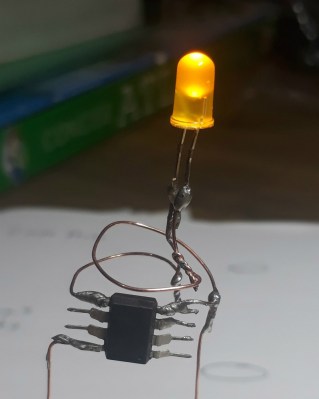
Entries into the Circuit Sculpture Contest tend to be pretty minimalist by nature, and this LED candle by [Amal Mathew] is a perfect example. The idea here was to recreate the slim and uncomplicated nature of a real candle but with a digital twist, and we think he’s pulled it off nicely with a bare minimum part count and exaggerated wire length that gives it the look of a thin pillar candle.

To give the LED a fading effect, [Amal] uses a ATtiny85 programmed with the Arduino IDE. His code uses the analogWrite() in a loop to gradually increase and then decrease the PWM frequency. With the LED connected directly to one of the pins on the ATtiny85, the simple program achieves the fading effect without needing any additional components.

On the opposite side of the candle, connected by long copper wires, is the single CR2032 which provides power for the circuit. In a nice touch, [Amal] has turned the battery 90 degrees relative to the rest of the circuit, so it can serve as a weighted base. We imagine getting it to stand up might be a little fiddly from the looks of it, but once it’s up and merrily fading in and out, it really helps sell the candle idea.

The finished product might look fairly straight-forward, but in his write-up on Hackaday.io, [Amal] gives detailed instructions on how to build your own version if you’re not a bare microcontroller wizard. This includes direction on how to program the ATtiny85 using an Arduino Uno; a neat trick to know even if you aren’t planning on making any candles in the near future. The next logical step is making it so you can “blow out” the LED, which should only take the addition of a resistor and some updated code.

There’s still plenty of time to enter your own functional piece of art in the Circuit Sculpture Contest. Just write it up on Hackaday.io and submit it before the January 8th, 2019 deadline.

Continue reading “Lighting Up A Very Wiry Candle”

LED “Candle” Gets The 555 Treatment

Regular readers may recall we recently covered a neat Arduino trick that allowed you to “blow out” an LED as if it was a candle. The idea was that the LED itself could be used as a rudimentary temperature sensor, and the Arduino code would turn the LED on and off when a change was detected in its forward voltage drop. You need to oversample the Arduino’s ADC to detect the few millivolt change reliably, but overall it’s pretty simple once you understand the principle.

But [Andrzej Laczewski], like many of our beloved readers, feels the Arduino and other microcontrollers can be a crutch if used exclusively. So he set out to replicate this hack with that most cherished of ICs, the 555 timer. In the video after the break, he demonstrates his “old-school” LED candle for anyone who thinks the only way to control an LED is with digitalWrite.

Not to say it’s easy to replicate the original Arduino project with a 555, or that it’s even practical. [Andrzej] simply wanted to show it was possible, which is something we always respect around these parts. He goes into great detail on how he developed and tested the circuit, even including oscilloscope screenshots showing how the different components work together in real-time. But the short version is that a MOSFET is used to turn the LED on and off, a comparator detects change in the LED’s voltage drop, and the 555 is used to control how long the LED stays off for.

Ever the traditionalist, [Andrzej] wrapped up this build by etching his own PCB using a variation of the classic laser toner transfer method. If this all looks a bit too much like Black Magic to you, there’s no shame in sticking with the Arduino version. At 1/20th of the parts count, and with no calibration required, who’s to say which version is “simpler”.

Continue reading “LED “Candle” Gets The 555 Treatment”

An LED You Can Blow Out, With No Added Sensor

We’d seen it done with buttons, switches, gestures, capacitive touch, and IR remote, but never like this. [electron_plumber] made an LED that can be blown out like a candle, and amazingly it requires no added sensors. The project uses an Arduino to demonstrate turning a tiny LED on and off in response to being blown on, and the only components are the LED and a resistor.

[electron_plumber] used an 0402 LED and thin wires to maximize the temperature responses.
How is this done? [electron_plumber] uses an interesting property of diodes (which are the “D” in LED) to use the LED itself as a temperature sensor. A diode’s voltage drop depends on two things: the current that is being driven through the diode, and the temperature. If the current is held constant, then the forward voltage drop changes reliably in response to temperature. Turning the LED on warms it up and blowing on it cools it off, causing measurable changes in the voltage drop across the device. The change isn’t much — only a handful of millivolts — but the effect is consistent and can be measured. This is a principle [Elliot Williams] recently covered in depth: using diodes as temperature sensors.

It’s a clever demo with a two important details to make it work. The first is the LED itself; [electron_plumber] uses a tiny 0402 LED that is mounted on two wires in order to maximize the temperature change caused by blowing on it. The second is the method for detecting changes of only a few millivolts more reliably. By oversampling the Arduino’s ADC, an effectively higher resolution is obtained without adding any hardware or altering the voltage reference. Instead of reading the ADC once, the code reads the ADC 256 times and sums the readings. By working with the larger number, cumulative changes that would not register reliably on a single read can be captured and acted upon. More details are available from [electron_plumber]’s GitHub repository for LEDs as Sensors.

Embedded below is a video that is as wonderful as it is brief. It demonstrates the project in action, takes a “show, don’t tell” approach, and is no longer than it needs to be.

Continue reading “An LED You Can Blow Out, With No Added Sensor”