Hardware Store White Balance Reference

We live in a time in which taking pictures is preposterously easy: take out your phone (assuming it wasn’t already in your hands), point it at something, and tap the screen. The camera hardware and software in even basic smartphones today is good enough that you don’t need to give it much more thought than that to get decent pictures. But what if you want to do better than just decent?

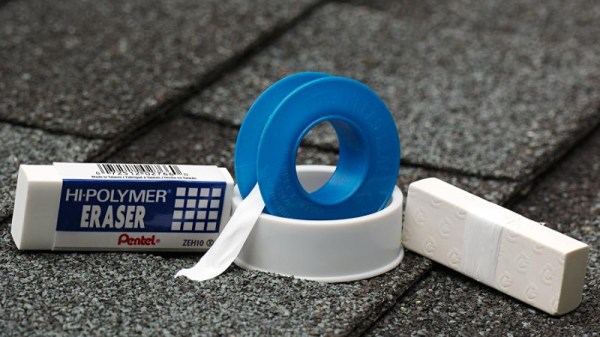
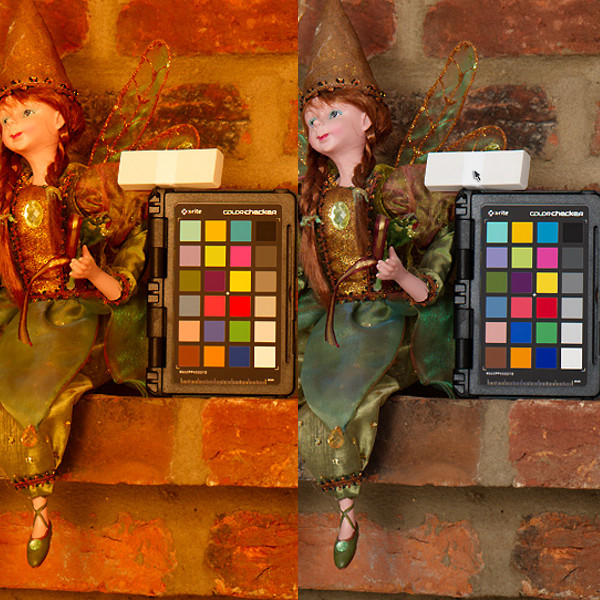
Ideally you’d take photos lit by high temperature lights, but failing that, you might need to compensate by adjusting the white balance during post-processing. But to accurately adjust white balance you need a pure white reference point in the image. Thanks to some diligent research by the folks at the FastRawViewer blog, we now have a cheap and widely available source for a pure white reference material: PTFE pipe tape.

Alright, we know what you’re thinking: how hard could it be to find a white object? Well, if you’re talking about really white, it can actually be quite difficult. Take a walk down the paint aisle of your local hardware store and see just how many “whites” there actually are. Think the shirt your subject is wearing is really white? Think you can use the glossy white smartphone in their hand as a reference? Think again.

By taking a rubber eraser and wrapping it with a few layers of the PTFE tape, you can create a white reference that’s so cheap it’s effectively disposable. Which is good, because protecting your white reference object and keeping it clean can be a challenge in itself. But with a PTFE tape reference, you can just chuck the thing when the photo shoot is done.

Combine this cheap white reference with some of the DIY photography lighting setups we’ve covered in the past, and you’ll be well on the way to getting better images to document all your projects. Just remember to submit them to us when you’re done.

[Thanks to Keith Olson for the tip.]

If You Are Planning On Building Your Own Space Shuttle…

One of the most complicated machines ever built was the US space shuttle (technically, the STS or Space Transportation System). Despite the title, we doubt anyone is going to duplicate it. However, one of the most interesting things about the shuttle’s avionics — the electronics that operate the machine — is that being a government project there is a ridiculous amount of material available about how it works. NASA has a page that gathers up a description of the vehicle’s avionics. If you are more interested in the actual rocket science, just back up a few levels.

We will warn you, though, that if you’ve never worked on space hardware, some of the design choices will seem strange. There are two reasons for that. First, the environment is very strange. You have to deal with high acceleration, shock, vibration, and radiation, among other things. The other reason is that the amount of time between design and deployment is so long due to testing and just plain red tape that you will almost certainly be deploying with technology that is nearly out of date if not obsolete.

Continue reading “If You Are Planning On Building Your Own Space Shuttle…”

Plasma Etching In A Microwave

Deep inside your smartphone are a handful of interesting miniature electromechanical devices. The accelerometer is a MEMS device, and was produced with some of the most impressive industrial processes on the planet. Sometimes, these nanoscale devices are produced with plasma etching, which sounds about as cool as it actually is. Once the domain of impossibly expensive industrial processes, you can now plasma etch materials in a microwave.

Of course, making plasma in this way is nothing new. If you cut a grape in half and plop it in a microwave, some really cool stuff happens. This is just the 6th grade science class demonstration of what a plasma is, and really it’s only a few dissociated water, oxygen, and nitrogen molecules poofing in a microwave. To do something useful with this plasma, you need a slightly more controlled environment.

The researchers behind this paper used a small flask with an evacuated atmosphere (about 300 mTorr) placed into a microwave for a few seconds. The experiments consisted of reducing graphene oxide to graphene, with the successful production of small squares of graphene bonded to PET film. Other experiments changed the optical properties of a zinc oxide film deposited onto a glass microscope slide and changing a PDMS film from being hydroscopic to hydrophobic.

While the results speak for themselves — you can use a microwave to generate plasma, and that plasma can change the properties of any exposed material — this is far from a real industrial process. That said, it’s good enough for an experiment and another neat technique in the home lab’s bag of tricks.

Automated Turntable For 3D Scanning

Those just starting out in 3D printing often believe that their next major purchase after the printer will be a 3D scanner. If you’re going to get something that can print a three dimensional model, why not get something that can create said models from real-world objects? But the reality is that only a small percentage ever follow through with buying the scanner; primarily because they are notoriously expensive, but also because the scanned models often require a lot of cleanup work to be usable anyway.

While this project by [Travis Antoniello] won’t make it any easier to utilize scanned 3D models, it definitely makes them cheaper to acquire. So at least that’s half the battle. Consisting primarily of a stepper motor, an Arduino, and a EasyDriver controller, this is a project you might be able to assemble from the parts bin. Assuming you’ve got a pretty decent camera in there, anyway…

The general idea is to place a platform on the stepper motor, and have the Arduino rotate it 10 degrees at a time in front of a camera on a tripod. The camera is triggered by an IR LED on one of the Arduino’s digital pins, so that it takes a picture each time the platform rotates. There are configurable values to give the object time to settle down after rotation, and a delay to give the camera time to take the picture and get ready for the next one.

Once all the pictures have been taken, they are loaded into special software to perform what’s known as photogrammetry. By compiling all of the images together, the software is able to generate a fairly accurate 3D image. It might not have the resolution to make a 1:1 copy of a broken part, but it can help shave some modeling time when working with complex objects.

We’ve previously covered the use of photogrammetry to design 3D printed accessories, as well as a slightly different take on an automated turntable a few years ago. The process is still not too common, but the barriers to giving it a try on your own are at least getting lower.

Continue reading “Automated Turntable For 3D Scanning”

Turning Everything Into A Tap Controller

Our entire life is staring at glowing rectangles, and all our surroundings are hard, flat surfaces. [Ben] had the idea to turn those flat surfaces into a generic tap interface controller, and his project for the Hackaday Prize might just do that.

Some of the prior art that went into this project includes Ping Pong Plus Plus, an augmented-reality-ish implementation of ping pong that puts projected light wherever a ping pong ball hits the table. The game does this by mounting piezos to the bottom of a table and just a slight bit of math to determine where on the table the ball hit. There’s also MicLoc, a door lock that responds to knocking.

With this prior art, it’s all about microcontrollers and peripherals, and for that, [Ben] turned to the STM32F303RE, which sports four very fast ADCs and op-amps. There’s a lot of DMA usage on there, and the code is using a ton of signal processing. The important bit here is finding the difference between whatever the tabletop equivalent to an earthquake’s P-waves and S-waves are — [Ben] only wants the first bit of a waveform that travels through the table longitudinally, not the much louder vibrations of the entire table.

If [Ben] manages to put this together, an entire wall could be a light switch or a dimmer. You could add a secret knock to your door, and your desk could control your computer. It’s a promising idea, and the engineering that’s going into this project is just fantastic.

All The Badges Of DEF CON 26 (vol 2)

There were so many amazing unofficial badges at DEF CON this year that I can’t possibly cover them all in one shot. I tried to see every badge and speak with every badge maker — like a hardware safari. Join me after the jump for about fourteen more badges that I saw at DEF CON 26!

If you missed the first batch, check those badges out too — there’s even a Badgelife Documentary that you need to add to your watch list. Okay, let’s dig in.

Continue reading “All The Badges Of DEF CON 26 (vol 2)”

Blink A Pi, Win A Prize

You can plug in a Raspberry Pi, and you can blink a LED. You can visualize data, and now there’s a contest on Hackaday.io to show off your skills. Right now, we’re opening up the Visualize It With Pi contest on Hackaday.io. The challenge? Visualize data with LED strips and panels. Is that ‘data’ actually just a video of Never Gonna Give You Up? We’ll find out soon enough.

The goal of this contest is to combine a Raspberry Pi and its immense processing power and the blinky goodness of LED strips and panels to visualize and interpret data in novel and artistic ways. We’re looking for animation. clarity, and flamboyant flickering. Want some ideas? Check out the World of Light or the American Constitution Candle. We’re looking for the most blinky you can do with a Pi, and yes, there will be prizes.

Prizes

BlinkyTile Explorers Kit

Prizes for the best blinky include, of course, more blinky. The best visualizations from a directly connected sensor, data from an Internet Source, and data from an esoteric data source will each receive some Blinkytape. This is a strip of WS2812b LEDs with an ATMega32u4 embedded on the end. Plug a USB power supply into the Blinkytape, and you get a strip of LEDs in whatever color you want with the ability to push animation frames to the chip on the strip. The Grand Prize winner for this contest will also receive Blinkytile Explorers Kit, a Serpentine LED strip, a LED ring, and two meters of ultra thin LED strip.

Let’s Do This!

The requirements for the contest are simple: just use a Raspberry Pi to drive LED strips or panels, post it as a new project on Hackaday.io, and submit the project to the contest. We’re looking for a full description, source, schematics, and photos and videos of the finished version of the project — do everything you can to show off your work! The contest is open right now, and ends at 08:00 Pacific on October 1st. We know you like to blink those LEDs, so get crackin’.