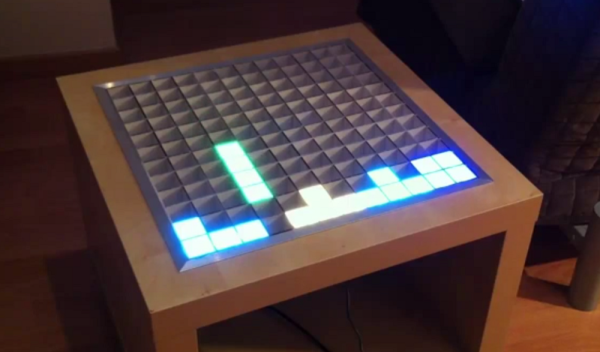
Troll Physics: 3 LEDs Powered By Hand

[Henryk] just sent us his latest episode of simple LED circuit puzzles. In front of the camera he solders one pin of each of the 3 LEDs to a different switch. He then puts the three assemblies in his hand and flips each switch to make the corresponding LED come on. We look forward to your explanations in the comments.

You may remember two other videos that [Henryk] made (also embedded after the break). The first video was a simple circuit with a resistor, three switches, and three LEDs in series. When a battery was connected, the LEDs were somehow switched on one at a time.The second video featured the same resistor/switches/LEDs, this time in a parallel circuit. Turning on the first switch made the first LED light up, and the second switch made the second LED light up.

Here are the few other troll physics projects we featured: the original LED circuits post, the super deluxe edition and the amazing solution to the trickery.

Continue reading “Troll Physics: 3 LEDs Powered By Hand”

Four Meter Light Paintings

HaD

We’ve seen some light painting before – waving a microcontroller and LED strip in front of a camera is a very interesting project after all. [Saulius]’ light painting stick is unlike anything we’ve seen before, though. It’s huge – four meters high, and is also very flexible in the field, drawing images served up from a smart phone.

To get his pictures onto his light painting stick, [Saulius] used the very cool Carambola, an exceedingly small board that also runs Python. The images were converted to a 128xWhatever .BMP file served to the Carambola over WiFi with a smart phone, Since the Carambola runs Linux, sometimes a kernel interrupt would mistakenly restart the drawing process. [Saulius] found a way around that by writing the drawing code in C and wrapping that in a Python module. The speed of C and the flexibility of Python, who could ask for more.

On the project page, you can see [Saulius] pulling off some very cool light paintings. Even though the Hackaday logo is the best way to get on the front page here, this pic is probably the most impressive

Bow Tie Kindly Suggests That You Back Off

personalSpaceBowtie

Everyone’s had their “personal space bubble” burst. You just wanted a friendly conversation, but now some overzealous blockhead is standing on your shoes and breathing in your face, making you guess what he had for lunch. Fortunately, [Grissini] has created this sylish bowtie solution. Stand too close (within 19 inches) and the LEDs come to life, flashing a warning that indicates a personal space violation. [Grissini’s] tie is 3D printed to accommodate most of the electronics, which snugly snap into place. The rest of the wiring appears to run through the neck strap and connect up to a battery pack hidden elsewhere. You can check out a brief description and demonstration in a video after the break.

We’ve seen this hack for the ladies: [Jeri’s] dress performs a similar function. We’re unsure, however, if these LEDs can deter your average socially-awkward space invader. What we’d really like to see is someone take these hacks to their logical conclusion and make a wearable out of the non-lethal dazzler clone…hopefully the victim would back up a step or two before they spewed.

If you’re lonely and want to encourage people to come closer, maybe this LED bow tie will help. Or, who knows, maybe it’s yet another way to scare people off.

Continue reading “Bow Tie Kindly Suggests That You Back Off”

The Cramp: A MSP430-powered Crane Lamp

theCramp

If you think your last project required a lot of soldering, take a look at [Multivac’s] remote controlled and fully-articulable desktop crane lamp. Sure, it’s a 430 microcontroller combined with an LED driver, 32 LEDs, PWM control, and some moving parts: but take a closer look at the structure. The Cramp uses an old HDD as its base, with the crane spinning around the main bearing that previously supported the platter. A system of spools and pulleys provides a reasonable range of motion to the rest of the build. Relocating the entire assembly, however, is evidently an unpleasant task.

[Multivac] based his design on a Liebherr LR1750 Crawler Crane, which he meticulously pieced together using leftover copper salvaged from an upgrade to his home’s mains wiring. A mountain of solder secures what must include several hundred joints—possibly more. The head of the lamp is an elegant exoskeleton-interpretation of industrial designer Eero Saarinen’s TWA Flight Center. You can see the Cramp in action in the video below.

Continue reading “The Cramp: A MSP430-powered Crane Lamp”

LED Module Used To Display Load, Traffic, And Status Data For Your PC

cpu-monitoring-block

You’re going to like [Ivan’s] write-up for this LED computer status monitor. Of course he didn’t just show-and-tell the final product — if he had you’d be reading this in a Links post. But he also didn’t just detail how he put the thing together. Nope, he shared pictures and details of every iteration that got him here.

It started off with a tachometer. Yeah, that analog display you put on the dashboard of your car which reads out RPM. He wanted to make it into a USB device which would read out his CPU load. But that’s an awful lot of work when it can only display one thing at a time. So he decided to add an 8×8 LED module which would display the load for each individual core of his CPU. It looks great next to the illuminated tachometer. From there he added resolution by transitioning to an RGB module, which ended up sucking him into a coding project to extend the data pushed to his embedded hardware. In the end his ReCoMonB (Real Computer Monitoring Block) displays CPU load, RAM usage, several aspects of HDD activity, as well as the network up and down traffic.

We think he’s probably squeezed all that he can from this little display. Time to upgrade to a TFT LCD.

Continue reading “LED Module Used To Display Load, Traffic, And Status Data For Your PC”

A Love Note In 14 Segments

14

[Terry] wanted to come up with a little electronics project for his kids, and also came up with something to keep the wife happy. It’s an adorable 14-segment love letter, pieced together with some leftover LED displays and a bit of solder.

There isn’t a microcontroller anywhere to be seen in this project – all the illuminated segments are tied to a switch, and aside from a few resistors there isn’t much to this circuit. The simplicity means it’s a great way for [Terry] to get his kids involved in electronics.

If you’re wondering why [Terry] didn’t throw multiple Arduinos, shift registers, or LED drivers into the build, consider this: sometimes segment displays can be static. The time circuit prop from Back to the Future (but not this modern recreation) was wired up in a similar manner, as only a few specific dates needed to be displayed. Either way, we’re thinking good on [Terry] for introducing his kids to a soldering iron and doing something special for his lady friend.

Hack It: In-refrigerator Egg Monitoring

Here’s a concept piece that monitors the eggs in your refrigerator. It’s still in development and we don’t think the general public is ready for digital egg monitoring quite yet. But we love the concept and want to hear from you to see if you could develop your own version.

What we know about the device is that — despite the image which makes smart phone proximity seem important — it connects to the Internet from inside your fridge. It will tell you how many eggs you have left, and even tracks the date at which each entered your refrigerator.

So, what’s inside this thing and who can build their own the fastest? We’ll cover some specs and speculate a bit to get you started: There’s a light sensor to detect when the door opens and an LED below each egg to illuminate the oldest. We think the light sensor triggers a microcontroller that uses each of the egg LEDs as a light sensor as well. If the threshold is too low then there is indeed an egg in that cup. We also like the fact that the tray has fourteen slots; as long as you don’t buy eggs until you have just two left you’ll always have room.

If you build one we want to know. We’re thinking 3D printed cups, low-power microcontroller, but we’re kind of stumped on the cheapest WiFi solution. Leave your thoughts in the comments.

[via Reddit via NY Daily News via Mind of Geek]