Microcontroller Comm With A Computer Monitor

Prolific Hack a Day author [Mike S] has been playing in his lab again and he’s come up with a neat way to talk to microcontrollers with an LCD monitor. The basic idea behind [Mike]’s work isn’t much different from the weird and/or cool Timex Datalink watch from the 1990s.

Despite the fancy dev board, the hardware is very simple – a photoresistor is pointed at a computer monitor and reads bits using Manchester encoding. The computer flashes a series of black and white screens thanks to a simple Javascript/HTML page, and data is (mostly) transmitted to the micro. [Mike] says he has about a failed message about 60% of the time, and he’s not quite sure where the problem is. He’s looking into another kind of Manchester encoding that uses samples instead of edges, so we hope everything works out for him.

This build is very similar – and was inspired by – an earlier post about microcontroller communication with flashing lights. Still, [Mike]’s build reminds us of the strangely futuristic Ironman watch we had in ’97. Check out [Mike]’s demo of his computer/micro comm link after the break and his code on github.

Continue reading “Microcontroller Comm With A Computer Monitor”

Sound Card Microcontroller/PC Communication

The usual way send data from a microcontroller is either over RS-232 with MAX232 serial ICs, crystals, and a relatively ancient computer, or by bit-banging the USB protocol and worrying about driver issues. Not content with these solutions, [Scott] came up with sound card μC/PC communication that doesn’t require any extra components.

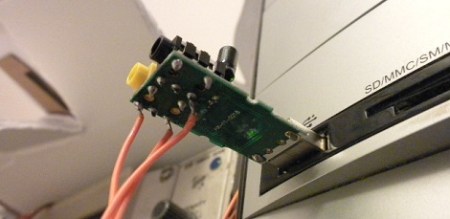
[Scott] bought a cheap USB sound card dongle on eBay (although a built-in sound card will do) and wired up the tip and ring of the plug to the microcontroller. The data is sent from the microcontroller a lot like Morse code – a short gap between pulses is a zero, a long gap is a one. This is parsed by a Python script using PyAudio. Synchronization, timing, and calibration is automatic because of a 10-bit ‘packet header’ explained in this video.

Continue reading “Sound Card Microcontroller/PC Communication”

External Text Display For Nexus One

Nexus One External Display

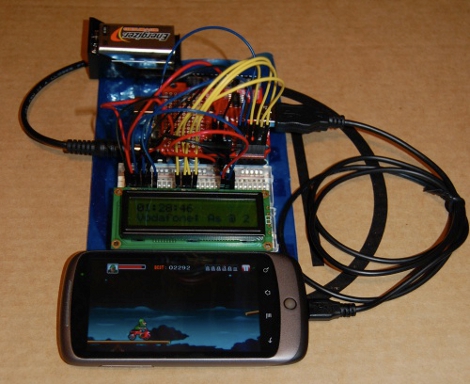
[follower] prototyped a 2-line external display for his Nexus One using an Arduino with a USB Host Shield, and the Android Open Accessory Protocol. There are two basic software pieces at work: an Arduino sketch that handles displaying data sent from the phone, and a lightweight android app to detect the presence of the external screen and send data to it. As shown here, it diplays the time and the beginning of the most recently received SMS message.

This project coalesced from several other things [follower] had been working on with regards to USB accessories, background services, interfacing with the Arduino and handling SMS messages, so it’s modular and open-source.  If you’re interested in mashing up microcontroller projects and your android phone, there’s plenty of stuff in this project to help you get off the ground.

As hacks go, this is very much a “because you can” sort of deal that’s designed to tie a bunch of cool things together. You’re unlikely to catch us carrying an LCD and breadboard around in our pockets any time soon, but it paves the way for some potentially fun phone accessories.

Use FPGAs The Easy Way With Alien Cortex AV

alien_cortex_av_fpga_board

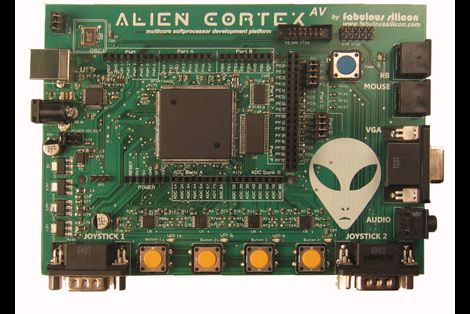
Hackaday reader [Louis] wrote in to call our attention to a neat project over at Kickstarter that he thought would interest his fellow readers. The AlienCortex AV is a pre-built FPGA board from [Bryan Pape] with gobs of ports and a ton of potential. At the heart of the board is an Xilinx PQ208 Spartan 3e 500k FPGA, which can be configured to perform any number of functions. The board sports a healthy dose of analog and digital I/O pins as you would expect, along with PS/2 inputs, VGA outputs, and even a pair of Atari-compatible joystick ports.

The AlienCortex software package allows users to easily load projects into the FPGA, which can run up to four different emulated microcontrollers at once. The software comes with half a dozen pre-configured cores out of the box, with others available for download as they are built. The default set of cores includes everything from a 32-channel logic analyzer, to a quad processor Arduino-sketch compatible machine.

Now, before you cry foul at the fact that he’s emulating Arduinos on a powerful and expensive FPGA, there’s nothing stopping you from creating an army of whatever microcontrollers you happen to prefer instead. We’re guessing that if you can run four Arduinos on this board at once, a good number of PICs could be emulated simultaneously alongside whatever other uC you might need in your next robotics project. A single board incorporating several different microcontrollers at once doesn’t sound half bad to us.

VGA Out On A Maple Board

The team at Leaf Labs just released a new library to demonstrate the VGA capabilities of their Maple dev board. Although it’s only a 16 by 18 pixel image, it shows a lot of development over past video implementations on the Maple.

The Maple is a great little Ardunio-compatible board with a strangely familiar IDE. We’ve covered the Maple before. Instead of the somewhat limited AVR, the Maple uses an ARM running at 72MHz, making applications requiring some horsepower or strict timing a lot easier.

We’ve seen a few projects use the increased power, like a guitar effects shield. It’s possible the Maple could be made into a game console that would blow the Uzebox out of the water, but we’re wondering what hackaday readers would use this dev board for.

Watch the video after the jump to see how far the Maple’s VGA capability has come after only a few months, or check out Leaf Lab’s Maple libraries.

Continue reading “VGA Out On A Maple Board”

Optimizing Code For PWM Efficiency

For some projects, it’s okay to have a microcontroller twiddling it’s thumbs most of the time. When a project requires the cpu to do just one thing over and over, there’s no loss with inefficient code – it either works or it doesn’t. However, if a project requires a microcontroller to do several things at once, like reading sensors, dimming LEDs, and writing serial data out, cpu utilization can become an issue. [Robert] wasn’t happy with the code he used to control a string of LEDs, so he rewrote his code. With the old implementation, [Robert]’s code used 60% of the cpu time. With the new and improved code, the cpu was only busy 8% of the time.

The code works by using a hardware timer to trigger an interrupt. After calculating the next time it should run again, and changing the state of the data line, the code just sits quietly until it’s needed again.

It’s not a pretty hack, or even one you can hold in your hands, but [Robert]’s determination in getting a μC to do what he wants is admirable.

Micro Audio Player Can Hide Behind A Postage Stamp

The original iPod shuffle was a pretty small device, there’s no doubt about that. However, in the world of miniature audio players, [Chan] is no slouch either.

A few years ago, he set out to construct a micro audio player that used little more than a small microcontroller and a microSD memory card. He chose an ATinyX5 series microcontroller to run the show, utilizing its pair of PWM output pins to directly drive the speakers. Since there is no built-in amplifier, the audio volume is not loud, but it does sound reasonable if you use a set of high efficiency desktop speakers. He does mention that the sound can easily be amplified after passing the signal through a filter, so there is hope for those of you who like your music turned up to 11.

The only downside we can see is that the audio player can only process Wave files, but it’s hard to expect more from a DIY audio player smaller than a postage stamp. It would be great to see what sort of micro-handiwork [Chan] could perform if he were to update his design and build a full-functioning MP3 player based upon this project.