Origami has become known as a miracle technique for designers. Elegant compliant mechanisms can leverage the material properties of a single geometry in ways that are sometimes stronger than those of more complicated designs. However, we don’t generally see origami used directly in 3D printed parts. [matthew lim] decided to explore this uncharted realm with various clever designs. You can check out the video below.
XR may not have crashed into our lives as much as some tech billionaires have wished, but that doesn’t stop the appeal of a full display that takes up no physical space. At that point, why not get rid of the computer that takes up living space as well? That is what [Michael] tries to do with Bento, the form factor of an Apple Magic keyboard and the power of a Steam Deck.
Most of us spend our lives within reach of a device that provides a clock, stopwatch, and a timer – you’re almost certainly reading this article on such a device – but there are fewer options if you want a screen-free clock. [Michael Suguitan]’s TOKIDOKI rectifies this situation by combining those three functions into a single, physical, analog clock face.
TOKIDOKI displays time by lighting the appropriate segments of two concentric rings of colored LEDs (Adafruit Neopixel rings); the inner ring indicates hours, while the outer ring displays minutes. There is one clock hand, and while it does indicate the passage of time in some situations, its main function is as a dial to control the clock’s different functions. The hand is connected to a Dynamixel XL-330 servo motor, which also serves as a position sensor. Winding the dial clockwise starts a countdown timer, with each successive full rotation switching to a larger unit of time (a fun/unsettling feature is that the largest chronometric unit is the user’s expected lifetime: 84 years). Winding counterclockwise either starts a stopwatch or sets an alarm, depending on how many full rotations you make.
A Raspberry Pi Pico running some MicroPython firmware manages the device and gets the current time from a local network. To soften the light’s quality, the LED rings are pointed backwards to provide back-lighting off of a recessed surface. The entire device is powered by USB-C, and is enclosed in a 3D-printed housing.
Some people really want a minimalist setup for their computing. In spite of his potentially worrisome housing situation, this was a priority for the man behind [Basically Homeless]: clean lines on the desk. Where does the PC go? You could get an all-in-one, sure, but those use laptop hardware and he wanted the good stuff. So he decided to hide the PC in the one place no one would ever think to look: inside his chair. (Youtube video, embedded below.)
This chair has very respectable specs: a Ryzen 7 9800XD, 64GB of ram and a RTX 4060 GPU, but you’d never know it. The secret is using 50 mm aluminum standoffs between the wooden base of the seat and the chair hardware to create room for low-profile everything. (The GPU is obviously lying sideways and connected with a PCIe riser cable, but even still, it needed a low-profile GPU.) This assemblage is further hidden 3D printed case that makes the fancy chair donated from [Basically Homeless]’s sponsor look basically stock, except for the cables coming out of it. It’s a very niche project, but if you happen to have the right chair, he does provide STLs on the free tier of his Patreon.
This is the first time we’ve seen a chair PC, but desk PCs are something we’ve covered more than once, so there’s obviously a demand to hide the electronics. It remains to be seen if hiding a PC in a chair will catch on, but if nothing else [Basically Homeless] will have a nice heated seat for winter. To bring this project to the next level of minimalism, we might suggest chording keyboards in the armrests, and perhaps a VR headset instead of a monitor.
It’s not often that we can include an operating system in a Hackaday article, but here’s the full 46-byte source of [Philippe Brochard]’s 10biForthOS in 8086 opcodes:
Admittedly, this is quite a minimal operating system. It’s written for the Intel 8086, and consists of a Forth implementation with only two instructions: compile (1) and execute (0). It can receive commands over a serial connection or from a keyboard. This allows a host computer to load more complex software onto it, one byte at a time. In particular, [Philippe] provides instructions for loading more advanced compilers, such as subleq-eForth for a more complete Forth implementation, or SectorC for C programming. He’s also written a 217-byte port of the OS to Linux Intel x64.
[Philippe] doesn’t take a strong stance on whether this should technically qualify as a Forth implementation, given that the base implementation lacks stacks, dictionaries, and the ability to define words. However, it does have an outer and inner interpreter, the ability to compile and execute code, and most importantly, “the simplicity and hacky feeling of Forth.”
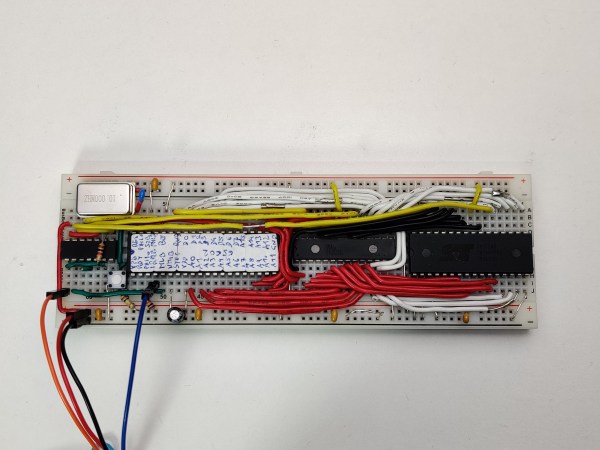
A central processing unit, or CPU, is the heart of any computer system. But it’s definitely not the only part: you also need RAM, ROM and at least some peripherals to turn it into a complete system that can actually do something useful. Modern microcontrollers typically have some or all of these functions integrated into a single chip, but classic CPUs don’t: they were meant to be placed on motherboards along with dozens of other chips. That’s why [c0pperdragon]’s latest project, the SingleBreadboardComputer, is such an amazing design: assisting its 6502 CPU are just four companion chips.
The entire system takes up just one strip of solderless breadboard. Next to the CPU we find 32 KB of SRAM, 32 KB of flash and a clock oscillator. The fifth chip is a 74HC00 quad two-input NAND gate, which is used as a very tiny piece of glue logic to connect everything together. Two of its NAND gates are used for address decoding logic, allowing either the ROM or RAM chip to be selected depending on the state of the CPU’s A15 line as well as blocking the RAM during the low phase of the system clock. The latter function is needed because the address lines are not guaranteed to be stable during the low phase and could cause writes to random memory locations.
The remaining two NAND gates are connected as an RS-flipflop in order to implement a serial output. This is needed because the CPU cannot keep its outputs in the same state for multiple clock cycles, which is required for a serial port. Instead, [c0pperdragon] uses the MLB pin, normally used to implement multiprocessor systems, to generate two-clock pulses, and stores the state in the flipflop for as long as needed. A few well-timed software routines can then be used to transmit and receive serial data without any further hardware.
Currently, the only software for this system is a simple demonstration that sends back data received on its serial port, but if you fancy a challenge you could write programs to do pretty much anything. You could probably find some inspiration in other minimalist 6502 boards, or projects that emulate a complete motherboard in an FPGA.
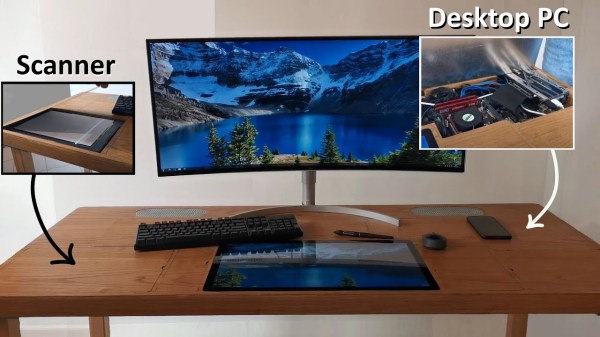
Say what you will about office life: there were definitely some productivity perks, but the coffee is much better at home. Like many of us, [Pierre] has been working from home for the last year or so. And as much as he might enjoy spending so much time in his small Parisian apartment, it lacks many of the amenities of the office such as a scanner, printer, and, you know, a reasonable amount of space in which to work.
Inspired by another build, [Pierre] set out to build his dream desk that is maximum PC power in minimum space. It is chock full of easily-accessible cavities that hide everything you’d expect, plus a few things you don’t, like a flatbed scanner, a printer, a router, and a wireless charging pad. One cavity is dedicated to I/O, and another has three international power sockets. The only thing it doesn’t hide is the 22″ pen display that [Pierre] uses for sketching, signing documents, and occasionally as a second monitor.
A home-brew jig makes consistent dowel drilling much easier.
This desk may look like solid wood, but the top is a veneer that’s glued on to a custom-cut 1mm steel sheet. The inside frame is made of hardwood and so are the legs — one of them has a hidden channel for the only two cords that are even somewhat visible — the power and Ethernet cables. He joined all the frame pieces with dowel rods, and made a 3D-printed and metal-reinforced drilling jig to get the holes just right.
[Pierre] started this build by planning out the components and making meticulous notes about the dimensions of every piece. Then he sketched it and modelled it in FreeCAD to get all the cavities and cable runs correct and ensure good airflow through the desk. After that it was on to woodworking, metalworking, and PCB fab for relocated and hidden display controls and a custom-built amplifier.
It’s obvious that a lot of thought went in to this, and there’s a ton of work appreciate here, so clear off that inferior desk of yours and check out the build video after the break. Wish you had a PC desk? [Pierre] is seriously considering a Kickstarter if enough people show interest.