“Machining” Copper Parts Using Cupric Chloride

[Ben Ardwin] was asked by a friend to help fix an old motor. It needed a new set of brushes. They’re just thin pieces of copper that mount on the motor housing and contact the commutator. The metal is so thin he thought he’d try fabricating replacements by dissolving copper stock.

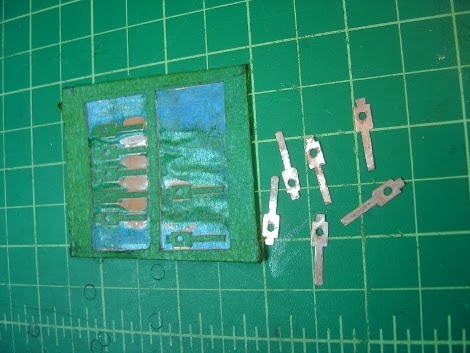
This is not copper clad board; the raw material used in PCBs that has a copper-covered fiberglass substrate. It’s just thin sheets of copper stock. [Ben] started by covering top and bottom with painter’s tape. This will act as a resist for the chemical etchant. He headed over to the laser cutter to remove the tape mask around the outline of the parts. From there it’s into the Cupric Chloride for about two hours.

The etched parts are a bit rough around the edges so he cleaned them up by hand using a file. When writing to us about the process he suggests a few improvements. The tape used for masking wasn’t ideal and he would try a different method. He would also remove less area around the parts to help speed up the process.

This technique is a really becoming popular as a home-fabrication tool. Recently we’ve seen etched copper used to make a faceplate for an enclosure, and a translucent template for a clock.

DIY Portable Charger/generator

portable_charger_generator

[Glenn] from The Back Shed has built a lot of windmills and stationary generators over the years, but recently decided to try his hand at building something a bit more portable.

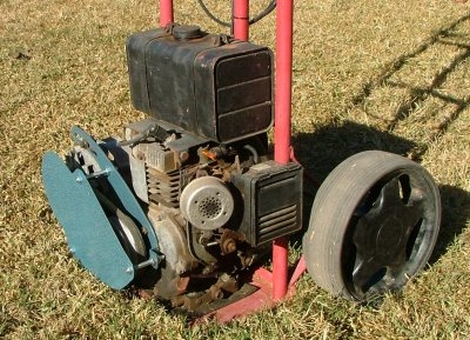
The charger is based of a relatively simple design, employing a 5.2 HP Kubota 4 stroke motor and a 12v car alternator to provide power. While you might be inclined to point out that his charger does exactly what an alternator and motor are built to do, there was a bit more to it than simply slapping the two parts together.

A laser cut adapter plate holds the motor and alternator together, but once [Glenn] wrapped things up and gave the motor a spin, he realized that he was driving the alternator backwards. This would eventually cause the alternator to overheat since the cooling fan was running the wrong way. He removed the fan and reversed the fins with a hammer so that he could get the cooling he needed without having to reinstall the alternator in the opposite orientation.

The whole kit was mounted on a hand truck for portability, and [Glenn] says that the charger/generator only needs to run about 5 minutes before a dead battery has enough juice to crank an engine.

[via HackedGadgets]

Robot Gets Around On Lopsided Wheels

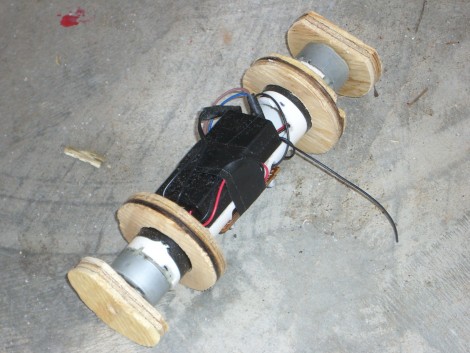
This concept robot uses angular momentum to roll around. You can see that on either end of the robot there are two discs which have been cut on one side to make them off-balance. For locomotion, two DC motors spin the outer discs which are not in contact with the floor. This spinning action exerts a force in the opposite direction on the body of the vehicle, causing it to move.

It’s not a perfect system and there is one major flaw with using this system. When the forces have equalized acceleration will stop and it will eventually come to a standstill. You can’t just stop spinning the motors because that will act as a braking mechanism. But still, it’s a concept we haven’t seen before and we love the experimentation that’s happening here. Take a look at the test footage after the break and don’t hesitate to let us know if this starts causing light bulbs to flip on above your head.

Continue reading “Robot Gets Around On Lopsided Wheels”

Super Winch Makes Sledding 100% More Fun

sledding_winch

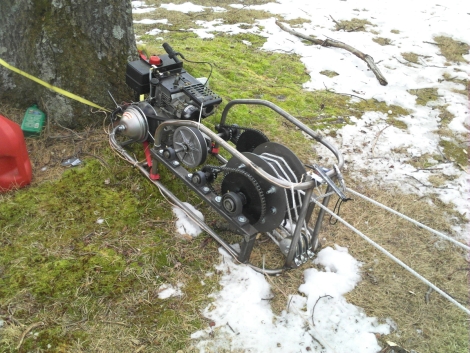
As every kid quickly finds out, sledding in the winter is awesome until you have to trudge back up to the top of the hill. If your sledding run is reasonably short, this isn’t a problem, but if you sled on huge hills like [Josh], you need to figure something out.

He had a go kart motor sitting around, so he figured he might as well put it to good use as a sledding winch. The winch runs a continual loop of over 1000 feet of rope, and is able to pull 3 adults up a 30 degree incline fairly easily. They say that necessity is the mother of innovation, but at some point you have to ask, “Does sledding really require an 8 HP motor and a continuously variable transmission?” The answer, of course is a resounding “Yes!”

Not only does this winch allow [Josh] and his friends to get back to real business of sledding in a hurry, it actually makes sledding fun in both directions.

Keep reading to see a video of the winch in action, and be sure to check out some other fun uses for winches we have featured in the past.

[via Neatorama]

Continue reading “Super Winch Makes Sledding 100% More Fun”

Giving A Canoe Lawnmower Power

There’s the quiet serenity of paddling through the backwoods in a canoe, and then there’s this. It’s a lawnmower motor powered canoe that comes complete with steering wheel, throttle, and a stereo system. To keep the craft balanced the driver rides in the front seat while the motor is hanging off the stern of the boat. The biggest trick is not swamping the thing while getting the motor running, but future plans do include adding an electric starter. There is a kill switch for safety and it appears that top speed will not cause any stability issues. It’s hard to tell for sure from the video after the break, but it sure does seem to be loud!

Continue reading “Giving A Canoe Lawnmower Power”

Arduino Electronic Speed Control Explained

You can salvage some nice motors out of optical drives but they can be tricky to control. That’s because brushless DC motors require carefully timed signals used in a process called Electronic Speed Control (ESC). [Fileark] built and ESC using an Arduino and has a couple of posts explaining the concept and demonstrating how it works. His test circuit uses six 2N2222 transistors to protect the Arduino from excessive current. You can see six red LEDs above which are inline with the base of teach transistor. This gives visual feedback when a transistor is switched, a big help for troubleshooting your circuit.

Once you’ve seen the videos after the break you’ll probably come to the conclusion that this is an impractical way to use a brushless motor. But it is a wonderful way to learn about, and experiment with the concept of ESC. Chances are you can get your hands on an old optical drive for free, making this an inexpensive weekend project.

Continue reading “Arduino Electronic Speed Control Explained”

Making Model Rocket Motor Igniters

[Stephan Jones] has an easy method for making your own model rocket engine igniter. The solid state motors used in this hobby consume one igniter with each electrically triggered launch. Whether you’re making your own motors or not, this construction technique should prohibit you from every buying an igniter again. The process involves bending some nichrome wire around a paper clip, adding some structural support to the leads using masking tape, and insulating the business end with a quick dip in paint.

Now would be a good time to send us your launchpad hacks. All we’ve seen so far is a launchpad for water rockets.

[via Make]