Automatic Trough Filler Makes Sure The Animals Have Water

It has been a hot hot summer for many parts of the US. The heat has been dangerous at times and making sure the livestock has the water they need is incredibly important. [Maddox] recently upgraded the automation on their water troughs which will help with the process. Sure, they still have to check on the animals, but this will ensure there’s plenty to drink in between those visits, and that a malfunction doesn’t waste precious water.

There has always been some level of automation here, but it relied on float valves which were frequently malfunctioning. This project seeks to get rid of the float value and use solenoid valves like those used in irrigation. These solenoids can run from a 9V battery and offer quite a bit more reliability than the mechanical vales. There is still a float sensor which measures the water level, filling up the trough when needed.

An MSP430 Launchpad was used for the prototype, from which a PCB was designed. Since this needs to be weather-proof a water tight enclosure was sourced. The company that makes the enclosure also provides DXF templates which [Maddox] used to establish the size and outline of the PCB.

MIDI Swiss Army Knife Built From An MSP430

[youtube=http://www.youtube.com/watch?v=0hvQUXcXlEg&w=470]

Hot off the heels of his web server for the TI MSP430, [Rob] shared a MIDI booster pack for the MSP430 LaunchPad, an exceedingly inexpensive and ever more capable microcontroller that is getting somewhat of a cult following.

[Rob]’s MIDI booster pack contains a MIDI in and out port as well as just about whatever MIDI manipulation apps his mind can dream up. So far, [Rob] has a MIDI arpeggiator, a harmonizer, an echo, filter, s MIDI monitor that displays incoming messages on a Nokia LCD, and a controller that interfaces with a light sensor or joystick to manipulate MIDI variables.

Back in the 80s (and 90s, and even into the aughts), a dedicated MIDI arp or harmonizer was a crazy expensive piece of kit, especially considering how simple the device is. Those dedicated rackmount boxes can now be replaced with a TI LaunchPad and [Rob]’s booster pack.

You can check out the arp and harmonizer in action after the break.

Continue reading “MIDI Swiss Army Knife Built From An MSP430”

Lightweight Web Server Using The MSP430

Need a tiny web server? [Rob] over on the 43oh forums made an Ethernet booster pack for the very popular TI MSP430 microcontroller. If that’s not enough, [Rob] also put together an all-in-one solution with a MSP430 and Ethernet controller that can be powered by a battery. Along with the web server that fits in just 5k of flash, we’re going to say [Rob] has a very good solution for remote sensing and data logging.

For his Ethernet-enabled 430, [Rob] chose to use the WIZnet W5200 Ethernet controller. This chip communicates with the 430 via and SPI interface and has a hardware TCP/IP stack that supports TCP, UDP, and PPPoE, offloading all the low-level stuff off of the 430 and onto the Ethernet controller.

After the break there are a pair of videos of [Rob] showing off his tiny web server. A few neat features include a full memory dump of the 430, as well as a reading the states of all the pins via an HTML page. If you’re looking for a way to collect data over Ethernet, we don’t think you could do better than [Rob]’s tiny 430-based web server. Also, if you’d like to control a few devices over the Internet, [Rob] included a few optoisolators  for lights or appliances.

The code is available on the 43oh forum page, but [Rob] says he’ll clean that up and put it in a Git.

Continue reading “Lightweight Web Server Using The MSP430”

Energia Brings Arduino IDE To The TI Launchpad

The Arduino IDE is an abstraction layer for the AVR chip which the board is based around. So it’s no surprise that it is now possible to use the Arduino IDE with the TI Launchpad board. This makes it dead simple for beginners to play around with the inexpensive and low-power MSP430 platform. This is all thanks to a lot of hard work on part of the Energia developers.

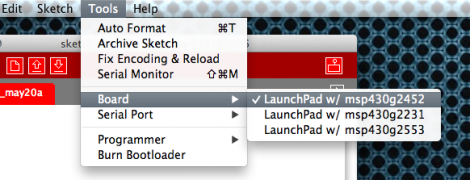
The project branches from Arduino so the look, feel, and function are all about the same. Most notably, the color scheme has migrated to red to match the board color of the Launchpad. You can configure the hardware the same way by selecting a COM port and target board. Almost everything is already working, but you should check the known issues page so that you don’t try to use a function that hasn’t been ported. Right now the list includes the random and random seed functions, as well as tone, notone, and micros. There is also an issue with analogWrite; it will only produce half the requested frequency and duty cycle can only be set from 0-50%. Still this is a great development if you’re most comfortable working from this IDE.

Logic Analyzer Add-on For The MSP430 Launchpad

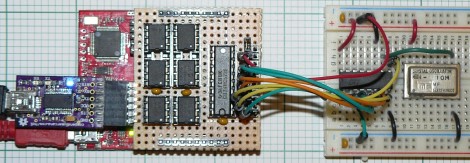
Here’s a 6-channel logic analyzer shield for the MSP430 Launchpad. It manages an eyebrow-raising 16 million samples per second. The prototype seen above is made on a hunk of protoboard with point-to-point soldering. [oPossum] did lay out a PCB — which is just 50mmx50mm — but has not had any produced quite yet.

He calls it the LogicBoost, and based it on the the LogicShrimp design. The sextuplet of 8-pin chips are all SPI RAM. These are responsible for storing the samples, with a 74HC573 latch routing the traffic. The MSP430 chip provides the SPI clock, and the Launchpad’s virtual com port can be used to push the data to a computer for graphing. That’s a bit slow so [oPossum] also included an optional header for an FTDI board that will do a faster job. The sample rate can be adjusted by tweaking the internal oscillator setting of the chip; there’s plenty to choose from so it will work for just about any purpose (as long as you don’t surpass the 16 Msps speed limit).

[via Dangerous Prototypes]

Using Spy-Bi-Wire With The MSP430 Launchpad

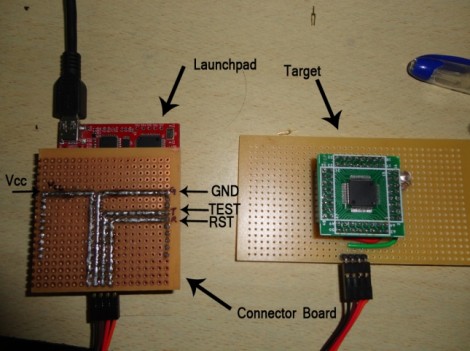
[Suraj] has been working with some larger MSP430 chips with won’t fit on the Launchpad board. But that’s okay because he built a shield and wrote a guide about using the Spy-Bi-Wire protocol for programming the chips.

SBW is a four-wire interface. In the past we’ve used all of the board’s programming connections for in circuit programming, but the chips that support SBW only need a connection to the SBW and TEST pins (of course the other two connections are for voltage and ground). This shield brings the four pins together into one male pin header. In the image above [Suraj] is using the technique to program an MSP430F4152. His guide is Windows-based, but looking back, [Sprite_TM] shows how to use SBW when debugging in Eclipse.

Fine Tune Your Morse Code Skills With This Mint Tin Practice Keyer

mint-tin-keyer

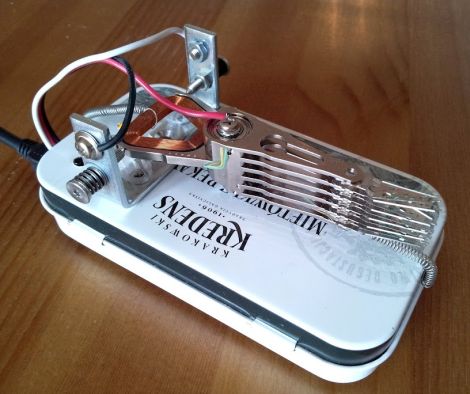
Hackaday reader [svofski] wrote in to share a device he built, which would be useful to any ham operators out there trying to hone their CW skills. He calls his practice keyer the Morseshnik, and it is a combination of various items [svofski] found while digging through his parts drawer.

He disassembled an old hard drive, saving its read arm to serve as the keyer’s paddle. He purchased some small angle brackets to create a set of contacts for the device, between which the lever sits, automatically centered by a pair of springs.

An MSP430, which was also collecting dust in [svofski’s] junk pile, resides inside the Morseshnik’s mint tin base on a small DIY PCB. It allows him to toggle between manual and automatic keying modes with the flick of a switch as he whiles his time away practicing his dits and dahs.

Continue reading to see a short video of the Morseshnik in action, and swing by his site for code and PCB schematics should you want to build one of your own.

Continue reading “Fine Tune Your Morse Code Skills With This Mint Tin Practice Keyer”