Need Many Thin Parts? Try Multi-material Stack Printing

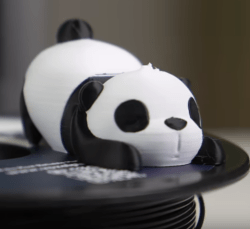
Admittedly it’s a bit of a niche application, but if you need lots of flat 3D printed objects, one way to go about it is to print them in a stack and separate them somehow. An old(er) solution is to use a non-extruding “ironing” step between each layer, which makes them easier to pull apart. But another trick is to use the fact that PLA and PETG don’t stick well to each other to your advantage. And thus is born multi-material stack printing. (Video, embedded below the break.)

[Jonathan] wants to print out multiples of his fun Multiboard mounting system backplates, and these are the ideal candidate for stack printing: they’re thin, but otherwise take up the entire build plate. As you’d expect, the main trick is to print thin layers of PETG between the PLA plate layers that you do want. He demonstrates that you can then simply pull them apart.

There are some tricks, though. First is to make two pillars in addition to the plates, which apparently convinces the slicer to not flatten all the layers together. (We don’t really understand why, honestly, but we don’t use Bambu slicer for multi-materials.) The other trick that we expect to be more widely applicable, is that [Jonathan] extrudes the PETG interlayers a little thicker than normally. Because the PETG overflows the lower PLA layer, it physically locks on even though it chemically doesn’t. This probably requires some experimentation.

As multi-material printers get cheaper, we’ve seen a lot more innovative uses for them popping up. And we wouldn’t be so stoked about the topic if there weren’t a variety of hacker projects to make it possible. Most recently, the impressive system from [Armored_Turtle] has caught our eye. Who knows what kind of crazy applications we’ll see in the future? Are you doing multi-material yet?

Continue reading “Need Many Thin Parts? Try Multi-material Stack Printing”

Automated Hotend Swapping For Less Wasteful Multicolor Printing

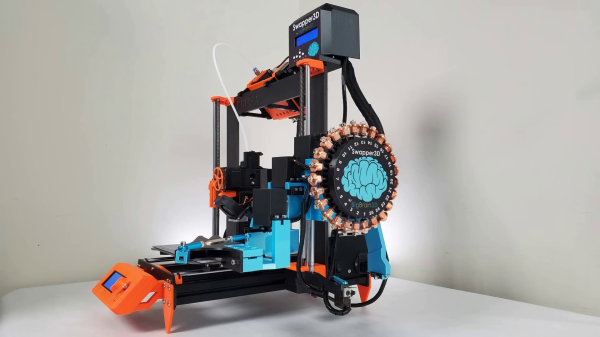
Multicolor printing on FDM machines can be tricky to get working flawlessly, and purging hotends when changing colors can end up wasting a lot of filament and material. To solve this problem for the popular Prusa i3 and Ender 3 printers, [BigBrain3D] developed the Swapper3D, an automated system that swaps the entire hotend when the material is changed, eliminating the need for purging almost entirely. Video after the break.

The Swapper3D works very similarly to the tool-changing systems on CNC machines, and is just as satisfying to watch. A large circular carousel on the side of the machine holds up to 25 hotends, and in practice, a pair of robotic arms pop out the previous hotend, cut the filament, and load up the specified hotend from the carousel. This means you can have a separate hotend for each color or type of filament. Since most existing hotends also integrate the heating element, [BigBrain3D] created a special hotend assembly that can be robotically removed/inserted into the heater block.

The Swapper3D is designed to be used with existing filament changers like the Prusa MMU and the Mosaic Palette. Using these systems involves a lot of purging, to the point where you sometimes end up using more filament during purging than you need for the actual part. On one five-color demo print, the Swapper3D reduced the print time by 45% and the filament used by a massive 86%. It also helps to eliminate problems like stringing and color fading in multicolor prints. With those advantages, it looks like the Swapper3D might be a worthwhile upgrade if you do a lot of multi-color printing, even though it adds quite a bit of complexity to the printer.

For larger, more expensive machines, swapping the entire toolhead is becoming more popular, with even E3D stepping into the fray.

Continue reading “Automated Hotend Swapping For Less Wasteful Multicolor Printing”

Toolchanging Printers Get A Nozzle Hanky Like No Other

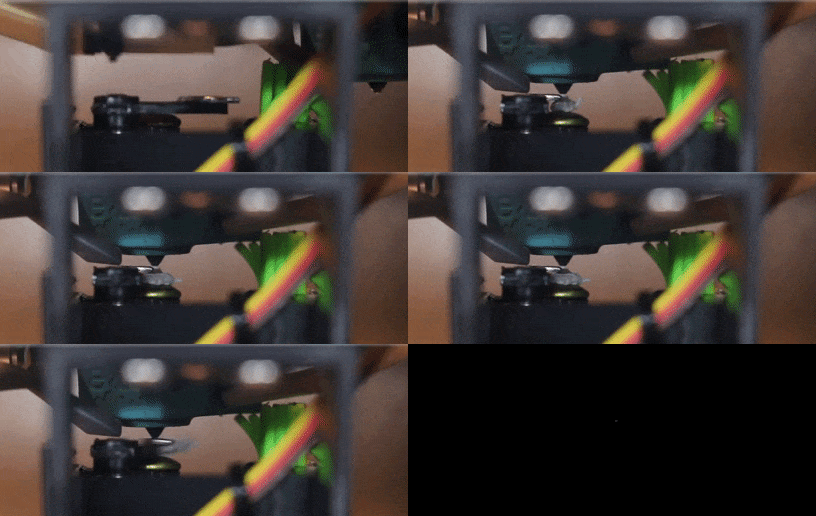
When it comes to toolchanging 3D printers, idle nozzles tend to drool. Cleaning out that nozzle goo, though, is critical before switching them into use. And since switching nozzles can happen hundreds of times per print, having a rock-solid cleaning solution is key to making crisp clean parts. [Kevin Mardirossian] wasn’t too thrilled with the existing solutions for cleaning, so he developed the Pebble Wiper, a production worthy nozzle wicking widget that’s wicked away nozzles thousands of times flawlessly.

With a little inspiration from [BigBrain3D’s] retractable purge mechanism, [Kevin] is first purging tools onto a brass brad. Rather than have filament extrude into free space, it collects into a small bloblike “pebble” that cools quickly into a controlled shape. From here, after one quick flick with a servo arm and a small wipe with a silicone basting brush, the nozzle is ready to use. The setup might sound simple, but it’s the result of thousands and thousands of tests with the goal of letting no residual ooze attach itself to the actual part being printed. And that’s after [Kevin] put the time into scratch-building his own toolchanging 3D printer to test it on first. Finally, he’s kindly made the files available online on Github for other hackers’ tinkering and mischief.

So how well does it work? Judging by the results he’s shared, we think spectacularly. Since adopting it, he’s dropped any sacrificial printing artefacts on the bed entirely and been able to consistently pull off stunning multimaterial prints flawlessly with no signs of residual nozzle drool. While toolchanging systems have been great platforms for hacking and exploration, [Kevin’s] Pebble Wiper takes these machines one step closer at hitting “production-level” of reliability that minimizes waste. And who knows? Maybe all those pebbles can be sized to be ground up, remade into filament, and respooled back into usable filament?

Continue reading “Toolchanging Printers Get A Nozzle Hanky Like No Other”

Programmable Filament For Multicolor Printing

A recent research paper shows a way to create multicolor 3D prints using a single extruder if you are too lazy to babysit the machine and switch filament. The concept: print your own “programmable” filament that has the right colors in the right place. This is the same idea as manually splicing filament but presumably is more efficient since the process works with one color at a time and doesn’t repeat. In other words, to print the 64 squares of a chessboard you’d swap filament at least 64 times on each layer. Using programmable filament, you’d load one spool, print half of the filament, load another spool, print the other half, and then finally load the newly created filament and print the chessboard. Notice that the first two operations aren’t printing the chessboard. They are printing the spool of filament you feed through on the third pass.

There are machines made to do this, of course, although they generally just splice lengths of filament together for you automatically. Using one filament solves the problems of keeping multiple heads in alignment as well as the added cost and complexity. However, you now have different problems such as the transition between materials and knowing exactly how much material will be at each point in the print.

Continue reading “Programmable Filament For Multicolor Printing”

Multi Material 3D Printing Makes Soft Robot

When you zoom in on a fractal you find it is made of more fractals. Perhaps that helped inspire the Harvard 3D printers that have various arrays of mixing nozzles. In the video below you can see some of the interesting things you can do with an array of mixing nozzles. The coolest, we think, is a little multi-legged robot that uses vacuum to ambulate across the bench. The paper, however, is behind a paywall.

There are really two ideas here. Mixing nozzles are nothing new. Usually, you use them to mimic a printer with two hot ends. That is, you print one material at a time and purge the old filament out when switching to the new filament. This is often simpler than using two heads because with a two head arrangement, both the heads have to be at the same height, you must know the precise offset between the heads, and you generally lose some print space since the right head can’t cross the left head and vice versa. Add more heads, and you multiply those problems. We’ve also seen mixing nozzles provide different colors.

Continue reading “Multi Material 3D Printing Makes Soft Robot”

Jubilee: A Toolchanging Homage To 3D Printer Hackers Everywhere

I admit that I’m late to the 3D printing game. While I just picked up my first printer in 2018, the rest of us have been oozing out beautiful prints for over a decade. And in that time we’ve seen many people reimagine the hardware for mischief besides just printing plastic. That decade of hacks got me thinking: what if the killer-app of 3D printing isn’t the printing? What if it’s programmable motion? With that, I wondered: what if we had a machine that just offered us motion capabilities? What if extending those motion capabilities was a first class feature? What if we had a machine that was meant to be hacked?

One year later, I am thrilled to release an open-source multitool motion platform I call Jubilee. For a world that’s hungry for toolchanging 3D printers, Jubilee might be the best toolchanging 3D printer you can build yourself–with nothing more than a set of hand tools and some patience. But it doesn’t stop there. With a standardized tool pattern established by E3D and a kinematically coupled hot-swappable bed, Jubilee is rigged to be extended by anyone looking to harness its programmable motion capabilities for some ad hoc automation.

Jubilee is my homage to you, the 3D printer hacker; but it’s meant to serve the open-source community at large. Around the world, scientists, artists, and hackers alike use the precision of automated machines for their own personal exploration and expression. But the tools we use now are either expensive or cumbersome–often coupled with a hefty learning curve but no up-front promise that they’ll meet our needs. To that end, Jubilee is meant to shortcut the knowledge needed to get things moving, literally. Jubilee wants to be an API for motion.

Continue reading “Jubilee: A Toolchanging Homage To 3D Printer Hackers Everywhere”

External Buffer Boosts 3D Printer Filament Splicing On The Palette 2

There was a time when most of us thought the next logical step for desktop 3D printing was to add additional extruders and hotends, allowing the machine to print in multiple colors or materials. Unfortunately such arrangements quickly become ungainly, and even with just two extruders, calibration can be a nightmare. Because of this, development has been trending towards systems that use just one hotend and simply alternate the filament being fed into it. But such systems have their own problems.

Arguably the biggest issue is how long it takes to switch filaments. The Palette 2 uses a physical buffer of spliced filament to try and keep ahead of the printer, but as [Kurt Skauen] demonstrates, there are considerable performance gains to be had by building a bigger buffer. He says there’s still some calibration issues to contend with, but judging by the video after the break, we’d say he is certainly on the right track.

The buffer is necessary to give the spliced filament time to cool and bond before being fed into the printer, but as currently designed, the machine simply can’t store enough of it to keep up with high print speeds. The stock buffer area holds 125mm worth of spliced filament, but the modification [Kurt] has designed adds a whopping 280mm on top of that to reach more than three times the stock capacity.

He’s successfully tested printing at speeds as high as 200mm/s with his upgraded buffer, a big improvement over what he was seeing with the original buffer area. This despite the fact that Mosaic (the company that produces the Palette) claim the original buffer size was already more than sufficient. It seems we’ve found ourselves in the middle of a debate between Mosaic and some very vocal members of the community, and while we don’t want to take sides, it’s hard to ignore [Kurt]’s findings.

Want to make your own? [Kurt] has released all the information necessary for others to duplicate his work, including the STLs for all printed parts and a list of the bearings, springs, and fasteners you’ll need to put it together. It looks like a fairly large undertaking, but with the potential for such a considerable speed boost, we don’t doubt others will be willing to take the plunge. One person who printed and assembled an earlier version of the buffer upgrade reports their print speeds with a 0.8 mm nozzle have more than doubled.

The Palette has come a long way from we first saw it in 2016, and since then, Prusa has thrown their orange hat into the ring with their own filament-switching upgrade. Neither machine is without its niggling issues, but they’re still probably our best shot at taking desktop 3D printing to the next level.

Continue reading “External Buffer Boosts 3D Printer Filament Splicing On The Palette 2”