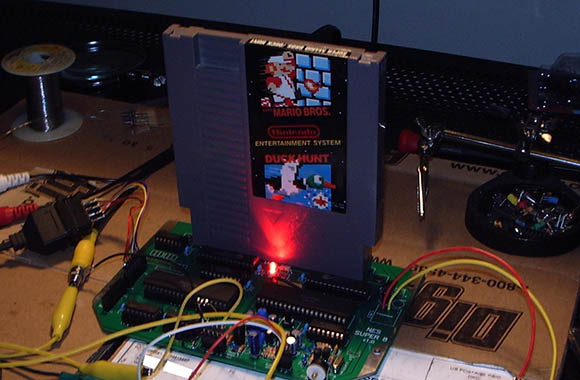
Stuffing An NES Into An FPGA

megaman_fpga

When the developer of the µTorrent torrent client and the ScummVM  LucasArts adventure game interpreter gets bored, something cool is bound to happen. Luckily for us, [Ludde] was a bit listless over Christmas, and with more time than energy to burn, implemented a Nintendo Entertainment System on an FPGA dev board.

The NES was powered by a Ricoh 2A03 CPU, a chip nearly identical to the 6502 found in the Commodore 64s and Apple IIs of the early 1980s. There are a few differences between the two, though: the NES CPU includes an Audio Processing Unit on the chip and is connected to a very cool Picture Processing unit elsewhere on the NES. [Ludde] put all these chips in his Spartan-6 FPGA with a lot of Verilog code.

The rest of the system – the RAM, display output, and controller input comes from the peripherals attached to the FPGA dev board. [Ludde]’s specific board didn’t have a good digital to analog converter, so the composite output was traded for a VGA output. It’s not a completely accurate color pallet, but it’s still an amazing piece of work for someone who was simply bored.

Dead NES Controller Used As A Makey Makey Shield

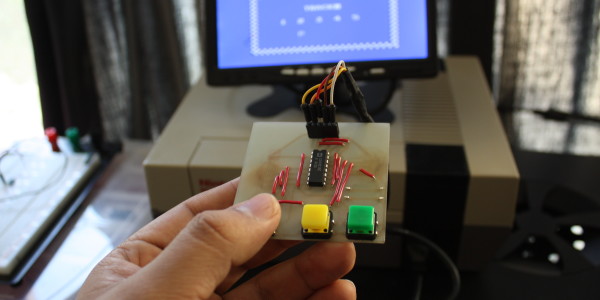
[Guillermo Amaral’s] NES controller was in great shape. Well, except for the fact that it didn’t work. Upon closer inspection it seems the shift register — which is the only IC on these ancient peripherals — had given up the ghost. But he made it usable again by making the NES controller into a MaKey MaKey shield.

You should remember the MaKey MaKey. It’s a little board that lets you create controllers out of just about anything — bananas being one of the more popular examples. All he needed to do is wire up the controller’s buttons to the board. For the task he chose to use extra long pin headers. To find the location for holes in the case he applied red ink to the top of each pin, then held the PCB up to the outside of the controller. After drilling at each red mark he glued the pin headers in place and started in on the controller’s original circuit board. Once all the point-to-point wiring was done he had a working controller. See for yourself in the clip after the jump.

Continue reading “Dead NES Controller Used As A Makey Makey Shield”

The Smallest NES Controller Ever

A few months ago, [Ben] saw a video of the world’s largest NES controller. “I bet I could make the smallest,” he thought in a strange game of one-upmanship. Now [Ben] has the smallest fully functional NES compatible controller, a feat of engineering that can only end in very, very sore thumbs.

The old NES controller is a very simple device: eight buttons are connected directly to a 4021 shift register. Every time the NES is looking for a change in input, it reads out the data in the shift register and gets the status of all the buttons.

After finding the  smallest footprint 4021 shift register he thought he could solder, [Ben] found some very small SMD push buttons and a very tiny resistor network for the pull ups. The result is tiny, and thanks to the sacrifices of a few NES controller extension cables he found on Amazon, 100% compatible with his old NES.

You can grab all the schematics over on [Ben]’s git. Tip ‘o the hat to [Troy] for sending this one in.

Emulators 101: How To Write A Program That Functions Like An NES CPU

We’d bet everyone reading this article has played a game on an emulator at some time or another. And you may have a base idea of how those emulators work. But we’d wager the vast majority of you are clueless about the actual implementation of game emulators (we know we are). But that has all changed after seeing this demonstration of how [Bisqwit] wrote his own NES emulator. The description doesn’t cover anything more than the basics of writing code that emulates the NES CPU hardware itself. But it’s presented in such a way that makes it quite easy to understand for anyone who has a basic knowledge of programming. He starts with a switch statement for handling the processor’s opcodes and then moves through piece by piece showing how he refined his code to make it work while keeping it readable. We think this is a great teaching method and appreciate the time he put into producing this tutorial.

The explanation starts about 4:22 into the video which is embedded after the break. You’ll also find the first two demo videos there. Those involve mostly fast-motion text editing of the emulator coding process with some gameplay tests at the end of the second video.

Continue reading “Emulators 101: How To Write A Program That Functions Like An NES CPU”

Adding Famicom Audio Channles To An NES Without Messing Up The Console

[Callan Brown] wrote in to show us a really interesting NES audio hack. [Callen] decided that he wanted the full Castlevania III audio experience, which (without modifications) can only be had through the original Japanese Famicom console. [Callen] weighed a few adapter options, and instead decided to come up with his own.

The issue is that the Japanese Famicom and the American NES actually have a different cartridge connector. The change in hardware from a 60 pin to a 72 pin connector added “features” like the 10 pins connected directly to the expansion port (used for stuff like the teleplay modem, who knew). The other two additional pins are used by the annoying 10NES lockout chip. While they were at it, Nintendo decided to route the audio path through the expansion connector instead of the cartridge.

This means that the Japanese cartridges can’t pipe sound to the NES audio channel with just a pin adapter. Good news though, after sourcing a pin adapter hidden inside certain NES games (Stack Up, Gyromite), audio can easily just be pulled from the adapter PCB. This requires the more expensive Famicom Castlevania III cartridge (Akumajou Densetsu). To cleanly route the new audio cable out of his front loading NES [Callan] reuses the sacrificial adapter game’s cart to make some kind of unholy hybrid. To round it off [Callan] also goes over steps to flash a translated ROM to the Japanese game.

What difference could an extra two squares and a sawtooth make? Check out the sound comparison video after the jump! Thanks [Callan].

Continue reading “Adding Famicom Audio Channles To An NES Without Messing Up The Console”

NES Light Gun Gets A Burning Laser Upgrade

The Nintendo Light Gun makes a perfect burning laser. Of course it’s been gutted to make this happen. Nonetheless, the retro look can’t be beat, and the gun form factor is just what you need in a laser weapon.

This will literally burn your eye out of your head, so [Justin] and his buddies over a North Street Labs are all wearing protective goggles designed for this laser’s wavelength. But they also built a safety into the zapper itself. At the beginning of the video clip (embedded after the break) you will see there’s a key lock mounted in the butt. This lock completes the circuit between the battery and driver board. The 2W output is achieved by a 445nm M140 diode. A lot went into the heat sink and mounting cylinder to make sure the diode doesn’t just burn up after a few seconds of use.

Continue reading “NES Light Gun Gets A Burning Laser Upgrade”

PIC-based USB Conversion For An NES Controller

[Andres] wrote in to share his USB for NES controller project (translated). It enumerates as a USB keyboard and is easily mapped on most emulators. Over the weekend we looked in on an AVR programmer used for this purpose. [Andres] went a different direction, using a PIC microcontroller and eventually incorporating his circuit into the body of the controller.

The prototype circuit can be seen above. [Andres] uses a breakout board for the PIC 18F4550 to test the circuit. The chip has native USB support, and reading the button states from the controller’s shift register is a snap. You can see him using this test rig to play Super Mario Bros. on an emulator in the video after the break.

The second iteration of the project moves from breadboard to a soldered circuit. A 18F2550 is used as it comes in a rather small DIP package. If the legs are flattened there’s room inside the controller case for it, along with a few capacitors and a crystal. The original controller cord is removed to make way for a USB cable.

Continue reading “PIC-based USB Conversion For An NES Controller”