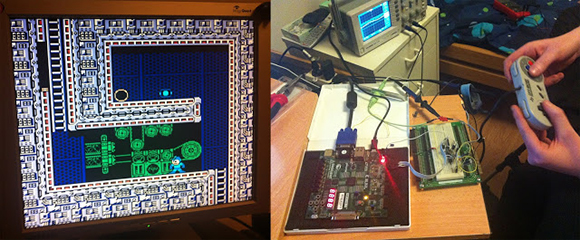
Adding Famicom Audio Channles To An NES Without Messing Up The Console

[Callan Brown] wrote in to show us a really interesting NES audio hack. [Callen] decided that he wanted the full Castlevania III audio experience, which (without modifications) can only be had through the original Japanese Famicom console. [Callen] weighed a few adapter options, and instead decided to come up with his own.

The issue is that the Japanese Famicom and the American NES actually have a different cartridge connector. The change in hardware from a 60 pin to a 72 pin connector added “features” like the 10 pins connected directly to the expansion port (used for stuff like the teleplay modem, who knew). The other two additional pins are used by the annoying 10NES lockout chip. While they were at it, Nintendo decided to route the audio path through the expansion connector instead of the cartridge.

This means that the Japanese cartridges can’t pipe sound to the NES audio channel with just a pin adapter. Good news though, after sourcing a pin adapter hidden inside certain NES games (Stack Up, Gyromite), audio can easily just be pulled from the adapter PCB. This requires the more expensive Famicom Castlevania III cartridge (Akumajou Densetsu). To cleanly route the new audio cable out of his front loading NES [Callan] reuses the sacrificial adapter game’s cart to make some kind of unholy hybrid. To round it off [Callan] also goes over steps to flash a translated ROM to the Japanese game.

What difference could an extra two squares and a sawtooth make? Check out the sound comparison video after the jump! Thanks [Callan].

Continue reading “Adding Famicom Audio Channles To An NES Without Messing Up The Console”

NES Light Gun Gets A Burning Laser Upgrade

The Nintendo Light Gun makes a perfect burning laser. Of course it’s been gutted to make this happen. Nonetheless, the retro look can’t be beat, and the gun form factor is just what you need in a laser weapon.

This will literally burn your eye out of your head, so [Justin] and his buddies over a North Street Labs are all wearing protective goggles designed for this laser’s wavelength. But they also built a safety into the zapper itself. At the beginning of the video clip (embedded after the break) you will see there’s a key lock mounted in the butt. This lock completes the circuit between the battery and driver board. The 2W output is achieved by a 445nm M140 diode. A lot went into the heat sink and mounting cylinder to make sure the diode doesn’t just burn up after a few seconds of use.

Continue reading “NES Light Gun Gets A Burning Laser Upgrade”

PIC-based USB Conversion For An NES Controller

[Andres] wrote in to share his USB for NES controller project (translated). It enumerates as a USB keyboard and is easily mapped on most emulators. Over the weekend we looked in on an AVR programmer used for this purpose. [Andres] went a different direction, using a PIC microcontroller and eventually incorporating his circuit into the body of the controller.

The prototype circuit can be seen above. [Andres] uses a breakout board for the PIC 18F4550 to test the circuit. The chip has native USB support, and reading the button states from the controller’s shift register is a snap. You can see him using this test rig to play Super Mario Bros. on an emulator in the video after the break.

The second iteration of the project moves from breadboard to a soldered circuit. A 18F2550 is used as it comes in a rather small DIP package. If the legs are flattened there’s room inside the controller case for it, along with a few capacitors and a crystal. The original controller cord is removed to make way for a USB cable.

Continue reading “PIC-based USB Conversion For An NES Controller”

Hackaday Links August 31, 2012

Landing a fixed-wing through hotel balcony french doors

As you can see, launching an RC airplane off of a hotel balcony is easy. But watch the video and you’ll find out trying to fly through the french doors for a landing is another story. [Team BlackSheep] hits (har, har) Thailand in this collection of breathtaking flights.

Quieting rack-mount switch for home use

[VictorB] got his hands on this switch to beef up his home network. Since the three fans on the back sound like a jet engine he did some cutting to use a larger, quieter fan.

Component package alphabet

Sure, you probably know what SOIC stands for, but what is a CSP? You can clear things up a bit by studying your IC Alphabet.

ZX Spectrum audio card

For those still looking to squeeze everything they can out of a classic ZX Spectrum, here’s a way to improve the audio with a custom sound card (translated).

AVR programmer reprogrammed as an NES controller interface

[Slack] modified his USBasp programmer to uses as an NES controller interface. The hardware can be had on eBay for under $10, and he was already using one as a dev board. After seeing this USB to NES dongle post it didn’t take long to make the programmer into a gaming tool.

MSP430 Gaming Shield Based On The Gameduino

Get your 8-bit gaming fix with this gaming shield for the TI Launchpad. It’s called the Launchpad GamingPack and was developed as part of TI’s 2012 Intern Design Contest. The team had just six weeks to complete the project.

The video after the break starts off with some fast-motion PCB layout. It is followed by footage of the board being populated, then anchored with graphics testing and some game play demonstrations. It looks like a real blast! NES controller ports were included on the board, and the device puts out 400×300 VGA, as well as audio.

As with the Gameduino, the hard work is done by the FPGA at the center of this board. It handles all of the VGA timing work, using what looks like 3-bit color. It is also responsible for generating the audio and monitoring the inputs. Since the team was under a time crunch the shield also includes a 10-pin header on the underside which was added for easy connection with a logic analyzer.

Continue reading “MSP430 Gaming Shield Based On The Gameduino”

USB Dongle For Unmodified NES Controllers

This USB dongle will let you use your unmodified NES controllers on a computer. That’s because it includes the same socket you’d find on the classic console.

The image above shows the prototype. Instead of etching the copper clad board, each trace was milled by hand (presumably with a rotary tool). To the left the black square is made of several layers of electrical tape that builds the substrate up enough to fit snugly in a USB port.

An ATtiny45 running the V-USB stack has no problem reading the controller data and formatting it for use as a USB device. This is actually the second iteration of the project. The first attempt used an ATtiny44 and a free-formed circuit housed inside the controller. It worked quite well, but required alterations to the circuit board, and you needed to replace the stock connector with a USB plug. This dongle allows the controller to go unaltered so it can be used with an NES console again in the future.

Multi-system Nintendo Emulator Uses Stock Controllers

The first month of [WoolyDawg5’s] summer break went into building one Nintendo emulator to rule them all. He thinks there’s nothing like playing the games on the original controllers, and we agree with him 100%. Here you can see that the cartridge door on this NES enclosure hides the extra connectors he needs.

With that door closed this looks like a stock console, but only from the front. If you take a look at the back of it you’ll see how he pulled this off. There’s a Zotac motherboard whose I/O panel has been fitted into the back. It’s responsible for emulating games for the NES, SNES, and GameCube consoles — we’re sure it can do more but that covers the controller ports seen here. Each port is wired to a USB controller module. The cables for these modules exit the back of the case and plug into the motherboard’s I/O panel. There is WiFi for the board, and that’s what [WoolyDawg] uses for configuration, tunneling into the OS instead of connecting a keyboard or mouse.

Of course you could just shoehorn all-original console hardware into one package to accomplish something like this.

[Thanks KoldFuzion]