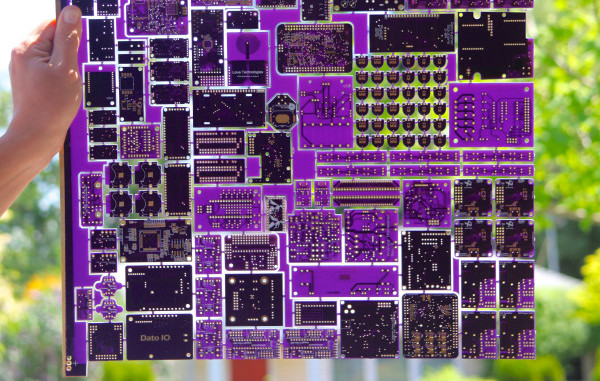
PCB art is getting better and better every year. This year, though, is knocking it out of the park. In March, [Andrew Sowa] turned me into money. More recently, [Trammell Hudson] has explored the layers of OSH Park soldermask and silk to create a masterpiece. Now, we’re moving up to full-blown art. [Blake Ramsdell] worked with OSH Park to create a full panel of art in gold, fiberglass, soldermask, and silkscreen. It’s 22×16 inches, and it’s fantastic.
There’s an independent Hackaday meetup going down in Hong Kong this week. The subject of the meetup will be vacuum systems for electron beam melting, mass spectrometry, and building Nixie tubes.
Why does my circuit still work when I remove some caps? This question was posed to the EEVBlog forums, with a picture attached of the worst mess of wires I’ve ever seen. This is — supposedly — not a joke, and a complete, functional CPU built out of 74HC series logic on thirty or so solderless breadboards. A weird bonus of access to the tip line at Hackaday means everyone here becomes experts in the field of absurdly constructed electronics. Want to see the worst PCB ever? We’ve seen it. This is, without question, the most rats nest electronic project anyone has ever built.
[Adam West] died this weekend at the age of 88. [West] is perhaps best known for his performance in Lookwell as a crime-solving, washed-up TV action hero. He is survived by his wife, Marcelle, and six children.
A decade ago, while RISC architecture was busy changing everything and people were wearing Utilikilts without beards, hackers were doing something amazing. They repurposed off-the-shelf routers and turned them into what we would now call the Internet of Things. Need to set up a PBX? A Linksys router will do it. Want to drive a remote control car over the Internet? It’s your old friend, WRT54G.
Now that the Internet of Things is a thing, a few companies have realized people will buy bare bones router chipsets. It’s like an Arduino, or something, and it connects to the Internet. We’ll sell a million. Get Indiegogo on the phone.
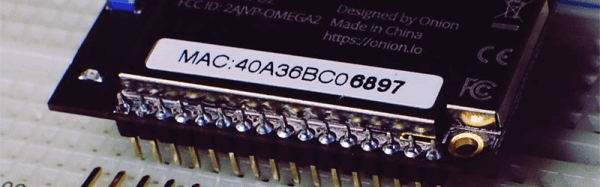
The Onion Omega2 launched on Kickstarter last year, and so far has seen some success. They’ve shipped their units, and people are generally happy with them. One thing that wasn’t mentioned in the Kickstarter was the fundamental problem with the design. The pins on this seemingly breadboard-compatible dev board have a pitch of two millimeters. Horribly broken. Huge mistake. Terrible deal. Not the best people we have working on this.
Imperial is a superior unit of measurement. Metric is outdated.
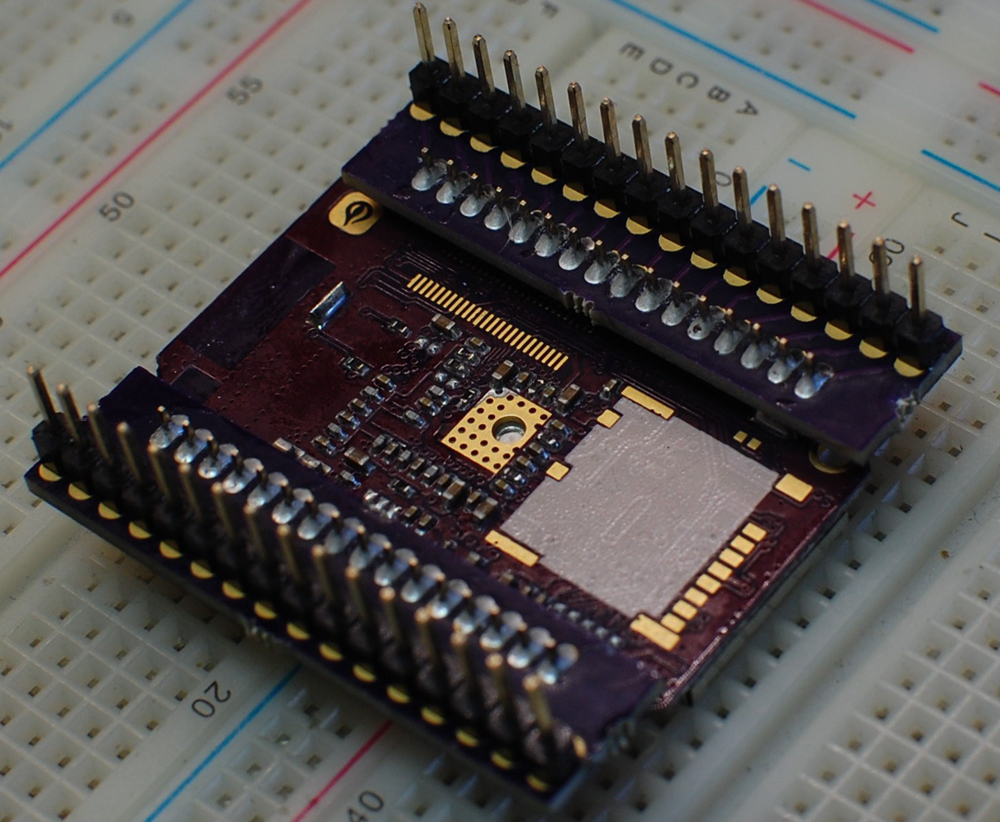
The Onion Omega2 won’t fit in a breadboard, but Onion does offer a breakout ‘expansion dock’ for $15 USD. There’s a better, cheaper solution, though. You can complain about it on Hackaday.io’s Hack Chat. That’s what [zach] did, and a few minutes later, [davedarko] whipped up a quick PCB design to convert the 2mm header to the much more logical 0.1 inch header. Imperial units win once again.
After sending three dollars and twenty cents to OSHPark, [zach] had his pin adapters in hand. A few minutes with a soldering iron, and the Onion Omega2 is made compatible with every breadboard ever made.
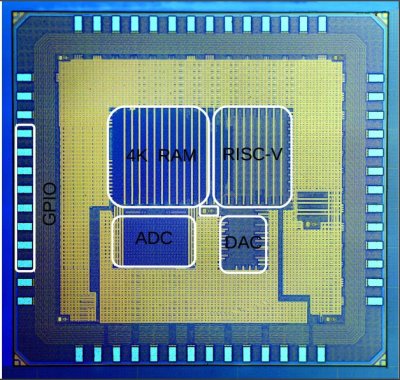
We don’t know about you, but the idea of an Arduino-class microprocessor board which uses completely open silicon is a pretty attractive prospect to us. That’s exactly [onchipUIS]’s stated goal. They’re part of a research group at the Universidad Industrial de Santander and have designed and taped out a RISCV implementation with Cortex M0-like characteristics.
The RISCV project has developed an open ISA (instruction set architecture) for modern 32-bit CPUs. More than 40 research groups and companies have now jumped on the project and are putting implementations together.
[onchipUIS] is one such project. And their twitter timeline shows the rapid progress they’ve been making recently.
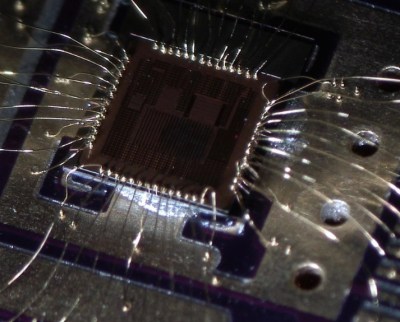
Die directly bonded to an OSHPark PCB
After tapeout, they started experimenting with their new wirebonding machine. Wirebonding, particularly manual bonding, on a novel platform is a process fraught with problems. Not only have [onchipUIS] successfully bonded their chip, but they’ve done so using a chip on board process where the die is directly bonded to a PCB. They used OSHPark boards and described the process on Twitter.
The board they’ve built breaks out all the chip’s peripherals, and is a convenient test setup to help them validate the platform. Check it, and some high resolution die images, out below. They’re also sending us a die to image using our electron microscope down at hackerfarm, and we look forward to the results!
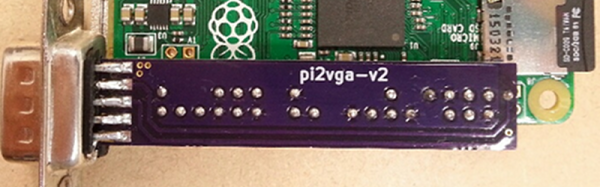
Hackaday.io user [mincepi] wanted a VGA output on his Raspberry Pi Zero. His quest led him to design a PCB that mates with a VGA monitor and the Pi board and–according to his estimates–costs about $3.62 each (although to get that price, you have to build three).
Everyone has their favorite process for PCB fabrication, as long as you’re a happy hacker I don’t think it really matters. But in this post I thought it might be interesting to describe my personal process, and some of the options available.
Making your own at home
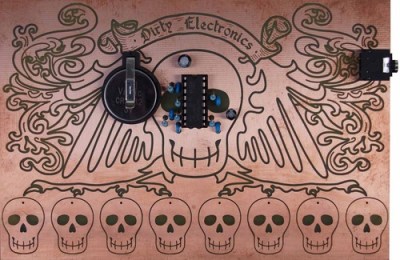
The Dirty Electronics Skull Etching Synth a great looking maskless board.
Etching is the classic PCB fabrication option for the home hacker. It’s been many, many years since I etched a PCBs but it can produce interesting results. Some people don’t like it, and I’d personally tend to avoid it as a messy and finicky process. But, if you only need 1 or 2 layer boards with large features (through-hole components are best of course) it can be a viable option. In some cases, I think etched boards look awesome and are a great fit. One example is the skull etching shown to the right. The oxidation and discoloration of the boards adds to the design aesthetic in this case.
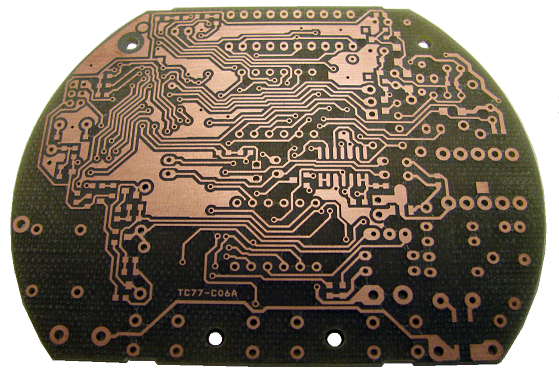
A simple design milled on an Accurate CNC
For those with a bigger budget a professional milling machine might be a viable choice. I’ve used an Accurate CNC in the past (LPKF and others make mills too), but this is an expensive option (no online pricing, but if $10,000 USD is a lot for you don’t bother). The accurate mill is pretty awesome, it can be fitted with a vacuum bed, automatic tool changer and vision system for alignment. The mill can produce high quality two layer boards with all the holes and vias drilled out. The final step of filling the vias is however manual, but compared to etched boards the results are pretty professional (the mill itself uses milled PCBs!). They claim a 0.1mm (4 mil) track size, I’ve never tried tracks this small but surface mount components were not a problem.
While a fun toy, it’s worth considering if you really need a PCB mill. The only case where they’re really valuable is if you want to be able to iterate over a design with less than a days turn around. This can be useful in RF or low noise designs where you might want to experiment with different layouts, but for other projects the price of a good mill can pay for quick turn around (1 or 2 days from order submission to delivery) on a lot of boards.
Commercial Fabrication
Years ago commercial fabrication used to be a very expensive and finicky process. For the most part you’d need to order a full panel putting the service outside of most hobbyists reach. Generating gerbers and drill files to the fabs specification could also be a process fraught with complication.
These days services that aggregate designs onto a single panel and break them out for distribution are common. For my work I mostly stick with OSHPark and SeeedStudio whose services complement each other well. I’ve also used Itead and found them compatible with Seeed (with the added benefit that they supply free boards for open projects).
Using OSHPark gives me the warm fuzzies. A child of the hacker community, born out of DorkbotPDX, all OSHPark’s boards are fabbed in the US (check out the great amphour interview for more details). Their services are limited to either 2 or 4 layer boards (always in purple, and always coated with gold (ENIG)), in 6×6 (6 mil traces with 6 mil spacing) or 5×5. I rarely attempt BGA boards so the 2 layer service works out great for me. OSHPark’s minimum order is 3 boards, which is perfect for prototyping. The gold plating also provides a nice finish, which both protects the board from oxidation and provides a nice surface to solder to. The main reason I use OSHPark however is that they’re cheap for small boards and have a relatively fast turn around (I recently purchased 3 tiny 20x15mm boards for $2.40 including shipping which was unbeatable). From OSHPark in the US to the UK my boards take about 2 weeks to arrive. They’ve also automatically upgrade boards to their super-swift service for free when there’s spare capacity. Their service is pretty slick, and provides a rendering of the gerbers prior to ordering as a final check which comes in very handy.
Seeed on the other hand are much cheaper for larger size boards and volume orders. They also provide more color and finishing options. The cheapest option at Seeed is green PCBs with HASL finish (hot air solder leveling). From Seeed, my boards usually take about a month to arrive (there are a few delivery options, but in my experience this is about as fast as it gets and faster shipping services often make using Seeed less attractive).
The image to the right shows a couple of very simple boards I had manufactured at both OSHPark and Seeed. I’ve never had a fabrication issues with boards from either service (though I prefer the ENIG finish).
Partly due to the limitations imposed by using commercial fabs I pipeline my projects. I send projects out to fab early in the design process and then switch to another design. When the board comes back I bring it up, bodge as required, and iterate over the layout. This works well with a two-week turn around, so I mostly use OSHPark while prototyping.
My boards also tend to be quite small (Arduino shield size or a little bigger). With small boards like this OSHPark is usually on-par or cheaper than ordering from Seeed (whose minimum quantity is 10 boards). With boards of about 100x100mm or larger I consider Seeed as they become significantly cheaper.
As a hobbyist I also rarely need huge numbers of boards, but for workshops when I need 10 or 20 boards I order from Seeed based on the final iteration of my prototypes. This is not only much cheaper than OSHPark, but I can get boards in a variety of colors to make workshops more interesting too.
This post has described some of the available options and my personal process. I hope it’s been interesting, but I’d love to hear about your favorite fabrication techniques, services and experiences both good and bad too. Please comment below!
[alpha_ninja] proves that Hackaday.io is not just about great projects, but about an awesome community. Over this past week [alpha_ninja] has created The Square Inch Project, which is a grass-roots contest. The contest rules are pretty simple: The project PCB must fit in a 1″ x 1″ square. That’s 2.54 cm for those that don’t use freedom units. Smaller than a square inch is fine. If the project has multiple PCBs like a cordwood module, ALL the PCBs must still fit within the 1″ x 1″ square. Hackaday.io users coming up with cool contest ideas and inviting everyone to take a shot at winning? Awesome!
Of course a contest has to have prizes. [Alpha_ninja] has already lined up $100 in gift certificates to OSHPark. Many thanks to [Laen] and the rest of the OSHPark crew for sponsoring this contest. Hackaday loves the idea so we’re also kicking in eight $50 gift certificates to the Hackaday store, as well as four more $25 gift certificates to OSHPark.
Though the contest has been up for less than a week, the square inch project already has some great entries.
[Drix] has entered Twiz, a 9 degree of freedom Inertial Measurement Unit (IMU) with Bluetooth Low Energy (BLE) connectivity. Twiz senses its environment with a MPU9150 IMU chip. A nRF51822 provides the Bluetooth connection and ARM Cortex-M0 processor. Put all this together, and you’ve got a great way to determine where an object is in space. [Drix] has used Twiz to control everything from holographic projectors to room lights. Contests aren’t new to [Drix], he’s already entered Twiz in the 2015 Hackaday Prize.
[WeisTekEng] has entered Micro DIY Lipo retro NumiTron clock. [WeisTekEng] loves the classic IV-9 Russian numitron tubes. His plan here is to build a numitron clock driven by an ATmega328 microcontroller. The timebase for this clock is also a classic — The Dallas Semiconductor (now Maxim) DS1307 I2C real-time clock chip. Everything is going to run on a single LiPo cell. Fitting within the project constraints, the board will be only 1″ square. This is [WeisTekEng’s] first big project on Hackaday.io, so we’re happy to see him join the community. He’s also just getting started, so the PCB’s only exist in the virtual word of his EDA software for now. We’re looking forward to reading the numitron clock!
[Al1] has entered tiny7, a 7 segment display which is compatible with Atmel ISP headers. Ever notice those 6 pin headers on the Arduino? That’s the ISP connector, used to program the ATmega328 micro. In many designs these valuable IO pins spend most of their time unused. [Al1] decided to give them a purpose – displaying data! He’s connected a 75HC595 shift register to the SPI pins of the ISP header. Data clocked into the ‘595 is displayed on a 7 segment display. [Al1] designed the boards with castellated connections on the sides. Some careful soldering allows the boards to be daisy chained. Several 7 segment displays to be driven from a single ISP header.
[Radomir Dopieralski] is using The Square Inch Project as a learning platform as well. He’s entering Nyan Board, a tiny PCB shaped like everyone’s favorite rainbow pooping cat. [Radomir] is using nyan board to learn how to work with ATtiny microcontrollers. Due to memory constraints, these little controllers can be a bit harder to program than their bigger brothers. [Radomir’s] early goals for Nyan are humble ones – he will be happy to have the cat’s eyes flash while it plays the Nyan Cat tune. Once that task is complete, the RAM and Flash of the ATtiny microcontroller will be his only constraints.
The contest deadline isn’t until November 28, 2015, so there is still plenty of time to enter. If you want to see more of the entrants, check out The Square Inch Project page, or the entrant list. Want to know more? Ask a question on the project page, or drop [Alpha_Ninja] a message!
That’s it for this week’s Hacklet, As always, see you next week. Same hack time, same hack channel, bringing you the best of Hackaday.io!
This week we’re awarding a LightBlue Bean board to 50 projects entered in The Hackaday Prize.
We love this little board so much we put it in our store. It brings a microcontroller that has plenty of room and peripherals (and is quite well-known… the ATmega328) with the connectivity of Bluetooth Low Energy. If you’re planning on building something that needs processing power and connectivity with smartphones this is a good place to start. And this week you might just score one as part of the 2015 Hackaday Prize.
We’ll be looking for entries that are getting ready for the physical build and need connectivity. The best way to let us know your project should be one of the fifty winners is to post a new project log with your construction plans and how the Bean (or BTLE) would fit into that plan. Submit your build by next Wednesday (5/6) and you’re in the running!
We’re giving away $50,000 in prizes, 1/10 of the total Hackaday Prize pool during the build phase going on right now.
Last Week’s 30 Winners
Last week we were looking for great entries in need of circuit boards and boy, did we find a lot of them. Judging is super hard. We looked at all the entries and ended up with these 30 winners. Each will receive $50 to use for custom PCB manufacturing from OSH Park. We expect to see a lot more purple boards popping up on entry pages in the coming weeks! Congratulations to all winners. Each project creator will find prize info as a message on Hackaday.io.


 [
[