A Pi Calculating Pi For Pi Day

What is it about pi that we humans — at least some of us — find so endlessly fascinating? Maybe that’s just it — it’s endless, an eternal march of digits that tempts us with the thought that if we just calculate one more digit, something interesting will happen. Spoiler alert: it never does.

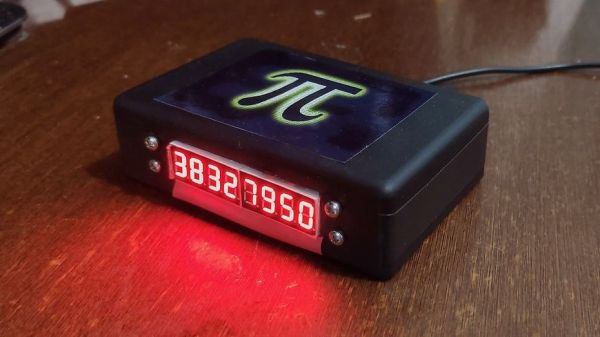
That doesn’t stop people from trying, of course, especially when “Pi Day” rolls around on March 14 every day  — with apologies to the DD/MM set, of course. This year, [Cristiano Monteiro] commemorated the day with this Pi-based eternal pi calculator. The heart of the build is a Raspberry Pi Pico board, which does double duty thanks to its two cores. One core is devoted to running the pi calculation routine, while the other takes care of updating the seven-segment LED display with the last eight calculated digits. Since the calculation takes increasingly more time the farther into pi it gets, [Cristiano] thoughtfully included a 1-Hz heartbeat indicator, to assure users that the display isn’t frozen; the video below shows how slow the display gets even just a few seconds after starting up, so it’s a welcome addition.

This is actually [Cristiano]’s second go at a Pi Day pi calculator; last year’s effort was a decidedly tactical breadboard build, and only supported a four-digit display. We applaud the upgrades, and if anyone wants to replicate the build, [Cristiano] has posted his code.

Continue reading “A Pi Calculating Pi For Pi Day”

Mice Play In VR

Virtual Reality always seemed like a technology just out of reach, much like nuclear fusion, the flying car, or Linux on the desktop. It seems to be gaining steam in the last five years or so, though, with successful video games from a number of companies as well as plenty of other virtual reality adjacent technology that seems to be picking up steam as well like augmented reality. Another sign that this technology might be here to stay is this virtual reality headset made for mice. Continue reading “Mice Play In VR”

Solar Powered Split Wireless Mechanical Keyboard

When thinking about a perfect keyboard, some of us have a veritable laundry list: split, hot-swapping, wireless, 3d printed, encoders, and a custom layout. The Aloidia keyboard by [Nguyen Vincent] has all that and more.

One of the first things to notice is a row of solar panels on the top, which trickle charge the keyboard. The keyboard uses 65uA in idle and 30uA when in a deep sleep. With the solar panels providing anywhere between 600-1200uAh a day, the battery should last a year and a half under even harsh conditions. The encoders were specially chosen to reduce pull-up power consumption. Given the focus on power and the lack of wires between the halves, you might wonder how the connection to the computer is handled. Does one-half handle the connection and use more power? The answer is that both talk to a dongle based around an nRF52840. This lets the keyboard halves idle most of the time and enables the dongle to handle the expensive communications to the host PC.

Instead of an e-paper screen in the top left, [Nguyen] placed a Sharp memory display. The 3D-printed case is stunning, with no visible screws on the top and tenting feet on the bottom. The two halves snap together very satisfactorily with the power of magnets (the printed palm rests also magnetically attach). Overall it is an incredibly well-thought-out keyboard with all sorts of bells and whistles.

There are project logs with detail to dig into and more videos and photos. We love a good keyboard journey like this one that went for a more ergonomic shape that meant more custom wiring.

Schematics are up on hackaday.io in the files section—video after the break.

Thanks [Shantanu] for the tip!

Continue reading “Solar Powered Split Wireless Mechanical Keyboard”

Pocket-Sized Thermal Imager

Just as the gold standard for multimeters and other instrumentation likely comes in a yellow package of some sort, there is a similar household name for thermal imaging. But, if they’re known for anything other than the highest quality thermal cameras, it’s excessively high price. There are other options around but if you want to make sure that the finished product has some sort of quality control you might want to consider building your own thermal imaging device like [Ruslan] has done here.

The pocket-sized thermal camera is built around a MLX90640 sensor from Melexis which can be obtained on its own, but can also be paired with an STM32F446 board with a USB connection in order to easily connect it to a computer. For that, [Ruslan] paired it with an ESP32 board with a companion screen, so that the entire package could be assembled together with a battery and still maintain its sleek shape. The data coming from the thermal imagining sensor does need some post-processing in order to display useful images, but this is well within the capabilities of the STM32 and ESP32.

With an operating time on battery of over eight hours and a weight under 100 grams, this could be just the thing for someone looking for a thermal camera who doesn’t want to give up an arm and a leg to one of the industry giants. If you’re looking for something even simpler, we’ve seen a thermal camera based on a Raspberry Pi that delivers its images over the network instead of on its own screen.

Cheap Camera Gives Clay-Pigeon’s-Eye View Of Trap Shooting

Speaking from experience, it’s always fun to build something with the specific intention of destroying it. Childhood sessions spending hours building boats from scrap wood only to take them to a nearby creek to bombard them with rocks — we disrespectfully called this game “Pearl Harbor” — confirms this. As does the slightly more grown-up pursuit of building this one-time-use clay pigeon camera.

The backstory on this build, which dates all the way back to 2017, is that [Thomas] was invited to a birthday bash at the local shooting range for a round of trap shooting. For the uninitiated, trap is a sport that involves launching a clay disc (known as a pigeon) into the air as a moving target and shooting it down with a shotgun. It’s a lot of fun, but [Thomas] was looking for a way to make it even more fun.

After toying with the idea of buying a cheap drone for aerial target practice, he settled on the idea of making a clay pigeon camera. After procuring a cheap keychain camera, he designed a simple wind vane mount for the camera, to keep it pointed in one direction rather than spinning with the pigeon. The wind vane was 3D printed and attached to the pigeon with a skate bearing, and the rig was ready for the range. The snuff film below tells the whole tale; the camera performed admirably and the wind vane did a good job of steadying the camera for all of about five seconds, until the inevitable and dramatic demise of the pigeon.

Watching this makes us feel like we need more projects designed for intentional destruction. Safety first, of course, but we’d be keen to see what everyone comes up with.

Continue reading “Cheap Camera Gives Clay-Pigeon’s-Eye View Of Trap Shooting”

Hackaday Berlin: The Badge, Workshops, And Lightning Talks

Hackaday Berlin is just under two weeks away, and we’ve got news times three! If you don’t already have tickets, there are still a few left, so grab them while they’re hot. We’ll be rolling out the final full schedule soon, but definitely plan on attending a pre-party Friday night the 24th, followed by a solid 14-hour day of hacking, talks, and music on Saturday the 25th, and then a mellow Bring-a-Hack brunch with impromptu demos, workshops, and whatever else on Sunday from 10:30 until 14:00.

The Badge Round Two

Many Europeans weren’t able to make the flight to Supercon, so here’s your chance to get hands on Voja Antonic’s superb down-to-the-metal computer trainer-slash-retrocomputer on this side of the Atlantic. It’s been re-skinned for Berlin, with a couple hardware tweaks because nobody can leave a board revision alone, but it’s 100% compatible with the badge that took Supercon 2022 by storm.

If you want to read more about it, you should. We loved it, and so did the crowd. One of the coolest badge hardware hacks was a “punchcard” reader, but there was also a lot of work on the software side as well, and we got pull requests for most of the cool demos. If you’re coming, and if you’d like to start your badge hacking a bit early, you could start your research now.

We’ll have a Badge Hacking Ceremony Saturday night, so you can show off whatever you made. It’s lots of fun. Continue reading “Hackaday Berlin: The Badge, Workshops, And Lightning Talks”

Mechanical Keyboard As Travel Saxophone

Those who play larger musical instruments, things like drums, piano, harp, tuba, upright bass, or Zeusaphone, know well the challenges of simply transporting their chosen instrument to band practice, a symphony hall, or local watering hole. Even those playing more manageably-sized instruments may have similar troubles at some point especially when traveling where luggage space is at a premium like on an airplane. That’s why [jcard0na] built this electronic saxophone, designed to be as small as possible.

Known as the “haxophone”, the musical instrument eschews the vibrating column of air typical of woodwind instruments in favor of an electronic substitute. Based around the Raspberry Pi, the device consists of a custom HAT with a number of mechanical keyboard switches arrayed in a way close enough to the layout of a standard saxophone that saxophonists will be able to intuitively and easily play. Two pieces of software run on the Pi to replicate the musical instrument, one that detects the player’s breaths and key presses, and another that synthesizes this information into sound.

While [jcard0na] notes that this will never replicate the depth and feel of a real instrument, it does accomplish its design goal of being much more easily transportable than all but the most soprano of true saxophones. As a musical project it’s an excellent example of good design as well, much like this set of electronic drums with a similar design goal of portability.