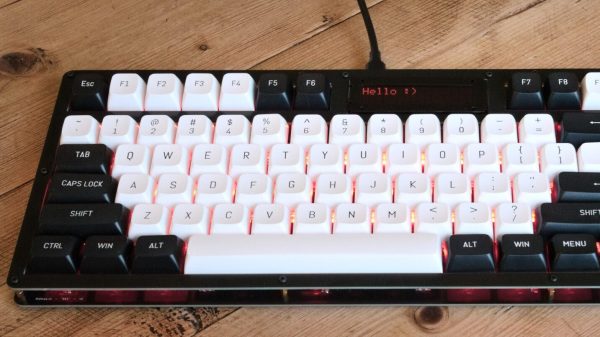
You might think [Thomas] would have started with a basic, barebones design, but he didn’t shy away from including some neat features. His keyboard has a “tenkeyless” layout, and uses Cherry MX-style switches, as has become the norm in the mechanical keyboard world. It has a 16×2 LCD display for user feedback, a rotary encoder, and it even has an RGB backlight for every key thanks to SK6812 addressable LEDs. Running the show is a Raspberry Pi Pico, equipped with the KMK firmware. The board actually uses twin PCBs as the enclosure, which is a nifty trick.
It’s remarkably fully featured for a first time build.
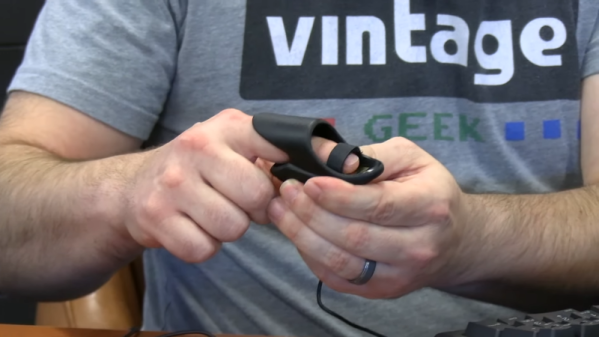
[Vintage Geek] found an interesting device from 1996 called “MindDrive” which claims you can control your computer with your brain. Oddly, though, it doesn’t connect to your head. Instead, it has a little finger sensor that looks like a pulse-ox sensor. Did it work? The video below will show you what it can and can’t do.
The company claims the device is the result of seven years of research. We suspect it is little more than a galvanometer, like a kid’s toy lie detector. There is a gold sensor and a Velcro strap. It is hard to imagine that it was feasible that “thinking left” would cause a change in your finger that the device can interpret.
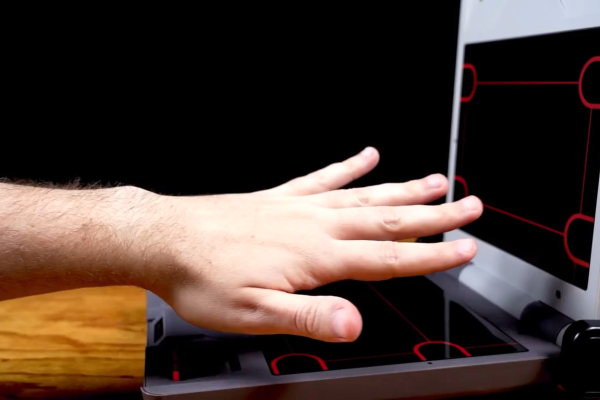
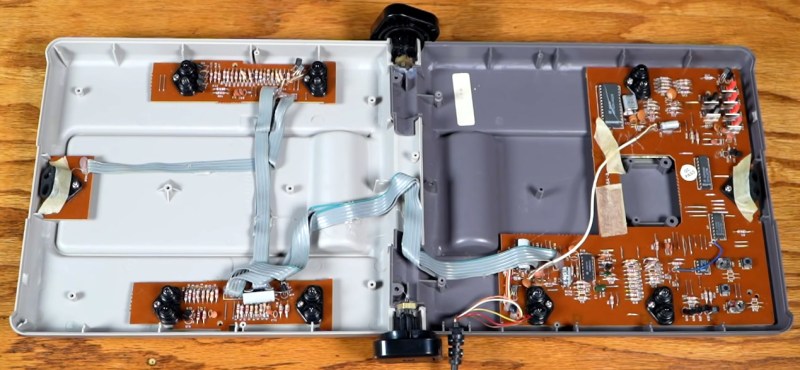
The device itself folded up like a laptop, and on the two surfaces had four IR LED/sensor pairs. All of these combined would localize your fist in space for playing Mike Tyson’s Punch Out, or would work with various other passive controller add-ons like a flight yoke for playing Top Gun. (One of the coolest bits is the flip-out IR reflectors triggered by the buttons in the yoke.)
All-in-all, the video’s take is that a number of factors doomed the U-Force to play second fiddle to the Power Glove. Battling Mattel’s marketing prowess is obvious, but other things like manufacturing problems due to bad hinges and inconsistent IR sensors delayed release and added cost. In the end, though, [Dave Capper], the U-Force’s inventor, puts it down simply to non-convincing gameplay. There were no blockbuster games that used it to its full potential.
We think there’s interesting hacker potential in a simple interface like this. Perhaps its biggest Achilles heel outside of the lack of a killer application was the fact that it required calibration. We can imagine all sorts of awesome interactions, and we’re not afraid of a little tweaking. Or maybe we would update the sensors to something more modern, like those inexpensive time-of-flight distance units.
Thanks [Karl Koscher] for bringing this documentary to our attention in the comments about the very similarly interesting laser theremin project we featured last year. It’s definitely opened our eyes to an old interaction of the past that would seem no less magical today.
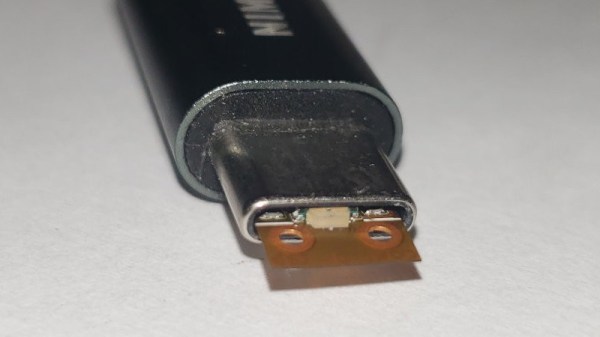
USB connectors have lent themselves to creative interpretations of their mechanical specifications ever since the first experimenter made a PCB fit into a USB-A socket. The USB-C standard with its smaller connector has so far mostly escaped this trend, though this might be about to change thanks to the work of [Sam Ettinger]. His own description of his USB-C connector using a flexible PCB and a BGA-packaged ATTiny84A microcontroller is “cursed”, but we can’t decide whether or not it should also be called “genius”.
Key to this inspired piece of connector fabrication is the realization that the thickness of BGA and flex PCB together comes to the required 0.7 mm. The BGA provides the necessary stiffness, and though it’s a one-sided connector it fits the space perfectly. There are several demo boards as proofs-of-concept, and the whole lot can be found in a GitHub repository.
We can see this technique finding a use in all kinds of diminutive USB-C projects, however cursed or genius it may be. We like to see projects that push the edges of what can be done with the medium, with a nod to a previous cursed USB-C device.
Gaming on a PC is obviously superior and you would be a fool to argue otherwise. The keyboard and mouse is the obviously superior input device, but there are times when you just want to play games on a couch. [Gabriel] has an interesting solution to this input problem in the second version of his KeyBall Controller. It’s a controller, but it leverages the superior layout and precision of the keyboard and mouse combo, without making any compromises.
[Gabriel]’s KeyBall Controller began its life as several generic console controllers. The main body of is mostly a clone of the original Xbox S controller. Inside, there are parts from a clone SNES controller, a PSX controller, a generic USB trackball, and an iPazzPort USB handheld keyboard.
The construction of the KeyBall follows in the tradition of the best case modders we’ve ever seen: cutting plastic, gluing plastic, applying epoxy putty, and lots of sanding. The electronics for the controller also follow in the most hallowed traditions of case modders: perfboard, hot glue, and many fine strands of wire. Inside the controller is a USB hub to connect all the different USB devices.
It’s a great device that finally solves the problem of putting a traditional keyboard and mouse layout in the palms of your hands.
The article Home Computers Behind the Iron Curtain sparked a lot of interest, which made me very happy. Therefore, I decided to introduce more computer curiosities from the Iron Curtain period, especially from the former Czechoslovakia (CSSR).
As I mentioned in the previous article, the lack of spare parts, literature and technology in Czechoslovakia forced geeks to solve it themselves: by improvisation and what we would today call “hacking.” Hobbyist projects of one person or a small party was eventually taken over by a state-owned enterprise, which then began to manufacture and deliver to stores with some minor modifications. These projects most often involved a variety of peripherals that could only be found in the Czechoslovakia with great difficulty.
Much like the production of components, the production of peripherals was also distributed throughout the eastern block so that each country was specializing in certain types of peripherals. For example, East Germany produced matrix printers, and Bulgaria made floppy disks drives. This meant industrial enterprises had to wait for vital computer parts, because the production in another country was not sufficient to cover even the local requirements, let alone the home user.
Want a back-lit keyboard? Make one yourself. Though you may not want to after seeing this build by [prodigydoo], who devoted 40 hours to upgrade his mechanical keyboard with a smattering of shiny.
No eye rolling just yet, though, because [prodigydoo’s] work is a monument to meticulous craftsmanship and dedication. So what if he accidentally dropped the keyboard’s PCB and cracked it? He patched that up with a few wires in true hacker-problem-solving fashion and no one will ever know.
With the electronics “safely” removed, [prodigydoo] set about desoldering every single key switch, then carefully detaching and disassembling the Cherry MX Blues. He then inserted an LED into each switch’s backplate, reassembled them, mounted the keys back on the board, then added some current-limiting resistors and heat shrink to the circuit. [prodigydoo] cut a few necessary holes for a power switch, state indicator LEDs (Caps Lock, etc.) and some under-the-board lighting, then rounded off the build by hooking up a power supply capable of running all the lights.
No microcontroller? No RGBLEDs? We like it anyway, and it seems [prodigydoo] is glad he kept it simple. Go check out the gallery for gritty details, an explanation of the circuit, and more pictures than your family vacation album.