Fubarino Contest: Persistence Of Vision Clock

propellerck5

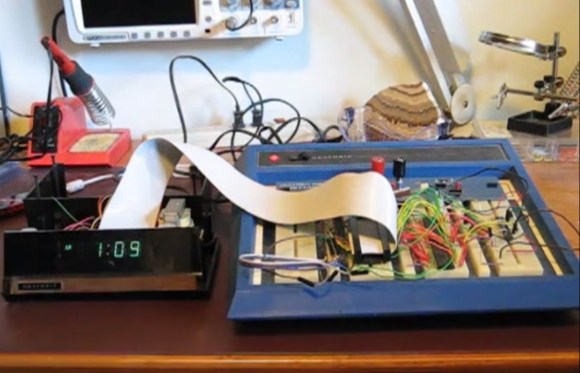
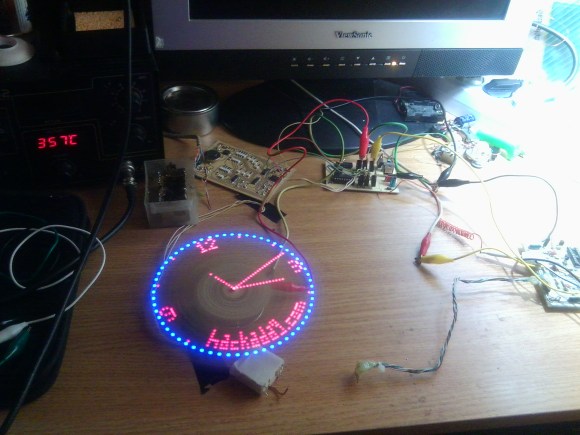
The best part of these contests is that we get people to actually show off what they’ve been working on! Check out the POV clock which was sent in by [Taciuc]. He doesn’t have a webpage for it, but he did send a video which you can see after the break.

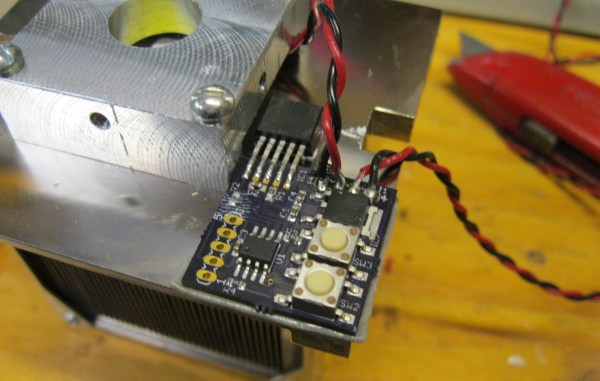
The project is a home-etched PCB with a long row or surface mount LEDs. The board is spun by a stepper motor which takes a little while to stabilize. But once it does it’s a twirling package of awesomeness. A PIC 16F628 drives the device, with a separate RTC chip to keep time. There’s also an IR receiver to facilitate user control. Our URL is displayed on the clock face itself and we think it’s always shown. But there is an easter egg in the code itself. If you try to dump the firmware from the chip you’ll see our web address in the hex output. Here’s his project archive if you want to the HEX, ASM and DipTrace schematic.


This is an entry in the Fubarino Contest for a chance at one of the 20 Fubarino SD boards which Microchip has put up as prizes!

Continue reading “Fubarino Contest: Persistence Of Vision Clock”

Scratch-built Smart Flashlight

scratch-built-smart-flashlight

This flashlight has a face; one of the many tricks which [Hobbyman] included during the development process. The smart flashlight build turned out to be a great way to practice so many different aspects of product development.

It was envisioned as a light for use when walking or biking that could do more than just light your way or flash on and off. Of course we know it’s really just a reason to spend way too much time in his lair. He started with the electronics, driven by a PIC 16F88. The 5×5 LED matrix gives him just enough to work with for patterns and rudimentary text. The prototype is wrapped up into a pretty tight package which leaves enough room in the 3D printed case for 4 AAA batteries. As the project progressed more and more features were added in. The most current offering includes a temperature sensor as well as the ability to react to ambient sound. See for yourself after the break.

Continue reading “Scratch-built Smart Flashlight”

Simple 10 Watt LED Driver Is Hot Stuff

[Peter] needed to drive a high power LED for his microscope. Rather than pick up a commercial LED driver, he built a simple constant current LED driver and fan control. We’ve featured [Peter’s] pumpkin candle LED work here on Hackaday in the past. Today he’s moving on to higher power LEDs. A 10 watt LED would be a good replacement light source for an old halogen/fiber optic ring light setup. [Peter] started with his old standby – an 8 pin Microchip PIC. In this case, a PIC12F1501. A PIC alone won’t handle a 10 watt LED, so he utilized a CAT4101 constant current LED driver from ON Semi. The PIC performs three tasks in this circuit. It handles user input from two buttons, generates a PWM signal to the LED driver, and generates a PWM signal for a cooling fan.

Control is simple: Press both buttons and the LED comes on full bright. Press the “up” button, and the LED can be stepped up from 10% to 100% in 10 steps.  The “down” button drops the LED power back down. [Peter] even had a spare pin. He’s currently using it as an LED on/off confirmation, though we’d probably use it with a 1wire temperature sensor as a backup to thermal protection built into the CAT4101. It may be overkill, but we’d also move the buttons away from that 7805 linear regulator. Being that this circuit will be used with a microscope, it may eventually be operated by touch alone. It would be a bit surprising to try to press a button and end up with a burnt fingertip!

Continue reading “Simple 10 Watt LED Driver Is Hot Stuff”

Heathkit Clock Updated With A PIC32 And GPS

heathkit-clock

One of [Bob’s] most treasured possessions is a Heathkit alarm clock he put together as a kid. Over the years he’s noticed a few problems with his clock. There isn’t a battery backup, so it resets when the power goes out. Setting the time and alarm is also a forward only affair – so stepping the clock back an hour for daylight savings time means holding down the buttons while the clock scrolls through 23 hours. [Bob] decided to modify his clock with a few modern parts. While the easiest method may have been to gut the clock, that wouldn’t preserve all those classic Heathkit parts. What [Bob] did in essence is to add a PIC32 co-processor to the system.

Like many clocks in the 70’s and 80’s, the Heathkit alarm clock was based upon the National Semiconductor MM5316 Digital Alarm Clock chip. The MM5316 operates at 8 – 22 volts, so it couldn’t directly interface with the 3.3V (5V tolerant)  PIC32 I/O pins. On PIC’s the input side, [Bob] used a couple of analog multiplexer chips. The PIC can scan the individual elements of the clock’s display. On the PIC’s output side, he used a couple of analog switches to control the ‘Fast’, ‘Slow’, and ‘Display Alarm/Time’ buttons.

Continue reading “Heathkit Clock Updated With A PIC32 And GPS”

Running Custom Code On Cheap One-time Password Tokens

One-time passwords (OTP) are often used in America but not so much in Europe. For our unfamiliar readers, OTP tokens like the one shown above generate passwords that are only valid for one login session or transaction, making them invulnerable to replay attacks. [Dmitry] disassembled one eToken (Aladin PASS) he had lying around and managed to reprogram it for his own needs.

Obviously, these kind of devices don’t come with their schematics and layout files so [Dmitry] had to do some reverse engineering. He discovered six holes in a 3×2 arrangement on the PCB so he figured that they must be used to reprogram the device. However, [Dmitry] also had to find which microcontroller was present on the board as its only marking were “HA4450” with a Microchip logo. By cross-referencing the number of pins, package and peripherals on Microchip parametric search tool he deduced it was a PIC16F913. From there, it was just a matter of time until he could display what he wanted on the LCD.

We love seeing tiny consumer hardware hacked like this. Most recently we’ve been enthralled by the Trandscend Wi-Fi SD card hacking which was also one of [Dmitry’s] hacks.

Hackaday Links: September 8, 2013

hackaday-links-chain

“I’m sorry Dave, I’m afraid I can’t open the dorm room door.” Does your dorm room have a peephole? Take [pjensen’s] lead and turn it into a mini HAL 9000 using a red LED.

Mix a little work in with your hobby skills. [Vittore] needed to build a video looper to drive some TV screens for a Hotel contract job. He grabbed a Raspberry Pi and got to work. The final product (translated) even uses a shared folder on the hotel’s network as the source slides.

We’re not sure if anyone noticed last Monday (it was Labor Day in the U.S.).  We had a little fun with coffee themed posts. [Tom] wrote in to remind us about the HTCPCP: Hyper Text Coffee Pot Control Protocol. If you don’t have time to read it all, he suggests you don’t miss his favorite, error code 418.

Maybe funny reading isn’t your thing right now, but we have some more helpful stuff to offer. Check out [John Chandler’s] Commandments for using PIC microcontrollers from a few years back.

[Andy] has some old smart phones which he is using in his projects. His beef with the touchscreens is that there’s no tactile feedback. Since these are going to be dedicated displays he’s outlining the touch controls with tape to let your finger know what it’s doing.

If you’re living in your first home in America there’s a really good chance it’s a 1950’s ranch house considering how many of them were built after World War II. Bring its infrastructure into the information age with a cable retrofit. [Andrew Rossignol] just did so and posted a lot of pictures of the process.

If you liked [Ken Shirriff’s] post about the Sinclair Scientific Calculator we think you’ll love his continuation of a Z80 reverse engineering series.

Hackaday Links: August 18, 2013

hackaday-links-chain

Let’s start off with some lock picking. Can you be prosecuted if it was your bird that broke into something? Here’s video of a Cockatoo breaking into a puzzle box as part of an Oxford University study. [Thanks Ferdinand via Endandit]

[Augybendogy] needed a vacuum pump. He headed off to his local TechShop and machined a fitting for his air compressor. It uses the Venturi Effect to generate a vacuum.

Build your own Arduino cluster using this shield designed by [Bertus Kruger]. Each shield has its own ATmega328. Many can be stacked on top of an Arduino board, using I2C for communications.

[Bunnie Huang] has been publishing articles a few articles on Medium called “Exit Reviews”. As a treasured piece of personal electronics is retired he pulls it apart to see what kind of abuse it stood up to over its life. We found his recent article on his Galaxy S II quite interesting. There’s chips in the glass, scuffs on the bezel, cracks on the case, and pervasive gunk on the internals.

We’d love to see how this this paper airplane folder and launcher is put together. If you know of a post that shares more details please let us know.

Squeezing the most out of a tiny microcontroller was a challenge. But [Jacques] reports that he managed to get a PIC 10F322 to play a game of Pong (translated). It even generates an NTSC composite video signal! Watch the demo video here.