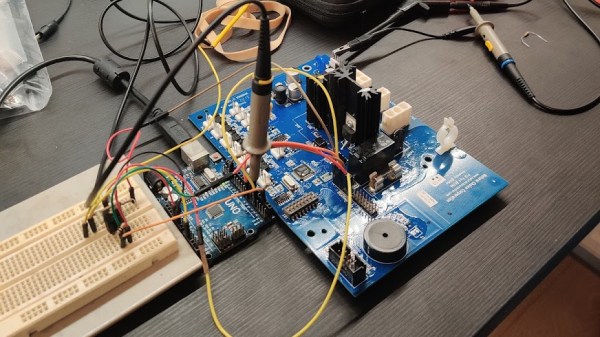
An image showing a water cooler PCB on the desk, with probes and jumper wires connected to it.

Taking Water Cooler UX Into Your Own Hands With Ghidra

Readers not aware of what Ghidra is might imagine some kind of aftermarket water cooler firmware or mainboard – a usual hacker practice with reflow ovens. What [Robbe Derks] did is no less impressive and inspiring:  A water cooler firmware mod that adds hands-free water dispensing, without requiring any hardware mods or writing an alternative firmware from scratch.

Having disassembled the cooler, [Robbe] found a PIC18F6527 on the mainboard, and surprisingly, it didn’t have firmware readback protection. Even lack of a PICkit didn’t stop him – he just used an Arduino to dump the firmware, with the dumper code shared for us to reuse, and the resulting dumps available in the same repository.

From there, he involved Ghidra to disassemble the code, while documenting the process in a way we can all learn from, and showing off the nifty tricks Ghidra has up its sleeves. Careful planning had to be done to decide which functions to hook and when, where to locate all the extra logic so that there’s no undesirable interference between it and the main firmware, and an extra step taken to decompile the freshly-patched binary to verify that it looks workable before actually flashing the cooler with it.

The end result is a water cooler that works exactly as it ought to have worked, perhaps, if the people defining its user interaction principles were allowed to make it complex enough. We could argue whether this should have been a stock function at all, but either way, it is nice to know that we the hackers still have some of the power to make our appliances friendly — even when they don’t come with an OS. Certainly, every single one of us can think of an appliance long overdue for a usability boost like this. What are your examples?

We’ve covered quite a few Ghidra-involving hacks, but it never feels like we’ve had enough. What about patching an air quality meter to use Fahrenheit? Or another highly educational write-up on cracking GBA games? Perhaps, liberating a Linux-powered 4G router to reconfigure it beyond vendor-defined boundaries? If you have your own goal in mind and are looking to start your firmware reverse-engineering journey, we can say with certainty that you can’t go wrong with our HackadayU course on Ghidra.

PIC Powered PicoBat Picks Up Pulsed Power

In 2012, [Bruno] wanted to detect some bats. Detect bats? Some varieties of bat (primarily the descriptively named “microbats”) locate themselves and their prey in space using echolocation, the same way your first robot probably did. The bat emits chirps from their adorably tiny larynx the same way a human uses its vocal cords to produce sound. The bat then listens for an echo of that sound and can make inferences about the location of its presumed prey in the volume around it. Bat detectors are devices which can detect these ultrasonic sounds and shift them into a range that humans can hear. So how would you build such a device? [Bruno]’s PicoBat probably sets the record for component count and code simplicity.

With no domain expertise the most conspicuous way to build a bat detector is probably to combine the glut of high performance microcontrollers with a similarly high performing analog to digital converter. With a little signal processing knowledge you sample the sounds at their native frequency, run them through a Fast Fourier transform, and look for energy in the ultrasonic frequency range, maybe about 20 kHz to 100 kHz, according to Wikipedia. With more knowledge about signal interference it turns out there are a surprisingly large number of ways to build such a device, including some which are purely analog. (Seriously, check out the Wikipedia page for the myriad ways this can be done.)

[Bruno] did use a microcontroller to build his bat detector, but not in the way we’d have expected. Instead of using a beastly high performance A/D and a similarly burly microcontroller, the PicoBat has a relatively tame PIC12 and a standard ultrasonic transducer, as well as a piezo buzzer for output. Along with a power rail, that’s the entire circuit. The code he’s running is similarly spartan. It configures a pair of GPIOs and toggles them, with no other logic. That’s it.

So how does this work? The ultrasonic transducer is designed mechanically to only receive sounds in the desired frequency range. Being piezoelectric, when enough sound pressure is applied the stress causes a small voltage. That voltage is fed into the PIC not as a GPIO but as a clock input. So the CPU only executes an instruction when ultrasonic sound with enough intensity hits the transducer. And the GPIO toggling routine takes four clock cycles to execute, yielding a 1:4 clock divider. And when the GPIOs toggle they flip the potential across the buzzer, causing it to make human-audible sound. Brilliant!

Check out [Bruno]’s video demo after the break to get a sense for how the device works. You might be able to do this same trick with other components, but we’re willing to be that you won’t beat the parts count.

Continue reading “PIC Powered PicoBat Picks Up Pulsed Power”

Morse Code Blinking Jewelry

With the size of electronic parts and batteries these days, very small items are obviously becoming more and more viable. [Yann Guidon] has made some awesome pieces of LED jewelry using a minimal number of surface mount parts and a small lithium-ion battery. To make the jewelry stand out a bit, other than just blinking on and off, these LEDs blink a short message in Morse code.

This is an update and open sourcing of some work that [Yann] did a few years ago, and the iterations have resulted in a smaller design. But the main part of the latest version is the addition of the Morse code blinking using a small microcontroller. The microcontroller [Yann] used is the SMD version of the PIC10F200, a small, 8 pin PIC microcontroller. This, a resistor and a metal clip are soldered to pads on a Luxeon Star LED.  The LEDs are undervolted so they’re not too bright, so the heat sink isn’t really needed, but it’s a good size for the components. Because the LEDs don’t generation much heat, the back of the aluminum frame that the LED is on is carved out a bit so that the small lithium-ion battery can go there.

The final component is the code itself, and [Yann] has released it as an assembly file. An associated text file contains the text of the message that you want the earrings to blink. The text file can contain up to 190 bytes. A shell script converts the text to a file that can be included in the asm file. After that script is run, assemble the code and flash it to the PIC and you’re done!

We’ve seen a couple of other LED jewelry projects done, including this LED engagement ring, and these tiny light-up earrings. You can see video of [Yann]’s project in the video below:
Continue reading “Morse Code Blinking Jewelry”

SIM Card Connectors And White PCBs Make Huge LED Snowflakes Happen

[Mike Harrison] talked about designing and building a huge scale LED lighting installation in which PCBs were used as both electrical and mechanical elements, and presented at Electromagnetic Field 2016. The project involved 84,000 RGBW LEDs, 14,000 microcontrollers and 25,000 PCBs. It had some different problems to solve compared to small jobs, but [Mike] shared techniques that could be equally applied to smaller scale projects or applications. He goes into detail on designing for manufacture and assembly, sourcing the parts, and building the units on-site.

The installation itself was a snowflake display for a high-end shopping mall in Hong Kong in the 2015 Christmas season. [Mike] wanted a small number of modular boards that could be connected together on-site to make up the right shapes. In an effort to minimize the kinds of manufacturing and parts needed, he ended up using modular white PCBs as structural elements as well as electrical. With the exception of some minor hardware like steel wire supports, no part of the huge snowflakes required anything outside of usual PCB manufacturing processes to make. The fewer suppliers, the fewer potential problems. [Mike] goes into design detail at 6:28 in the video.

For the connections between the boards, he ended up using SIM card connectors intended for cell phones. Some testing led to choosing a connector that matched up well with the thickness of a 1.6mm PCB used as a spacer. About 28,000 of them were used, and for a while in 2015 it was very hard to get a hold of that particular part, because they had cleaned everyone out! Continue reading “SIM Card Connectors And White PCBs Make Huge LED Snowflakes Happen”

Build Your Own Retrocomputer With Modern Chips

If you’ve ever wanted to get started in retrocomputing, or maybe the Commodore 64 you’ve been using since the 80s just gave up the ghost, [Rick] aka [Mindrobots] has just the thing for you: a retrocomputer based on a PIC microcontroller and a Parallax Propeller.

The two chips at the heart of the computer are both open source. The Propeller is the perfect board to take care of the I/O, video, and audio outputs because it was purpose-built to be a multitasking machine. The microcontroller is either a PIC32MX150 or a PIC32MX170 and is loaded with a BASIC interpreter, 19 I/O pins, a full-screen editor, and a number of communications protocols. In short, everything you would ever want out of a retro-style minicomputer.

The whole computer can be assembled on a PCB with all the outputs you can imagine (VGA, PS/2, etc) and, once complete, can be programmed to run any program imaginable including games. And, of course, it can act as a link to any physical devices with all of its I/O because its heart is a microcontroller.

Retrocomputing is quite an active arena for hackers, with some being made from FPGAs and other barebones computers being made on only three chips. It’s good to see another great computer in the lineup, especially one that uses open chips like the Propeller and the PIC.

Koch Lamp Is 3D Printed With A Twist

Koch Lamp

[repkid] didn’t set out to build a lamp, but that’s what he ended up with, and what a lamp he built. If the above-pictured shapes look familiar, it’s because you can’t visit Thingiverse without tripping over one of several designs, all based on a fractal better known as the Koch snowflake. Typically, however, these models are intended as vases, but [repkid] saw an opportunity to bring a couple of them together as a housing for his lighting fixture.

Tinkering with an old IKEA dioder wasn’t enough of a challenge, so [repkid] fired up his 3D printer and churned out three smaller Koch vases to serve as “bulbs” for the lamp. Inside, he affixed each LED strip to a laser-cut acrylic housing with clear tape. The three bulbs attach around a wooden base, which also holds a larger, central Koch print at its center. The base also contains a PICAXE 14M2 controller to run the dioder while collecting input from an attached wireless receiver. The final component is a custom control box—comprised of both 3D-printed and laser-cut parts—to provide a 3-dial remote. A simple spin communicates the red, green, and blue values through another PICAXE controller to the transmitter. Swing by his site for a detailed build log and an assortment of progress pictures.


Open Your Hackerspace Door With A Phone Call

elabHackerspaceDoor

[Mário] sent us a tip detailing the access control system he and his friends built for the eLab Hackerspace in Faro, Portugal. The space is located in the University of Algarve’s Institute of Engineering, which meant the group couldn’t exactly bore some holes through campus property and needed a clever solution to provide 24/7 access to members.

[Mário] quickly ruled out more advanced Bluetooth or NFC options, because he didn’t want to leave out members who did not have a smartphone. Instead, after rummaging around in some junk boxes, the gang settled on hacking an old Siemens C55 phone to serve as a GSM modem and to receive calls from members. The incoming numbers are then compared against a list on the EEPROM of an attached PIC16F88 microcontroller, which directs a motor salvaged from a tobacco vending machine to open the push bar on the front door. They had to set up the motor to move an arm in a motion similar to that of a piston, thus providing the right leverage to both unlock and reset the bar’s position.

Check out [Mário’s] blog for more details and information on how they upload a log of callers to Google spreadsheets, and stick around for a quick video demonstration below. If you’d prefer a more step by step guide to the build, head over to the accompanying Instructables page. Just be careful if you try to reproduce this hack with the Arduino GSM shield.

Continue reading “Open Your Hackerspace Door With A Phone Call”