NESPo: Another 3D Printed Portable NES

portableNESSide2

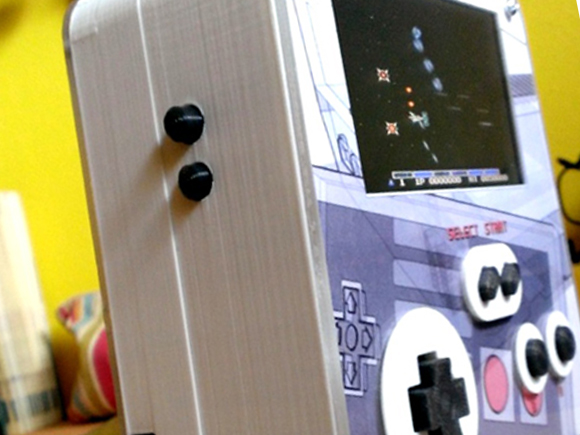
Grab your favorite cartridge and violently blow into the end, because [Dave Nunez] is sending us on a nostalgia trip with his 3D printed portable NES. He takes the typical route of chopping up a Nintendo on a chip (NOAC) retro machine rather than sacrifice a real NES, and opts for a NiMH battery over lithium (which isn’t a bad idea; they can burst into flames if you charge them incorrectly). The battery life is, however, tolerable: 2.5 to 3 hours.

All the components are packed into a custom-made 3D printed PLA enclosure, which [Dave] kindly shares on thingiverse. He also decided to 3D print each of the buttons and their bezels/housings, which he then topped off by cutting acrylic sheets that seal up the front and back. As a final touch, [Dave] slips in some custom art under the acrylic and mounts a printed LED nameplate in the corner.

We’ve seen [Dave’s] work at Hackaday before, when he built a one-size-fits-all-consoles arcade controller.

Briefcase Mill

briefcase-mill

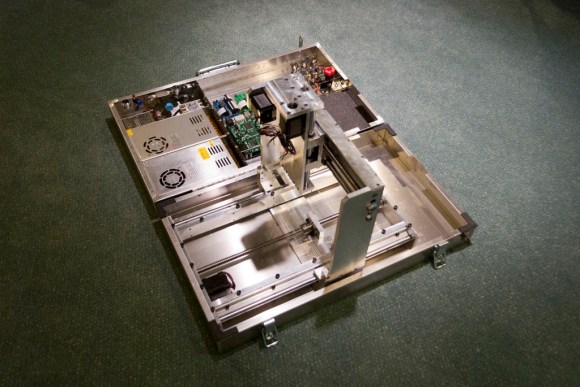
Take the machine shop with you; that’s the mantra which drove [Ryan] to build this CNC mill in a briefcase. That album will give you a taste of the final product. But you’ll want to dig through two pages of his forum thread starting with this post in order to behold the build process.

The image above is only part way through the fabrication, but we thought it gave the best overall view of his work. It’s missing the cables which connect to the control circuitry in the lid. The bed has also not been installed and this was before he fabricated the protective case for the PCBs.

Getting everything to fit inside of a folding case was quite a trick. Of course he used CAD to make sure it was possible. There are several places where the clearance when closed is about 2mm. We’re shocked by the build quality of the mill itself. It’s a novel idea to make it portable, but the accuracy and reliability of the machine didn’t suffer for the concept.

If you need a desktop mill that’s not quite as portable here’s a project which will dish out some inspiration.

Atari 2600 Has A Raspberry Pi Hiding Under The Hood

raspberry-pi-2600

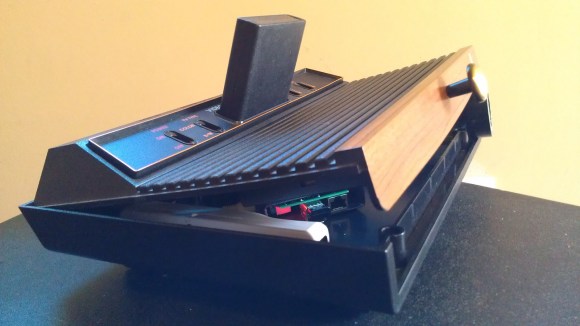
Seriously, the drawer pull on this Atari 2600 is not stock. Don’t they know this voids the warranty? The thing is, you won’t actually find any of the original internals anyway. When building this portable emulator housed in a 2600 case [Linear Nova] was careful to ensure that everything could be restored to its original condition (except for two hinges mounted on the back) sometime down the road. That’s a good goal to set for yourself. We think the build is the fun part of most projects and often wonder what to do with them when they’re done and our interest has waned.

A seven-inch LCD screen was attached to the underside of the lid using Velcro. When tilted up it’s at a nice viewing angle for the player. [Linear] prefers to use a Wii remote as the control this portable video game emulator. It connects to the Raspberry Pi over Bluetooth using a USB dongle. The advantage of this is that you just throw the remote inside the case too. For now there are two power cords, one for the RPi and the other for the LCD screen but he plans to add a power hub in the future to narrow this down to one. We wonder it that would also be a good time to add his own rechargeable battery pack option? There should be enough room for an RC style pack.


Making A Commodore 64 Portable

making-a-c64-portable

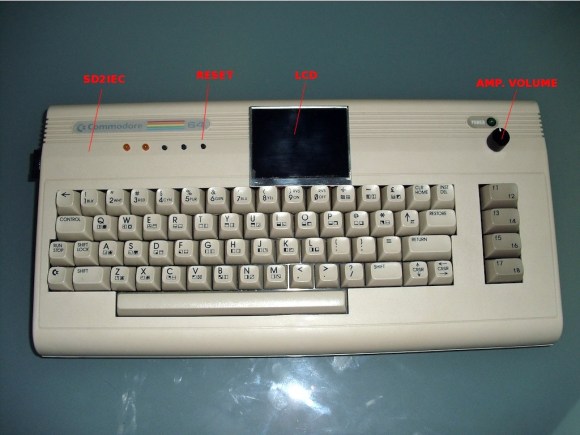
This is [Wpqrek’s] Commodore 64 modified to go on the road with him. The elderly machine has a special place in his heart as it was what he learned to code on. He performed a series of hacks which house everything necessary to use the machine inside the original case.

Obviously the hack that has the most effect when it comes to portability was swapping a display for the small LCD mounted above the number keys. This was a pretty simple process because the screen, originally intended for a rear view camera in a vehicle, already had a composite video input. To emulate the floppy disc drive he’s using an SD card via an sd2iec board which he laid out himself. Rounding up the alterations is a stereo SID. The second channel uses the pre-amp circuit cut from a second C64. This audio hardware will let him do cool things like playing some classic Zeppelin.

You can get a video tour of these alterations after the break.

Continue reading “Making A Commodore 64 Portable”

Portable Gaming Console Uses SSD1289 And Propeller

building-a-portable-video-game

[Samir] dabbles in hobby electronics and decided to put his skills to the test by building this portable gaming console (Note: this site uses an HTTPS address which cannot be used through Google Tranlator. It does work for the Chrome browser translator). The image above is a screenshot from his Breakout-style game. The paddle at the bottom is controlled with the touchscreen. You move it back and forth to keep the ball from traveling past the bottom edge (it bounces off of the red borders on the sides and top).

The main PCB is larger than the 3.2″ LCD footprint, but [Samir] made sure to include a lot of peripherals to make up for it. The board sports a Parallax Propeller chip to run the games. It interfaces with the SSD1289 screen (this is a cheap and popular choice) but that really eats up a lot of the IO pins. To control the game the touchscreen can be used as we’ve already mentioned. But there are two other options as well. There is an expansion port which uses a shift register (74HC165) to serialize the input. For prototyping this allowed [Samir] to use an Atari joystick. He also rolled a Bluetooth adapter into the project which we would love to see working with a Wii remote. Rounding out the peripherals are an SD card slot, audio jack for sound, and an RTC chip for keeping time.

There are several videos included in the post linked above. After the break we’ve embedded the game-play demo from which this screenshot was taken.

Continue reading “Portable Gaming Console Uses SSD1289 And Propeller”

A Pair Of N64 Portables

portables

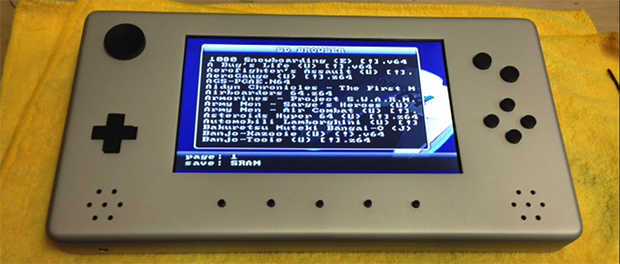
Casemodding has moved far beyond the old portabalized Ataris and NESes of only a few years ago. Now, the new hotness is more modern consoles including the GameCube, Dreamcast, and the venerable N64. Two N64 case mods rolled into our tip line over the past few days, and we can’t think of a better display of case fabrication and console modification than these two.

First up is [Travis]’s N64 handheld. The case was constructed out of a sheet of ABS plastic with Bondo used to make everything sleek and smooth. There’s a 7″ display in this handheld as well as two LiIon batteries able to provide up to three hours of play time. The fit and finish on this build is spectacular, a testament to [Travis]’ patience and Bondo skills.

Next up is a very very tiny build claiming to be the smallest N64 portable. It’s the work of [bud] and is barely larger than an N64 cartridge. Inside is a 3.5 inch screen and enough LiPos to provide about 2 hours of gaming time. Unlike other (larger) builds, [bud] put the cartridge slot on the outside of the case allowing the cartridge to stick out at a 90 degree angle.

Both very awesome builds that really show off what can be done with a lot of sanding and body filler. You can check out the videos for each casemod after the break.

Continue reading “A Pair Of N64 Portables”

Convert A Speaker To A Battery-powered Amplifying Party Box

[Matt the Gamer] loved his pair of Minimus 7 bookshelf speakers. That is until a tragic hacking accident burned out the driver and left him with a speaker-shaped paper weight. But the defunct audio hardware has been given new life as a single portable powered speaker. Now he can grab it and go, knowing that it contains everything he needs to play back audio from a phone or iPod.

The most surprising part of the build is the battery. [Matt] went with a sealed lead-acid battery. It just barely fits through the hole for the larger speaker, and provides 12V with 1.2 mAh of capacity. He uses an 18V laptop power supply when charging the battery. The PSU is just the source, his own circuit board handles the charging via an LM317 voltage regulator. Also on the board is an amplifier built around a TDA2003A chip. He added a back panel which hosts connections for the charger and the audio input. Two switches allow the speaker to be turned on and off, and select between battery mode and charging mode. As a final touch he added a power indicator LED to the front, and a drawer pull as a carrying handle.