LEDs Fade To The Music Using A Python Filter

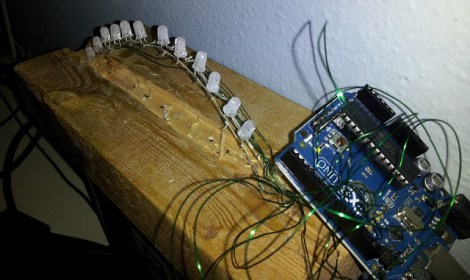
This little LED rig fades in time to music. The hardware itself is quite simple, some LEDs connected to the PWM pins of an Arduino. But the signal processing is happening on a computer using a Python script.

Many of the projects we see which pulse lights to music use the MSGEQ7 chip to perform hardware processing on the audio signal. But since [Zolmeister] is using a computer to play his tunes he took a different route. His Linux box uses PulseAudio to handle sound. This allows him to record from the audio playback which provides an internal source for the pyAudio package. His Python script saves snippets of the streaming audio to .wav files. I then normalizes the volume level and uses the amplitude to set a PWM value before deleting the sample and moving onto the next. These values are pushed to the Arduino at 115200 baud to achieve the results seen in the video after the break.

Continue reading “LEDs Fade To The Music Using A Python Filter”

Hacked Kobo Becomes A Weather Display

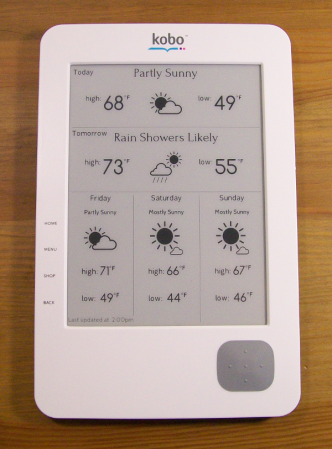
The Kobo e-reader has been hacked for a while now. It’s pretty easy to enable telnet access by modifying some files. Once [Kevin] was able to telnet into the device and draw to the display, he created the Kobo Wifi Weather Forecast. This hack was inspired by the Kindle weather display that we discussed in the past, but this version runs entirely on the Kobo.

The weather report software is written in Python using the pygame library. After loading the software package onto a Kobo, a few commands are run over telnet to set up Python and run the display. Since Python and pygame run on the Kobo, it allows for direct access to the e-ink display.

There’s a lot of possibilities for a internet connected e-ink device running custom graphics code. It’s asking to be turned into any kind of display you can imagine. What ideas do you have for a custom e-ink display? Let us know in the comments.

The Python Programming Language For Physical Hacking

We see projects here all the time that blend computing with the real world. Some people are naturally stronger on the mechanical end of things, whereas some are better with electronics or coding. All three specialities can be needed depending on your project. If your weakness lies in making a computer do your bidding, I might suggest that the Python language is a good one to learn.

I’ve been going through Learn Python the Hard Way, which is offered for free online, or you can pay for it if you so choose. I’ve published my thoughts on lessons 1-10 and 11-20 so far. As a mechanical engineer with limited (but not totally nonexistent) programming skills, it’s been an excellent experience so far.

If you’re wondering if Python is a good language to learn if you’d like to participate in [HAD] style projects, why not check out the following projects featured here:

Or just do a search of [HAD], and you’ll find many other projects for inspiration. If you’ve got a Python project to share, be sure to tell us about it in the comments!

Hackathon Results In The Facebook Book

[Jeremy Blum] and [Jason Wright] pose with their project at the end of a 24 hour hackathon. The Facebook headquarters in New York City held the event as part of their Summer of Hack program. As an homage to the hosts, the hacking duo decided to create a physical book and populate it with the virtual Facebook. And what do you call such a creation? The Face(book)^2.

The video after the break gives the best overview of the hardware, but here’s the gist of it: They started with the largest hardcover book they could find, hollowing out its pages to house their own hardware. When you open the book it calls back to a computer over an Xbee link with a request for data. The python script on the computer pulls the newest from a Facebook feed, sending it back to the book to be displayed. There is a graphic LCD and four character LCDs built in for this purpose. There’s also an accelerometer which is used for detecting page turns when the cover is jostled. The rest of the interactivity is provided by a few tactile switches mounted next to the smaller LCD screens for navigation and the ‘like’ feature.

Continue reading “Hackathon Results In The Facebook Book”

Multi-channel Analog Input Module Is A Good Jumping-off Point For Many Projects

[Scott Harden] has already produced some projects which measure analog inputs. But he’s got plans for more and wanted a base system for graphing analog signals. You can see the small board next to his laptop which offers the ability to sample up to six signals and push them to a PC via USB.

The ATmega48 and a few supporting components are all you’ll find on that board. The USB connection is taken care of by an FTDI cable. He went that route because the cables are relatively cheap, easy to come by, and already have driver support on all the major operating systems. If you look at the screen you can see a window graphing one analog input in real-time. He wrote this in Python (which is once again a cross-platform tool) and it has no problem graphing all six inputs at once.

This is immediately useful as an upgrade to [Scott’s] ECG machine. His future plans include a Pulse Oximeter, EEG, and EEG.

Using The GPIO Pins On A Raspberry Pi

In addition to being a serviceable single board computer, the Raspberry Pi also has a header full of GPIO pins at your beck and call. [Tedbot] sent in a great tutorial on using these pins with Python, Bash, and C.

The GPIO pins on the Raspi are arranged in a 2×13 header. Until Sparkfun manages to manufacture a decent Raspi protoboard, the easiest way to break these pins out is with an old IDE ribbon cable. After plugging the other end into a breadboard, [Tedbot] had an easily accessible set of Raspi pins.

To control these pins, [Tedbot] found two libraries: the first is WiringPi that implements a C-style, Arduino-like programming environment on the Raspi. The second is the RPi.GPIO Python package. Since the Raspi runs Linux, and everything in Unix is a file, [Tedbot] used a shell script to blink a LED.

One word of warning if you’re building a board to extend the capabilities of the Raspi: these pins aren’t 5 V tolerant, so you’ll need to throw in a buffer or level converter when building a Raspi circuit.

Edit: Adafruit is releasing a Pi Plate prototyping board in a few weeks. Neat, huh?

MyHDL Python Programming Option For FPGA

MyHDL is a Python module that brings FPGA programming into the Python environment. [Christopher Felton] tipped us off about a simple tutorial he just finished that gives an overview of how the module is used.

You may remember hearing about PyCPU a couple days ago which can run very simple Python code on a FPGA. There was a healthy discussion in the comments section comparing PyCPU and MyHDL. Although they may seem similar at first, the two are quite different. PyCPU creates a processor on the FPGA chip which can execute a small range of Python code. MyHDL actually implements Hardware Description Language in the Python environment. Once you’re used HDL to model your hardware choices in a Python script, it is converted to VHDL then fed to the toolchain and pushed to the chip like normal.

This is not an absolute beginner’s experience. But if you’re well-versed in Python it makes the jump to HDL a lot easier because you’ll be working with syntax that is already familiar to you.