My RepRap Is Bigger Than Yours

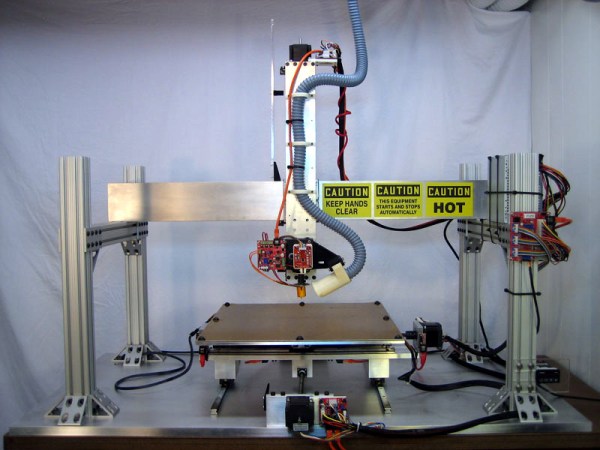
This 3D printer build is a thing of beauty. It prints in ABS plastic on quite a large base. The platform provides all of the X and Y movement, making the gantry stationary except for the Z axis. it is possible to print parts up to about 15″x15″ by 13″ high. The gray hose snaking down around the right side of the print head is a fume extractor, keeping the air clear around the PID controlled head, and heated base. Judging from the example items this prints with fantastic accuracy.

[via Make]

The Twelve Days Of… Self-replicating

Okay, it’s more like the 23 days but who’s counting? [Kliment] is giving the gift of self-replication this holiday season by uploading one new printable part a day. If you follow along and print each one you’ll have a Prusa Mendel by Christmas (this started on 12/2 so you’ll need to catch up). The Prusa is a variation on the Mendel that uses bushings wherever possible, reducing the need for bearings down to just two.

So yeah, you need to have access to a 3D printer in order to make the parts for this 3D printer, but that’s how it always works. [Kliment] has gone the distance to make this little exercise enjoyable. The parts that take longer to print are reserved for the weekends, some have been altered to include a holiday theme, and all of them have been optimized to fit on a Makerbot build platform.

[Thanks Christopher]

3D Printing With LEGO

With 2400 LEGO bricks and a lot of patience, [Will Gorman] built a LEGO 3D printer. It’s similar to a RepRap or a Makerbot, but instead of extruding plastic, it uses pre-extruded building blocks (aka LEGO bricks).  The grey wall extending far above the unit itself is a feed magazine which holds the raw material. A Java application takes an MLCad file and translates it into building instructions for the printer. Those instructions are then sent to the device via USB. See it happen after the break.

Now this just needs to be combined with the LEGO sorting machine for an inexhaustible supply of bricks.

Continue reading “3D Printing With LEGO”

DIY Print Head Experiments

Inkjet printheads are a pretty rare thing to see done in home workshops. We would love to see more and got really excited when we saw this single nozzle, drop on demand, head being built. using a piezo disk intended to be a cheap buzzer and some reprap magic, [Johnrpm] got some results. [Madscifi] has been refining the design of the nozzle and the two have shared the process with us. Since it drops a single droplet of liquid, it can be used in a variety of manners, such as dropping plain old boring ink, or dropping a solvent into a powder for some 3d printing. You can see an example of the 3d printing in sugar above.


[via Makezine]

Laser Cutter Doubles As A 3D Printer

[Bart] figured out how to use his laser cutter as a 3D printer. We’ve checked in on his open source laser cutter in the past and we’re happy to see he’s now done with the build. But rather than stop there he took it a step further. For less than $200 he built an extruder head and added RepRap circuitry. You can see in the image above the laser tube is in the background and the extruder head with a line of black filament is mounted on the gantry. [Bart] has other plans for extensibility as well, including a knife cutter, a pen plotter, and a Dremel mount.

From RepStrap To RepRap; A 3D Printer Is Born

[Gavilan Steinman] just printed and assembled his own RepRap machine and filmed the process. This isn’t news but we found it very interesting to watch. He started with a RepStrap, a rapid-prototyping 3D printer that as built by hand instead of printed by a similar machine. This is the seminal step in the self-replicating process.

From there he prints an extruder head which improves the quality of the parts the RepStrap can produce. We then see time-lapse footage of the printing process for a Mendel unit, the second generation of RepRap machines. We’ve embedded the video after the break. It’s a great way to spend ten minutes on a Sunday afternoon.

Continue reading “From RepStrap To RepRap; A 3D Printer Is Born”

CNC Build Ditches Rods For Hardboard

This is a redesigned x-axis for [Peter Jansen’s] selective laser sintering rig. We looked in on his SLS project last month and since then he’s been refining the design. The new component uses a rack and pinion system, relying on some Kapton tape to reduce friction for a nice smooth slide. One stepper motor powers the laser-cut gear box with four gears interfacing the sled to the frame for stable and accurate motion. Now he’s just got to work out the math/physics that go into finding the optimal gear ratios as this prototype is just a rough guess. If you’ve got the skills to work it out please lend [Peter] a hand as we’re quite excited with where this is going.