New Part Day: Memristors

For the last few years, the people in the know have been wondering about the memristor. The simplest explanation of what a memristor is comes from the name itself – it’s a memory resistor. In practice it’s a little more complex, but this basic understanding is enough to convey the fact that it’s a resistor that changes its resistance based on how much current has gone through it. The memristor was first described in the 70s by [Leon Chua], the idea sat in journals for nearly forty years, and in 2008 a working memristor was created by HP Labs.

Now you can buy one. Actually, you can buy eight in a 16-pin DIP package. It will, reportedly, cost $240 for the 16-pin DIP. That’s only $30 per memristor, and it’s the first time you can buy them.

These memristors are based on a silver chalcogenide (Ge2Se3). When a circuit ‘writes’ to this memristor and applies a positive voltage, silver ion migrate to the chalcogenide, forming what the datasheet (PDF) calls dendrites. This lowers the resistance of the memristor. When a negative voltage is applied to the device, these dendrites are removed, the memristor is ‘erased’, and the memristor returns to a high-resistance state.

This silver chalcogenide memristor is different from the titanium oxide memristors developed by HP Labs that is most frequently cited when it comes to this forgotten circuit element. This work is from [Kristy Campbell] of Boise State University. She’s been working on it for more than a decade now, with IEEE publications, conference proceedings (that one’s full text), and dozens of patents.

As far as applications for memristors go, there are generally two schools of thought on that. The most interesting, in terms of current computer technology, is storage. Memristors can hold either a binary 0 or a 1 in a fraction of the space NAND Flash or old-fashioned magnetic hard drives ever will. That means greater storage density, and bigger capacity hard drives with lower power requirements. These memristors have a limit of how many times they can be cycled – ‘greater than 2000 times’ according to the datasheet. That’s nearly an order of magnitude less than MLC Flash, and something wear leveling can’t reasonably compensate for. This is a new technology, though, so that could change.

The second major expected use for memristors is neural nets. Neural nets are just a series of inputs, a few neurons, outputs, and connections between all three. These connections are weighted, and the variable resistance of memristors puts them in a unique position to emulate in hardware at the most basic level what was once done with software and custom ASICs. The trade name for these memristors – Neuro-Bit – and the company name – Bio Inspired Technologies – give you a clue at what the intended use is.

As with all new technologies, there’s always something that is inevitably created that was never imagined by the original designers. What these new applications are is at this point just speculation. Now that anyone can buy one of these neat new chips, it’s going to be interesting to see what can be made with these parts.

Hackaday Links Column Banner

Hackaday Links: May 24, 2015

A few months ago, we heard about a random guy finding injection molds for old Commodore computers. He did what the best of us would do and started a Kickstarter to remanufacture these cool old cases. It’s the best story on retrocomputing this year, and someone else figured out they could remanufacture Commodore 64 keycaps. If you got one of these remanufactured cases, give the keycaps a look.

Remember this Android app that will tell you the value of resistors by reading their color code. Another option for the iOS crowd was presented at Maker Faire last weekend. It’s called ResistorVision, and it’s perfect for the colorblind people out there. An Android version of ResistorVision will be released sometime in the near future.

A few folks at Langly Research Center have a very cool job. They built a hybrid electric tilt wing plane with eight motors on the wing and two on the tail. It’s ultimately powered by two 8 hp diesel engines that charge Liion batteries. When it comes to hydrocarbon-powered hovering behemoths, our heart is with Goliath.

A bottom-of-the-line avionics panel for a small private plane costs about $10,000. How do you reduce the cost? Getting rid of FAA certification? Yeah. And by putting a Raspberry Pi in it. It was expoed last month at the Sun ‘N Fun in Florida, and it’s exactly what the pilots out there would expect: a flight system running on a Raspberry Pi. It was installed in a Zenith 750, a 2-seat LSA, registered as an experimental. You can put just about anything in the cabin of one of these, and the FAA is okay with it. If it’ll ever be certified is anyone’s guess.

Reading Resistors With OpenCV

Here’s a tip from a wizened engineer I’ve heard several times. If you’re poking around a circuit that has failed, look at the resistor color codes. Sometimes, if a resistor overheats, the color code bands will change color – orange to brown, blue to black, and so forth. If you know your preferred numbers for resistors, you might find a resistor with a value that isn’t made. This is where the circuit was overheating, and you’re probably very close to discovering the problem.

The problem with this technique is that you have to look at and decode all the resistors. If automation and computer vision is more your thing, [Parth] made an Android app that will automatically tell you the value of a resistor by pointing a camera at it.

The code uses OpenCV to scan a small line of pixels in the middle of the screen. Colors are extracted from this, and the value of the resistor is displayed on the screen. It’s perfect for scanning through a few hundred through hole resistors, if you don’t want to learn the politically correct mnemonic they’re teaching these days.

Video below, and the app is available for free on the Google Play store.

Continue reading “Reading Resistors With OpenCV”

Resistance Decade Box Using DIP Switches

resistance-decade-box

Here’s a simple piece of equipment which you’ll be proud to display on your electronics bench. It’s a resistance decade box. The concept has been around forever — it offers the ability to tune a wide range of resistance values just by adjusting the controls. We especially like the clean look of this one, and think the use of DIP switches is a nice touch.

Check out the toggle switch at the top. It lets you disconnect the resistance values from the output in order to test them with your meter. It may not seem like much, but fudging your switch settings could end up smoking your target project. The value of that feature isn’t lost on us.

The DIP switches are mounted to some Radio Shack breakout boards which work perfectly for hosting the resistors as well. This keeps the inside of the enclosure nice and tidy. The final touch is the printed face plate applied to the cover of the box.

Like we’ve said, this one is nice but our favorite is still this one that uses thumbwheel switches to dial in a value.

Hack Removes Firmware Crippling From NVIDIA Graphics Card

If hardware manufacturers want to keep their firmware crippling a secret, perhaps they shouldn’t mess with Linux users? We figure if you’re using Linux you’re quite a bit more likely than the average Windows user to crack something open and see what’s hidden inside. And so we get to the story of how [Gnif] figured out that the NVIDIA GTX690 can be hacked to perform like the Quadro K5000. The thing is, the latter costs nearly $800 more than the former!

[Gnif] wanted the card for gaming and to support multiple monitors. It has no problem driving up to three screens under Windows. But the Linux drivers only allow this on the professional counterpart to the GTX690, the Quadro K5000. It turns out that the card responds to a device ID as assigned by a series of analog values. These can be tweaked by swapping, yanking, or adding resistors in just the right places. As with that Agilent multimeter unlock of his which we saw a few days ago, he somehow managed to figure out the secret sauce that unlocks the power hidden in this card.

Papercraft Dial Is The Slide-ruler Of Current Limiting Resistors

led_resistor_dial_39

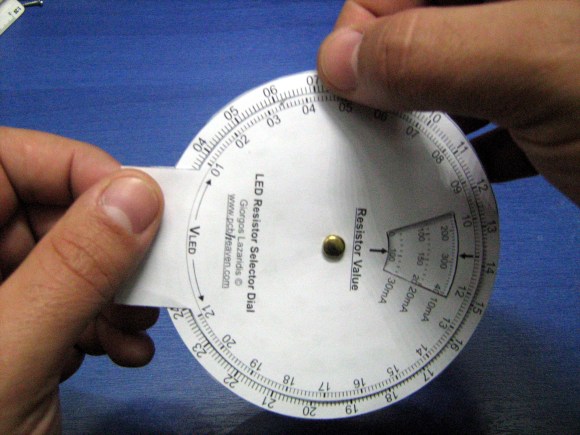
This paper dial makes selecting current limiting resistors a snap. [Giorgos Lazaridis] came up with the tool, which he describes in detail in the Worklog tab of his writeup. If you want one of your own he also posted a PDF which you can print, cut, and tack together.

At this point we can calculate resistor values for LED circuits without looking at reference material. But it wasn’t always like that. This wheel will be a fantastic tool for those just starting out in hobby electronics who are trying to grasp the theory behind lighting up a simple project. The outer wheel references the source voltage, with the inner being a gauge of forward voltage across the LED(s). Line those two values up and you can read the optimal resistor value in the window seen to the right. But wait, there’s more! As you can see in the video after the break the opposite face of the dial also includes a window which will tell you the power dissipation so that you may choose a properly rated resistor. Slick!

Continue reading “Papercraft Dial Is The Slide-ruler Of Current Limiting Resistors”

Automated Resistor Sorter Puts Them Into Small Plastic Tubes

This one might be an oldie, but it’s certainly a goodie.

Way back in 2005, [David] and [Charles] needed a project for one of their engineering courses. With so many loose resistors scattered over the lab, they decided to build an automated resistor sorter (PDF warning) to separate these resistors and put resistors of the same value together in the same bin.

The electrical and programming portion of this build is relatively simple – just a PIC microcontroller reading the value of a resistor. The mechanical portion of this build is where it really shines. Resistors are sorted when they pass through small plastic tubes mounted to a wooden frame.

There are several levels of these tubes in [David] and [Charles]’ sorter that move back and forth. The process of actually sorting these resistors is a lot like going down a binary tree; at each level, the tube can go right or left with the help of a solenoid moving that level of the frame back or forth.

[David] and [Charles]’ project wasn’t entirely complete by the end of the class; to do so would require  8 levels and 128 different tubes on the bottom layer. Still, it worked as a proof of concept. We just wish there was a video of this machine in action.

Tip ‘o the hat to [Alexander] for finding this one and sending it in.