Building The DIY HP41C: A Field Report

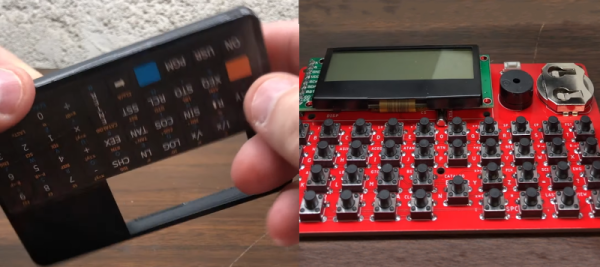
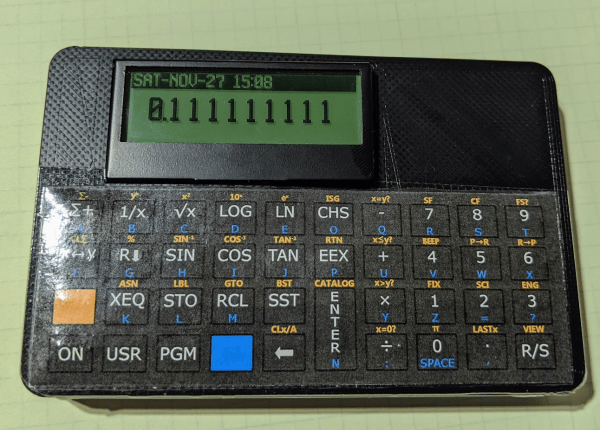
I have a confession to make. I write about a lot of projects for Hackaday, but there are very few I read about and then go actually build a copy of it. I don’t have a lot of time and I’m usually too busy building my own stuff. But once in a while, something strikes my fancy and I’ll either raid the junk box or buy the kit. The most recent case of that was the PX-41C, a replica of the classic HP-41C.

Nicely bagged parts.

The HP-41C is a somewhat legendary reverse-polish notation calculator. I still have my original HP-41C from 1979 (a very low serial number). It is still a workhorse but at 43 years old or so, I don’t like to leave it hanging around or near anything that might damage it. It has enough wear from the daily use it received 40 years ago. Sure, I have great emulation on my phone and I use that too, but the PX-41C kit looked fun, and with all through-hole parts it would be a quick build. The black Friday sale on Tindie sealed the deal for me.

Start-Up

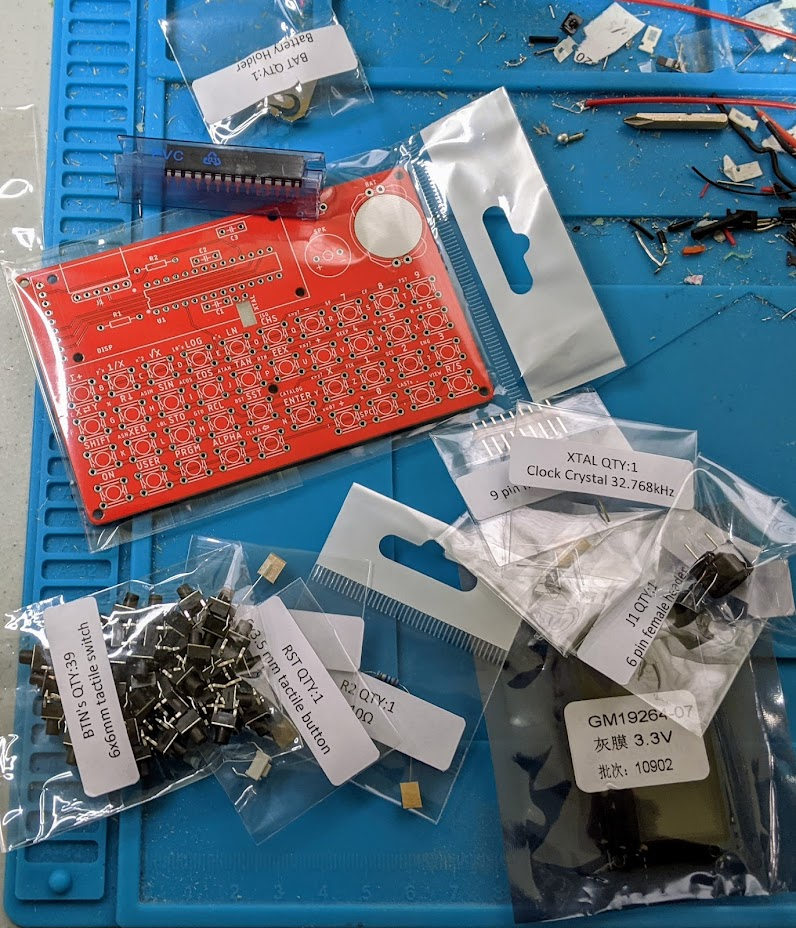
The kit arrived on the Saturday after Thanksgiving, I decided to tackle it while waiting for some 3D prints. The components were all nicely bagged and marked. Tearing into the bags was a bit frustrating, but not hard and it did keep everything separate. There was a bill of materials, but — I thought — no instructions. Turns out the last part of the bill of materials is a link to some instructions. They aren’t much and I didn’t realize they were until after completing the board, but it isn’t hard to figure out. All the parts are marked on the silkscreen and you can probably figure it out — with a few caveats.

Continue reading “Building The DIY HP41C: A Field Report”

Build Your Own HP41C

There was a time when engineers carried slide rules. Then there was a time when we all carried calculators. Sure, calculators are still around, but you are more likely to use your phone. If you really need serious number crunching, you’ll turn to a full computer. But there was that awkward time when calculators were very important and computers were very expensive that calculators tried to be what we needed from full-blown computers. The HP41C was probably the pinnacle of that trend. If you’ve ever had one, you know that is a marvel of the day’s technology with alphanumeric capabilities and four plug in ports for more memory or ROMs. It really was a little hand-held computer. Didn’t have one? Don’t worry, you can now build your own. In fact, the HP emulator will also act like an HP15C or 16C, if you prefer.

You can see the device in action in the video below. As you might expect, this version uses a through-hole ATMEGA328 and even at 8 MHz, the emulation is faster than the original calculator. The machine also has over double the memory the original calculator had along with a real-time clock built-in. The display is also backlit, something we all wanted in the original.

Continue reading “Build Your Own HP41C”

A PDP 11 By Any Other Name: Heathkit H11 Teardown And Repair

[Lee Adamson] is no stranger to classic computers. He recently picked up a Heathkit H11A which, as you might remember, is actually a PDP-11 from DEC. Well, technically, it is an LSI-11 but still. Like a proper LSI-11, the computer uses the DEC QBus. Unlike a lot of computers of its day, the H11 didn’t have a lot of switches and lights, but it did have an amazing software library for its day.

[Lee] takes us through a tour of all the different cards inside the thing. It is amazing when you think of today’s laptop motherboards that pack way more into a much smaller space. He also had to fix the power supply.

Continue reading “A PDP 11 By Any Other Name: Heathkit H11 Teardown And Repair”

Vintage Computers With A Real Turbo

In prior centuries, it was common practice to tie the operation of a program to a computer’s clock speed. As computers got faster and faster, the programs tied to that slower clock speed sometimes had trouble running. To patch the issue temporarily, some computers in the early 90s included a “TURBO” button which actually slowed the computer’s clock speed down in order to help older software run without breaking in often unpredictable ways. [Ted Fried] decided that he would turn this idea on its head, though, by essentially building a TURBO button into the hardware of old computers which would greatly increase the execution speed of these computers without causing software mayhem.

To accomplish this, he is running CPU emulators on Teensys (Teensies?), but they are configured to be a drop-in replacement for the physical CPU of several retro computers such as the Apple II, VIC-20, and Commodore 64 rather than an emulator for an entire system. It can be configured to run either in cycle-accurate mode, making it essentially identical to the computer’s original hardware, or it can be placed into an accelerated mode to take advantage of the Teensy 4.1’s 800 MHz processor, which is orders of magnitude faster than the original hardware. This allows (most of) the original hardware to still be used while running programs at wildly faster speeds without needing to worry about any programming hiccups due to the increased clock speed.

The video below demonstrates [Ted]’s creation running in an Apple II but he has several other cores for other retro computers. It’s certainly a unique way to squeeze more computing power out of these antique machines. Some Apple II computers had a 4 MHz clock which seems incredibly slow by modern standards, so the 800 MHz Teensy would have been considered wizardry by the standards of the time, but believe it or not, it’s actually necessary to go the other direction for some applications and slow this computer down to a 1 MHz crawl.

Continue reading “Vintage Computers With A Real Turbo”

An Emulator For OBP, The Spaceflight Computer From The 1960s

[David Given] frequently dives into retrocomputing, and we don’t just mean he refurbishes old computers. We mean things like creating a simulator and assembler for the OBP spaceflight computer, which was used in the OAO-3 Copernicus space telescope, pictured above. Far from being a niche and forgotten piece of technology, the On-Board Processor (OBP) was used in several spacecraft and succeeded by the Advanced On-board Processor (AOP), which in turn led to the NASA Standard Spaceflight Computer (NSSC-1), used in the Hubble Space Telescope. The OBP was also created entirely from NOR gates, which is pretty neat.

One thing [David] learned in the process is that while this vintage piece of design has its idiosyncrasies, in general, the architecture has many useful features and is pleasant to work with. It is a bit slow, however. It runs at a mere 250 kHz and many instructions take several cycles to complete.

Sample of the natural-language-looking programming syntax for the assembler. (Example from page 68 of the instruction set manual for the OBP.)

One curious thing about the original assembler was documentation showing it was intended to be programmed in a natural-language-looking syntax, of which an example is shown here. To process this, the assembler simply mapped key phrases to specific assembly instructions. As [David] points out, this is an idea that seems to come and go (and indeed the OBP’s successor AOP makes no mention whatsoever of it, so clearly it “went”.) Since a programmer must adhere to a very rigid syntax and structure anyway to make anything work, one might as well just skip dealing with it and write assembly instructions directly, which at least have the benefit of being utterly unambiguous.

We’re not sure who’s up to this level of detail, but embedded below is a video of [David] coding the assembler and OBP emulator, just in case anyone has both an insatiable vintage thirst and a spare eight-and-a-half hours. If you’d prefer just the files, check out the project’s GitHub repository.

Continue reading “An Emulator For OBP, The Spaceflight Computer From The 1960s”

A vintage supercomputer with unique dual screen display

VCF East 2021: The Early Evolution Of Personal Computer Graphics

The evolution of computer graphics is something that has been well documented over the years, and it’s a topic that we always enjoy revisiting with our retrocomputing readers. To wit, [Stephen A. Edwards] has put together an impressively detailed presentation that looks back at the computer graphics technology of the 1960s and 70s.

The video, which was presented during VCF East 2021, goes to great lengths in demystifying some of the core concepts of early computer graphics. There’s a lot to unpack here, but naturally, this retrospective first introduces the cathode-ray tube (CRT) display as the ubiquitous technology that supported computer graphics during this time period and beyond. Building from this, the presentation goes on to demonstrate the graphics capabilities of DEC’s PDP-1 minicomputer, and how its striking and surprisingly capable CRT display was the perfect choice for playing Spacewar!

As is made clear in the presentation, the 1960s featured some truly bizarre concepts in regards to cutting edge computer graphics, such as Control Data Corporation’s 6600 mainframe and accompanying vector-based dual-CRT video terminal, which wouldn’t look out of place on the Death Star. Equally strange at the time was IBM’s 2260 video data terminal, which used a ‘sonic delay line’ as a type of rudimentary video memory, using nothing but coiled wire, transducers and sound itself to store character information following a screen refresh.

These types of hacks were later replaced by solid state counterparts during the microcomputer era. The video concludes with a look back at the ‘1977 trinity’ of microcomputers, namely the Apple II, Commodore PET and TRS-80. Each of these microcomputers handled graphics in a slightly different way, and it’s in stark contrast to today’s largely homogenised computer graphics landscape.

There’s a lot more to this great retrospective, so make sure to check out the video below. When you’re finished watching, make sure to check out our other coverage of VCF 2021, including some great examples of computer preservation and TTL-based retrocomputing.

Continue reading “VCF East 2021: The Early Evolution Of Personal Computer Graphics”

Chip Tester Knows If Your Old Chips Are Working

[Noel’s Retro Lab] has looked at retro chip testers before, but in a recent video you can see below he’s looking at the Chip Tester Pro, a preassembled chip tester for vintage chips, especially those used in Commodore computers. The device looks good on the surface with a form factor like a calculator or cell phone, an LCD display, and a 48 pin ZIF socket.

The user interface is pretty simple. A rotary encoder and a big red button are about it. However, there are also some headers where you have to use jumpers to wire signals to the chip. The firmware gives you specific directions, but it is reminiscent of programming old punchcard machines with jumper wires. Luckily, it looks like you only route the power to the device so you don’t have many wires to connect (usually two or three).

Continue reading “Chip Tester Knows If Your Old Chips Are Working”