PicoMite Gives Your Pico A Deluxe BASIC

What makes developing a microcontroller project quick and easy? Tops on our list are an interactive shell and comprehensive libraries that handle all the low-level peripheral stuff. You think we’re talking MicroPython? Not today! MMBasic has just been ported to the Raspberry Pi Pico dev board, and it has all the batteries included.

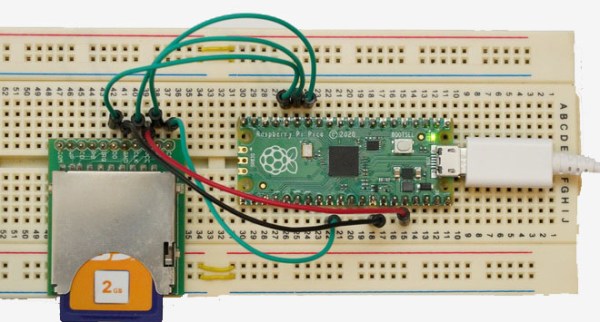
Just to give you a taste, it has built-in support for SD cards, all sorts of displays, touch screens, real-time clocks, IR remotes, numerous sensors, and of course WS2812 LED strips. And because all of this is baked into the BASIC, writing code to use any of these peripherals is straightforward.

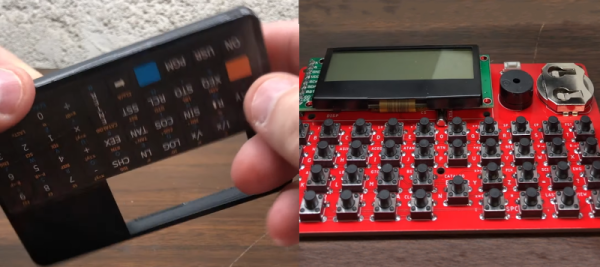
Now, there’s BASIC and there’s BASIC. This is a modern BASIC: it has loops, functions, arrays, floating point, and a built-in full-screen editor. You connect to the Pico via UART, and you’re off to the races. If you’ve got a Pico sitting around, flash it and give it a try. Or check out the GitHub repository if you want to poke around in the internals.

This is a port of the BASIC that’s used on the Maximite virtual retrocomputer platform, which means that there are many working examples out there for you to crib from, and even a forum. Add in the incredibly nice user manual and tutorial (PDF), and you’ve got the perfect weekend afternoon.

Think MicroPython killed BASIC? Think again. BASIC is small enough that it can run where Python can’t, but that’s of course a more minimal experience. In contrast, MMBasic looks like it’s got all the toppings. The whole enchilada. It’s like BASIC Deluxe.

Build Your Own HP41C

There was a time when engineers carried slide rules. Then there was a time when we all carried calculators. Sure, calculators are still around, but you are more likely to use your phone. If you really need serious number crunching, you’ll turn to a full computer. But there was that awkward time when calculators were very important and computers were very expensive that calculators tried to be what we needed from full-blown computers. The HP41C was probably the pinnacle of that trend. If you’ve ever had one, you know that is a marvel of the day’s technology with alphanumeric capabilities and four plug in ports for more memory or ROMs. It really was a little hand-held computer. Didn’t have one? Don’t worry, you can now build your own. In fact, the HP emulator will also act like an HP15C or 16C, if you prefer.

You can see the device in action in the video below. As you might expect, this version uses a through-hole ATMEGA328 and even at 8 MHz, the emulation is faster than the original calculator. The machine also has over double the memory the original calculator had along with a real-time clock built-in. The display is also backlit, something we all wanted in the original.

Continue reading “Build Your Own HP41C”

A portable Bluetooth turntable.

Bluetooth Record Player Puts A New Spin On Vinyl

You know, we were just discussing weird and/or obsolete audio formats in the writers’ dungeon the other day. (By the way, have you ever bought anything on DAT or MiniDisc?) While vinyl is hardly weird or (nowadays) obsolete, the fact that this Bluetooth record player by [JGJMatt] is so modern makes it all the more fantastic.

Not since the Audio-Technica Sound Burger, or Crosley’s semi-recent imitation, have we seen such a portable unit. But that’s not even the most notable part — this thing runs inversely to normal record players. Translation: the record stands still while the the player spins, and it sends the audio over Bluetooth to headphones or a speaker.

Inside this portable player is an Arduino Nano driving a 5 VDC motor with a worm gear box. There really isn’t too much more to this build — mostly power, a needle cartridge, and a Bluetooth audio transmitter. There’s a TTP223 touch module on the lid that allows [JGJMatt] to turn it off with the wave of a hand.

[JGJMatt] says this is a prototype/work-in-progress, and welcomes input from the community. Right now the drive system is good and the Bluetooth is stable and able, but the tone arm has some room for improvement — in tests, it only played a small section of the record and skidded and skittered across the innermost and outermost parts. Now, [JGJMatt] is trying two-part arm approach where the first bit extends and locks into position, and then a second arm extending from there and moves around freely.

Commercial record players can do more than just play records. If you’ve got an old one that isn’t even good enough for a thrift store copy of a Starship record, you could turn it into a pottery wheel or a guitar tremolo.

File testing rig

Science Vs Internet Trolls: Testing Another Kind Of File System

No matter what you do or say on the Internet, you’re always doing it wrong. Keyboard commandos are ready to pounce and tell you how it’s “ackchyually” supposed to be done. And so it was of little surprise when [Jason] of Fireball Tools was taken to task by the armchair millwright for his supposedly deficient method of filing metal.

But [Jason] chose to fight back not with words but deeds, building a system to test alternative methods of filing. His filing style is to leave the file in contact with the stock on both the front- and back-strokes, which enraged those who claim that a file must never be dragged back over the workpiece, lest the teeth become dull. The first video below shows the build of the test rig, which leveraged his enormous Cinncinatti shaper as the prime mover, as well as a pneumatic jig to hold the workpiece and imitate both styles of filing. Part two below shows the test rig in action, and [Jason] really outdoes himself with his experimental approach. He tested three different grades of Pferd files — nothing but the best, no expense spared — and did duplicates of each run using both the Internet-approved style and his lazier style.

The result? We won’t spoil that for you, but suffice it to say that the hive mind isn’t always right. And what’s more, [Jason]’s careful myth-busting yielded a few interesting and unexpected results. His channel is full of great shop tips and interesting builds, so check him out if you want to see how metalworking is done.

Continue reading “Science Vs Internet Trolls: Testing Another Kind Of File System”

The insides of an oscilloscope

Oscilloscope Probes Itself To Add Video

Modern oscilloscopes are often loaded with features, but every now and then you run into a feature that seems easy to implement yet isn’t available. [kgsws] wanted to use his Rigol DS1074 to show live measurements in his YouTube videos, but found out that this scope doesn’t support video output. Not to be deterred, [kgsws] decided to add this feature himself. In the video embedded below, he describes in detail the process of adding a USB Video Capture (UVC) interface to his oscilloscope.

The basic idea was to find the signals going into the scope’s display and read them out using a Cypress EZ-USB board. This is a development board that can be used to design USB devices, and supports the UVC mode. However, with no documentation of any of the Rigol’s internal circuitry [kgsws] had to probe the display connector to find out which pin carried which signal. And since he had no other scope available than this Rigol, he hooked up the various bits of the disassembled instrument so that it could (awkwardly) probe its own internal signals.

After mapping out its own display signals, it was time to hook them up to the EZ-USB board. [kgsws] achieved this by soldering about two dozen tiny wires to SMD pads on the motherboard. The EZ-USB board itself was placed in the back of the scope’s case, but had to be stripped of unneeded components in order to save space and power. A very clever trick was the addition of a reed switch, which allowed [kgsws] to set the EZ-USB board to programming mode without having to open the scope’s case, by simply holding a magnet near the switch.

After soldering a USB connector into a spare slot in the RF shield the project was complete. The Rigol can now be connected to a PC and will simply appear as a video capture device, ready to be streamed or captured for [kgsws]’s future project videos. We’ve seen other hacks on the Rigol DS1000Z series to capture a series of screenshots or to enable additional bandwidth and features, but adding a live video output was not one of the options so far. Continue reading “Oscilloscope Probes Itself To Add Video”

Flip-up clock

A Flip Clock That Flips Up, Not Down

The venerable flip clock has become an outsized part of timekeeping culture that belies the simplicity of its mechanism. People collect and restore the electromechanical timepieces with devotion, and even seek to build new kinds of clocks based on split-flap displays. Designs differ, but they all have something in common in their use of gravity to open the leaves and display their numbers.

But what if you turned the flip clock on its head? That’s pretty much what [Shinsaku Hiura] accomplished with a flip clock that stands up the digits rather than flipping them down. The clock consists of three 3D-printed drums that are mounted on a common axle and linked together with gears and a Geneva drive. Each numeral is attached to a drum through a clever cam that makes sure it stands upright when it rotates to the top of the drum, and flops down cleanly as the drum advances. The video below makes the mechanism’s operation clear.

The build instructions helpfully note that “This clock is relatively difficult to make,” and given the extensive troubleshooting instructions offered, we can see how that would be so. It’s not the first time we’ve seen a mechanically challenging design from [Shinsaku Hiura]; this recent one-servo seven-segment display comes to mind.

Continue reading “A Flip Clock That Flips Up, Not Down”

Mechanical Musical Sculpture Recalls The Four Muses

Music was created by humans, but often we find ourselves creating performances with machines. [Alana Balagot] and [Federico Tobon] did just that, constructing the stunning 4 Muses musical sculpture with their combined talents.

4 Muses is made up of four individual instruments, under the command of a single keyboard controller. The keyboard can be used to play the instruments live, or alternatively, can learn from the player or be used as a sequencer. It can also act as a simple device to play back music using the four instruments.

The pipe instrument uses servo-controlled valves, which allow air from a blower fan to reach several wood pipes. The xylophone instead uses solenoids to play its 13 tines. Percussion is provided by a mechanized cajón drum, using motors to actuate mallets that strike the various sections of the box. Meanwhile, hackers will be familiar with the concept of the motor-noise instrument, which drives stepper motors at different frequencies to generate tones.

Inside, a cavalcade of microcontrollers make everything work, from Arduino Megas and Teensys to NRF24s sending wireless packets from the controller to the instruments. [Alana] and [Federico] go in-depth with their documentation, highlighting the challenges they faced putting together the various instruments and showing how the final build came together.

Built with and brass hardware and sporting a variety of exquisite wood finishes, the final result is a quartet of machines that play beautiful music composed by [Alana] herself. Musical sculptures are often a great example of the artistry possible when putting electrons to work. Video after the break.

Continue reading “Mechanical Musical Sculpture Recalls The Four Muses”