Sniffing RFID Readers With A Piece Of Paper

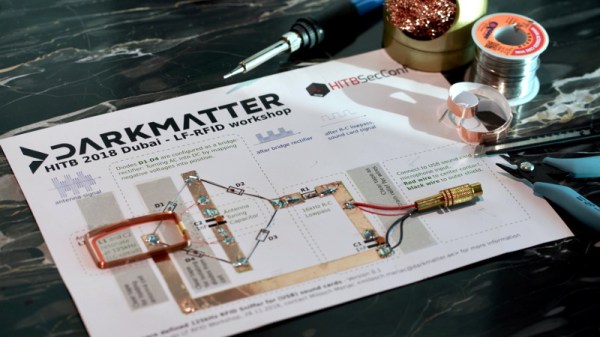
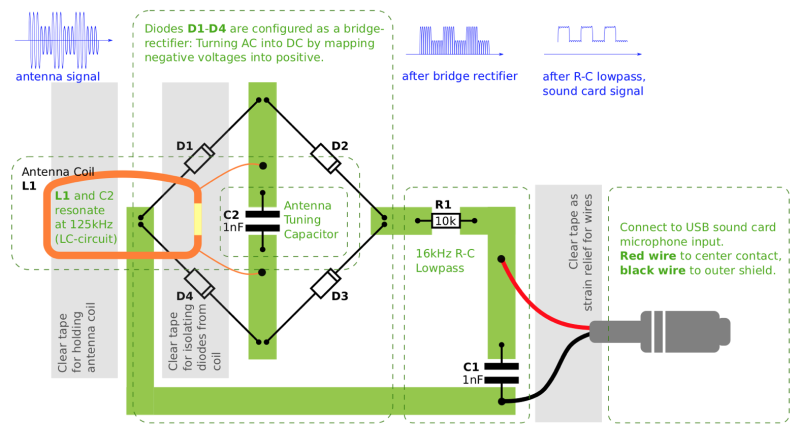
We feature plenty of printed projects here on Hackaday, though they tend to be of the three dimensional type thanks to the proliferation of affordable 3D printers. But in this case, [Milosch Meriac] has managed to put together a printable design that’s not only a very cool hack, but is made up of a scant two dimensions. His creation, which could perhaps be considered something of an interactive circuit diagram, allows anyone with a paper printer and a few passive components to make a functional low-frequency RFID sniffer.

[Milosch] tells us the goal of the project is to lower the barrier for experimenting with the RFID technology that’s increasingly part of our everyday lives. Rather than having to use something expensive and complicated such as an oscilloscope, experimenters can simply plug their DIY RFID sniffer into their computer’s line-in jack and explore the produced waveform with open source tools.

To create a paper RFID sniffer, you start by printing the image out on a thick piece of paper, like card stock. You then apply foil tape where indicated to serve as traces in this makeshift PCB, and start soldering on the components as described in the text. [Milosch] says the assembly procedure is so simple even a kid can do it, and the total cost of each assembled sniffer is literally pennies; making this an excellent project for schools or really any large group.

If you want to play it safe the sniffer can be connected to a USB sound card rather than your machine’s primary sound hardware, and still come in dirt cheap. [Milosch] stops short of explaining the software side of things in this particular project, but any tool which can use input from the sound card as a makeshift oscilloscope should be a good start.

In the past we’ve seen [Milosch] perform low frequency RFID sniffing through the sound card with the powerful baudline tool, but if you want a little more capable hardware, we can point you in the right direction.

Vaporwave For The Parallel Port

FM synthesis is the sound of the 1980s, it’s the sound of shopping malls and Macintosh Plus. It’s the sound of the Motorola DynaTAC, busts of Helios, and the sound of vaporwave サ閲ユ. The chips most responsible for this sound is the OPL2 and OPL3, tiny little FM synthesizers on a chip, produced by Yamaha, and the core of the AdLib and Sound Blaster sound cards. It’s the chip behind the music in all those great DOS games.

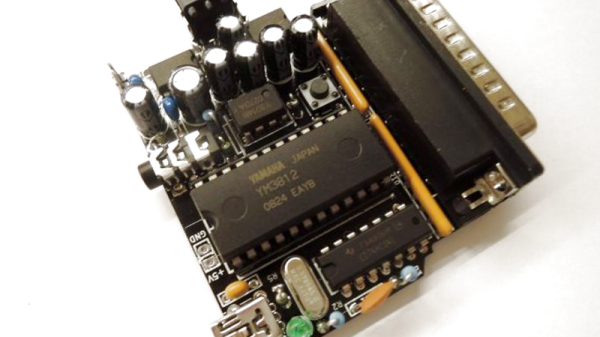
Unfortunately, computers don’t have ISA slots anymore, and cards don’t work in 486 and Pentium-based laptops, the latest hotness for retrocomputing enthusiasts. For his Hackaday Prize entry, [serdef] is bringing the sound of the 80s to the parallel port with the OPL2LPT. It’s a sound card for the parallel port that isn’t just a resistor DAC like the Covox Speech Thing.

The design of the OPL2LPT is pretty much what you would expect; it’s an OPL2 chip, opamp, a 1/8″ jack, and a few passive components. The real trick here is in the driver; by default, every DOS game around expects an Adlib card on port 338h, whereas the parallel post is at 378h. A driver takes care of this in software, but it is possible to patch a game to change every write to an Adlib card to a write to a parallel port.

Already, [serdef]’s parallel port graphics card is a real, working product and has caught the attention of Lazy Game Reviews and the 8-Bit-Guy, you can check out those video reviews below.

Continue reading “Vaporwave For The Parallel Port”

Fixing Linux Audio One Chipset At A Time

Linux audio may be confusing for the uninitiated. As a system that has evolved and spawned at least two independent branches over time it tends to produce results that surprise or irritate the user. On the other hand it is open source software and thus can be fixed if you know what you do.

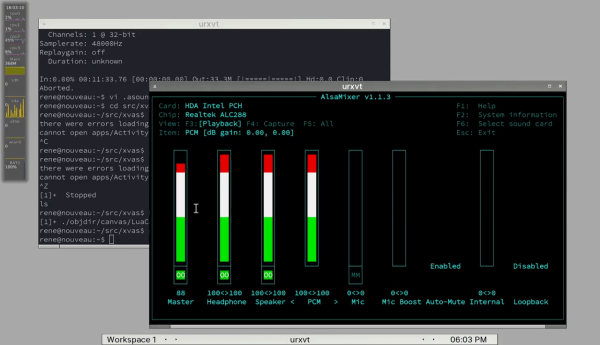
Over at reddit [rener2] was annoyed by the fact that listening to music on his laptop was a significantly worse experience under Linux than under Windows. Running Windows the output of  the headphone jack covered the whole spectrum while his Linux set up cut off the low end resulting in a tinny sound. The culprit in this is the sound card: it has two different output paths for the internal speakers and the headphone jack. The signal for the internal speakers is routed through a high pass filter to spare them the embarrassment of failure to reproduce low frequencies.

When headphones are plugged in, the sound card driver is supposed to make the sound card bypass the filter and deliver the full spectrum. The authors of the Windows driver knew this and had it taken care of. In his video [rener2] runs us through the process of patching the ALSA driver while referencing the documentation of a sound card that he deems ‘similar enough’ to his Realtek ALC288.

Continue reading “Fixing Linux Audio One Chipset At A Time”

Detecting Mobile Phone Transmissions With A Sound Card

Anyone who had a cheap set of computer speakers in the early 2000s has heard it – the rhythmic dit-da-dit-dit of a GSM phone pinging a cell tower once an hour or so. [153armstrong] has a write up on how to capture this on your computer. 

It’s incredibly simple to do – simply plug in a set of headphone to the sound card’s microphone jack, leave a mobile phone nearby, hit record, and wait. The headphone wire acts as an antenna, and when the phone transmits, it induces a current in the wire, which is picked up by the soundcard.

[153armstrong] notes that their setup only seems to pick up signals from 2G phones, likely using GSM. It doesn’t seem to pick up anything from 3G or 4G phones. We’d wager this is due to the difference in the way different cellular technologies transmit – let us know what you think in the comments.

This system is useful as a way to detect a transmitting phone at close range, however due to the limited bandwidth of a computer soundcard, it is in no way capable of actually decoding the transmissions. As far as other experiments go, why not use your soundcard to detect lightning?

A Reproduction Vintage Sound Card

Before the AdLib sound card, sound on PCs was in a terrible shape. Since the dawn of IBM, all PCs included a speaker, but this PC speaker was only capable of sounding one note at a time. Chords on the PC speaker produced a weird ‘bubbling’ effect. Just a few years later, 8-bit sound could be created with the Covox Speech Thing, effectively a resistor ladder, with the parallel port on one side, and an 1/8″ plug on the other. These solutions for PC sound sucked.

It wasn’t until the first AdLib cards that superior sound showed up on the PC. Recently, [eric] had been fixing up an old IBM XT and quickly realized the original AdLib sound cards were collector’s items and far too expensive for what they were. He decided to build a reproduction Ad Lib. completely compatible and nearly identical to the original 1990 version of the best sound card on the market.

The first Ad Lib sound card is a relatively simple circuit based on the Yamaha YM3012 (OPL2) and YM3014B chips. These chips are frequently available on eBay, and [Sergey] already has a complete circuit for turning these chips into an ISA sound card. While this modern card is compatible with the AdLib Music Synthesizer Card, it doesn’t look like one. [eric] wanted a card that looked like the real thing, and sounded like one, too.

PCB design has come a long way in a generation, and where the AdLib card was once a wonder of modern technology, anyone with enough patience can now design an identical board, send the file off to China, and receive a reproduction of the first successful sound card. All the files are up on Github should you want to build your own. Now all we need is someone making modern 486 motherboards.


One Dollar USB Sound Card Turned O-Scope

Using the inputs on a computer’s sound card is an old trick to fake a very simplistic, AC coupled, slow oscilloscope. You can get DC operation by desoldering a couple capacitors, but if the sound card is integrated into the motherboard it raises the stakes if you mess that up.

[TMSZ] has a better option, a ~1 dollar USB sound card which is easily hacked to work as a simple oscilloscope. Easily found on eBay, the 7.1 virtual channel sound card is identical in brains to a more expensive c-media model, but the layout of the PCB makes it easier to bypass the DC blocking caps. Software and DLL files to use the sound card with Miniscope v4 — a Windows GUI for oscilloscopes — are also linked, so getting set up should be fairly simple.

Now of course this is not lab-grade measurement equipment: the sampling rate is limited to 44KHz and the voltages must be in the typical “line level” range, under two volts. If you don’t mind a little extra noise, you can increase the input impedance with a single resistor. This extends the input range up to six volts, which covers most hobby and microcontroller usage.

So if you’re really in need of a scope, but only have a buck to spend, this may be just the hack for you! Those willing to shell out a hefty sum for a high-end headless oscilloscope should look onto the virtual bench.

MIDI And Vintage FM Synthesis

FM

Before the days when computers could play and record audio that far surpassed the quality of CDs, sound cards were very, very cool. Most audio chips from the 80s, from the Commodore SID is pretty much a synth on a chip, but you can also find similar setups in ancient ISA sound cards. [Emilio] pulled one of these cards with an ADLIB OPL2 chip on it, and used a PIC micro to create his very own FM synthesis synth (IT, translatatron, although Google is screwing up the formatting).

The Yamaha YM3812 chip, otherwise known as the OPL2, was a fairly complete synthesizer in a very tiny package using FM synthesis for some very unique sounds. Once [Emilio] had the PIC sending commands to the sound chip, he added MIDI support, allowing him to play this vintage ‘synth on a chip’ with a keyboard instead of a tracker.

Judging from the video below, it sounds great, and that’s with [Emilio] mashing the keys for a simple demo.

Continue reading “MIDI And Vintage FM Synthesis”