Retrotechtacular: The Bessemer Converter

Here’s a rose-colored look into the steelworks at Workington, Cumbria in northern England. At the time of filming in 1974, this plant had been manufacturing steel nonstop for 102 years using the Bessemer process. [Sir Henry Bessemer]’s method for turning pig iron into steel was a great boon to industry because it made production faster and more cost-effective.

hot ingotsMore importantly, [Bessemer]’s process resulted in steel that was ten times stronger than that made with the crucible-steel method. Basically, oxygen is blown through molten iron to burn out the impurities. The silicon and manganese burn first, adding more heat on top of what the oxygen brings. As the temperature rises to 1600°C, the converter gently rocks back and forth. From its mouth come showers of sparks and a flame that burns with an “eye-searing intensity”. Once the blow stage is complete, the steel is poured into ingot molds. The average ingot weighs four tons, although the largest mold holds six tons. The ingots are kept warm until they are made into rail.
The foreman explains that Workington Works would soon be switching over to a more modern process. As it was, Workington ran a pair of Bessemer converters on a 40-minute schedule, ensuring constant steel production from ore to rail. Between 1872 and 1974, these converters created an estimated 25 million metric tons of steel.

Continue reading “Retrotechtacular: The Bessemer Converter”

Behold Lil’ Screwy, A Homebrew 100-Ton Press

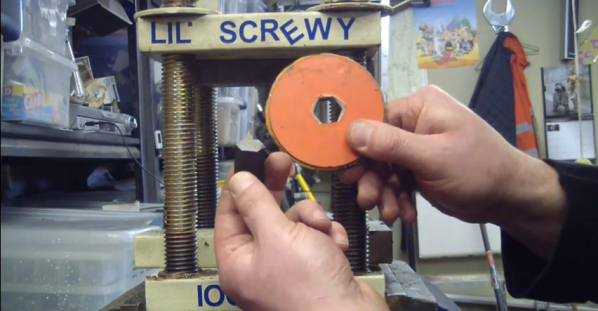
Here we have a magnificent example of the power of the inclined plane. [Chris] has built Lil’ Screwy, a 100-ton home-built press for about $35 plus scrap on hand. He demonstrates its frightening power by punching a 17-mm hole through 8mm-thick steel using an Allen key.

As [Chris] explains in his hilarious video waiting for you after the jump, the force comes from using really big screws. Lil’ Screwy uses four 1-inch L7-rated ready rods with eight threads to the inch. The bolts run between two 1″ steel plates to form the press. In the top plate, he drilled 1″ holes. The bottom holes are drilled out 7/8″ and tapped so the two plates clamp together with awesome crushing power when you twist the giant coupling nuts.

[Chris] milled a pocket in the underside of the top plate for a big neodymium magnet that will keep, for instance, a 17-mm Allen key in place while you punch a piece of steel with it. He has a ring of smaller ones embedded into the bottom plate to hold supports in place for broaching.

As a special bonus, [Chris] shows you how to stick it to the man when it comes to using that last bit of Never-Seez in the can, and also how to make your decals temporarily repositionable.

Continue reading “Behold Lil’ Screwy, A Homebrew 100-Ton Press”

Retrotechtacular: How A Bicycle Is Made

Does your bicycle master boardwalk and quagmire with aplomb? If it was built by the Raleigh Bicycle Company, it ought to. This week’s Retrotechtacular is a 1945-era look into the start-to-finish production of a standard bicycle. At the time of filming, Raleigh had already been producing bicycles for nearly 60 years.
The film centers on a boy and his father discussing the purchase of a bicycle in the drawing office of the plant where a bicycle begins its life. The penny-farthing gets a brief mention so that the modern “safety model”—wherein the rider sits balanced between two wheels of equal size—can be compared. The pair are speaking with the chief designer about the model and the father inquires as to their manufacturing process.

We are given the complete story from frame to forks and from hubs to handlebars. The frame is forged from high-quality steel whose mettle is tested both with heat and with a strain much greater than it will receive in manufacture or use. It is formed from long pieces that are rolled into tubes, flame sealed at the joint, and cut to length. The frame pieces are connected with brackets, which are formed from a single piece of steel. This process is particularly interesting.

Continue reading “Retrotechtacular: How A Bicycle Is Made”

Electrochemical Etching With A Microcontroller

IMAG1459_zps68634c16

While most of the time the name of the game is to remove a lot of metal, etching is an entirely other process. If you just want to put a logo on a piece of steel, or etch some labels in a piece of aluminum, You need to think small. Mills and CNC routers will do, but they’re expensive and certainly not as easy to work with as a small, homebrew electrochemical etcher.

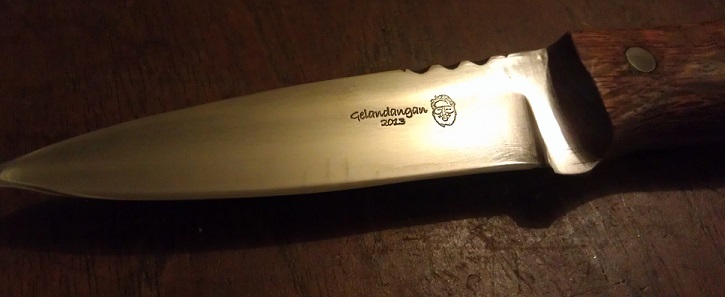
This etchinator is the brainchild of [Gelandangan], and gives the techniques of expensive commercial etchers to anyone who can put together a simple circuit. This etcher can etch with both AC and DC thanks to a H bridge circuit, and can be fabbed up by anyone who can make their own circuit board.

To actually etch a design in a piece of metal, simply place the piece on a metal plate, put the stencil down, and hold a felt-covered electrode moistened with electrolyte down over the stencil. Press a button, and in about 30 seconds, you have a wonderfully etched piece of metal.

[Gelandagan] has some templates that will allow you to make your own electro etcher, provided you can etch your own boards and can program the PIC16F1828 microcontroller. All this info is over on the Australian blade forum post he put up, along with a demo video below.

Continue reading “Electrochemical Etching With A Microcontroller”

[Ben Krasnow] Discusses The Heat Treatment Of Steel

steel

For home metallurgy, there are two sources of information for the heat treatment and tempering of steel. The first source is academic publications that include theoretical information, while the second includes the home-spun wisdom of blacksmiths who learn through trial and error. [Ben Krasnow] put up a great video that tries to bridge that gap with some great background information with empirical observations to back up his claims.

For investigating the hardness of steel, a few definitions are in order. The first is stiffness, or the ability of a material to ‘spring back’ after being flexed. The second is strength, specifically yield strength, which is the amount of strain a material can withstand before being permanently deformed.

[Ben] did all these experiments with a 1/8″ W1 steel drill rod. As it came from McMaster, this rod could handle a bit of force before becoming permanently bent, and in terms of stiffness was much better than a piece of coat hanger wire [Ben] had lying around. After taking a piece of this drill rod, heating it up to a cherry red and quenching it in water, [Ben] successfully heat treated this steel to a full hardness. After putting it on his testing jig, this full hardness steel didn’t deform at all, it simply broke.

Full hardness steel is basically useless as a structural material, so [Ben] tried his hand at tempering pieces of his drill rod. By putting a few pieces in a kiln at the requisite temperature, [Ben] was able to temper his drill rods to be stronger than the stock material, but not as terribly brittle as a full hard rod.

Continue reading “[Ben Krasnow] Discusses The Heat Treatment Of Steel”

Stopping A Hackerspace From Rusting Away

steel

The illutron hackerspace in Copenhagen makes their home on a barge sitting in port. Not only is this awesome, but the members of the hackerspace also worry about corrosion to their beloved fablab. In an effort to ally some fears about rust slowly eating through the hull, [Dzl] has rigged up a cathodic protection system for their hull, essentially preserving their barge at the expense of a few old steel rails.

Cathodic protection systems are able to protect the steel of a ship’s hull by offering up a sacrificial anode made of aluminum or zinc. This can be done by either attaching a sacrificial anode directly to the hull, or with a more complex system that connects both the cathode (the ship) and the anode (an engine block) to a DC power source.

[Dzl] is converting mains voltage down to 12 VDC, then further lowering the voltage with an Arduino-controlled buck converter. The control panel allows for adjustments in the voltage, as well as a nice uptime meter to make sure it’s running.

The results are fairly impressive; in the above pic, the right piece of steel was electrically connected to the barge’s hull, while the left piece was free to rust in the North Sea. That’s only two days worth of corrosion there.

On Not Getting Metal Fume Fever With Galvanized Conduit

galv

You can find galvanized steel pipes at Home Depots and construction sites all around the world. These relatively thin-walled steel pipes would make for great structural members if it weren’t for the fact they were covered in a protective layer of zinc. This layer of galvanization lends itself to crappy welds and some terrible fumes, but badass, TV personality, and hacker extraordinaire [Hackett] shows us how to strip the galvanization off these pipes with chemicals available at any hardware store.

Since the galvanization on these pipes covers the inside and the outside, grinding the small layer of zinc off these pipes is difficult at best. To be sure he gets all the zinc off this pipe, [Hackett] decided to chemically strip the pipes with a cup full of muriatic acid.

The process is simple enough – fill a cup with acid, dunk the ends of the pipes, and clean everything up with baking soda. A great way to turn scrap pipe into a usable material, make a cool paper mache volcano, and avoid ‘ol galvie flu

Continue reading “On Not Getting Metal Fume Fever With Galvanized Conduit”