Semi-automatic Pick And Place Machine

semi-automatic-pick-and-place

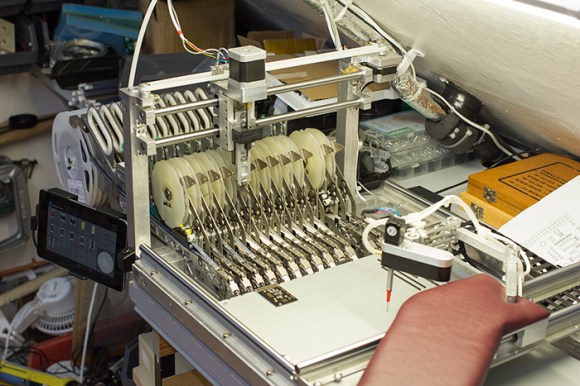
This is a fascinating take on building your own pick and place machine. It does an amazing job of automating the hardest parts of hand assembly, while relying on human dexterity to achieve the hardest parts of automation. It’s a semiautomatic pick and place machine driven by an Arduino and controlled by an Android tablet.

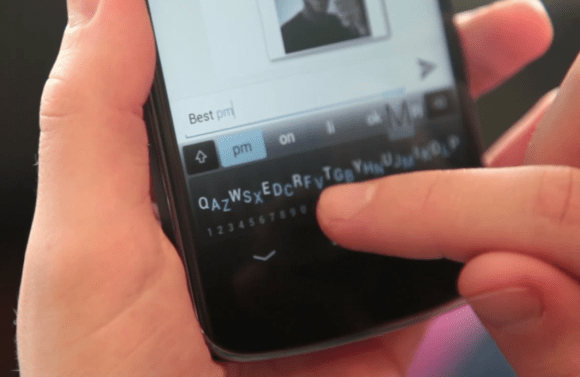
The machine is built in two parts. The portion in the upper left feeds components from reels and is fully automated. The portion on the lower right consists of a padded arm-rest which slides smoothly along two axes. A mechanical arm with multiple articulations is attached to the end, culminating in a tip connector for some vacuum tweezers. Right handers are the only ones who will find this convenient, but oh well. The clip after the break shows it in action. The assembly technician first selects the component from an icon on the Android tablet. The reel machine then dispenses that part, which is picked up by the vacuum tweezers using the left hand to switch the vacuum on and off again. If the part orientation needs to be rotated it can done using the jog wheel on the Android app. It smooth, quick, and best of all, clever!

Continue reading “Semi-automatic Pick And Place Machine”

Ask Hackaday: Are We Close To Reinventing The Keyboard For Touchscreens?

minuum-keyboard

We mourn the loss of the physical keyboard with the advent of tablets. After all, we do a bit of typing getting all of these features posted throughout the week. And we kind of blame tablets for the decline of the netbook industry (we still use a Dell Vostro A90 when not at home). But we’re trying to keep an open mind that we may not need a physical keyboard anymore. If someone can come up with an innovative alternative to the Qwerty layout that we are able to learn and can use with speed and without physical strain we’ll be on board. Our question is,  do you think we are close to a screen typing breakthrough?

This question came to mind after seeing the Minuum keyboard shown above. It compresses all of the rows of a Qwerty into a single row, monopolizing less screen space than conventional smartphone input methods. The demo video (embedded after the break) even shows them hacking the concept into a distance sensor and using a graphite-on-paper resistor. Pretty cool. But what happens when you type a word not in the dictionary, like this author’s last name?

You can actually try out the Minuum style thanks to [Zack’s] in-browser demo hack. He’s not affiliated with Minuum, but has done quite a bit of alternative keyboard input work already with his ASETNIOP chorded typing project. It’s another contender for changing how we do things.

Continue reading “Ask Hackaday: Are We Close To Reinventing The Keyboard For Touchscreens?”

Turning The Samsung Galaxy Note 10.1 Into A Proper Linux Box

Over on the xda developers forum, [exception13] shows us the work he’s put into geting Debian running on his Samsung Galaxy Note 10.1, allowing him to dual boot Android and Linux on a single device.

The project is still in a fairly early state, but so far [exception13] has most of the goodies required for a decent Linux experience running already. There’s WiFi, bluetooth, sound, usb-otg and touchscreen support, as well as support for the Note’s S Pen, the Wacom digitizer that basically turns the Galaxy Note 10.1 into an Intuos touch pad.

There’s still a lot of work work to be done, including getting the camera up and running, as well as enabling the GPS receiver. Still, it’s a very cool project that puts the power of a proper desktop interface into a tablet with enough horsepower to get something useful done.

If you’d like to get this running on your Galaxy Note, [exception13] has a download avaiable over on Google Code. There’s also a video [exception13] put together demoing all the cool stuff his Note can do, you can check that out after the break.

Continue reading “Turning The Samsung Galaxy Note 10.1 Into A Proper Linux Box”

PwnPad, The Pentesting Tablet

pwnpad3_1024x1024

Over the last few months, we’ve seen our fair share of pentesting appliances. Whether they’re in the form of a Raspberry Pi with a custom distro, or an innocuous looking Internet-connected wall wart, they’re all great tools for investigating potential security vulnerabilites at home, in the workplace, or in someone else’s workplace. Pwnie Express, manufacturers of pentesting equipment, are now releasing one of the best looking and potentially most useful piece of pentesting equipment we’ve ever seen. It’s called the PwnPad, and it allows you to get your pentesting on while still looking stylish.

Based on Google’s Nexus 7 tablet, the PwnPad combines all the goodies of a really great tablet – the ability to read NFC tags and multiband radios – with open source tools and a USB OTG cable with USB Ethernet, Bluetooth, and WiFi adapters. Everything in the PwnPad is designed for maximum utility for pentesting applications.

Of course, for those of us that already have a $200 Nexus 7, Pwnie Express says they’ll be giving away the source for their software, enabling anyone with knowledge of make to have the same functionality of the PwnPad. Of course you’ll need to get yourself a USB OTG cable and the WiFi, Bluetooth, and Ethernet adapters, but that should only add up to about $100; combined with a $200 Nexus 7, building your own is more than just a bit cheaper than Pwnie Express’ asking pre-order price of $795.

Smashed Tablet In NES Case Lives Out Its Days As An Emulator

smashed-tablet-nes-emulator

The creator of this project started off with a 7″ tablet he received from a coworker. The screen was horribly smashed from one corner spreading out through the entire surface. But the hardware inside still worked, including the HDMI out port. He ended up transplanting the tablet hardware for use as an emulator.

After a bit of sizing up it was determined that the tablet hardware would fit inside the case of a broken NES. The battery would have been a tough fit, but this thing is always going to need to be connected to a television so there’s no need to work without mains power. The back plate was cut down to size and used as a try for mounting the motherboard in the case. Before that step he wired up a USB hub and mounted it so that two ports could be accessed through the original controller port openings.

There’s no details on the software used, but the final image in the gallery shows a game of Starfox being played.

[Thanks Cody]

Telepresence Upgrade With A Minimum Of Effort

telepresence-upgrade-with-very-simple-parts

This telepresence upgrade lets an employee take part in the office from more than four thousand kilometers away. It’s an upgrade of their previous setup which used a laptop on a rotating platform to add a bit of control to the video conferencing experience. But all that original version could do was swivel, this one lets you drive your virtual self around for fifteen hours between battery charges.

The real work is in the base of the robot, as the audio and video are handled by a tablet independently from the locomotion. The team spent about four hundred bucks to throw the thing together. It starts with a hunk of plywood. Two 3A motors were mated with lawnmower wheels for the front of the bot. Dragging under the back of the base are a couple of casters that make it possible to turn without skidding. A motor shield and a WiFi shield for the Arduino make it possible to control the thing over the Internet. They even added some functionality on the client side to use a PlayStation 3 controller. Check out the completed machine in the clip after the break.

Continue reading “Telepresence Upgrade With A Minimum Of Effort”

Electronically Controlled NFC Tag

P1010393

[Per] is replacing his car stereo with a Nexus 7 tablet. It’s a great modification to add GPS, navigation, and a good music player, but [Per] wanted to pause his tunes and tell the tablet to go to sleep with an NFC tag. This means building a an NFC tag he can turn on and off, an interesting problem to say the least.

The easiest way to do this is with a CMOS switch, but a chip like a 74HC4066 is overkill for a project this simple. What [Per] needed was a single CMOS switch, something he found and fabbed a board for.

Now, with a press of a button, [Per] can activate his NFC tag and pause the music in his new stereo. Check out the video of this electronically controllable tag after the break.

Continue reading “Electronically Controlled NFC Tag”