DIY ESP32 Alarm System Leverages 433 MHz Sensors

There’s a huge market for 433 MHz alarm system hardware out there, from PIR motion detectors to door and window sensors. If you want to put them to work, all you need is a receiver, a network-enabled microcontroller, and some code. In his latest video, [Aaron Christophel] shows how easy it can be.

In essence, you connect a common 433 MHz receiver module to an ESP32 or ESP8266 microcontroller, and have it wait until a specific device squawks out. From there, the code on the ESP can fire off using whatever API works for your purposes. In this case [Aaron] is using the Telegram API to send out messages that will pop up with a notification on his phone when a door or window is opened. But you could just as easily use something like MQTT, or if you want to go old-school, have it toggle a relay hooked up to a loud siren.

Even if you aren’t looking to make your own makeshift alarm system, the code and video after the break are a great example to follow if you want to get started with 433 MHz hardware. Specifically, [Aaron] walks the viewer through the process of scanning for new 433 MHz devices and adding their unique IDs to the list the code will listen out for. If you ever wondered how quickly you could get up and running with this stuff, now you’ve got your answer.

In the past we’ve seen the Raspberry Pi fill in as an RF to WiFi gateway for these type of sensors, as well as projects that pulled them all together into a complete home automation system on the cheap.

Continue reading “DIY ESP32 Alarm System Leverages 433 MHz Sensors”

A Battery Sipping Cellular Mailbox Notifier

Like many of us, [Zak Kemble] has an indeterminate number of tiny packages coming his way from all over the globe at any given time. Unfortunately, the somewhat unpredictable nature of the postal service where he lives meant he found himself making a lot of wasted trips out to the mailbox to see if any overseas treasures had arrived for him. To solve the problem, he decided to build an Internet-connected mailbox notification system that could work within some fairly specific parameters.

For one thing, the mailbox is too distant to connect directly to it over WiFi. [Zak] mentions that 433 MHz might have been an option, but he decided to skip that entirely and just connect it to the cellular network with an A9G GPRS/GSM module from A.I. Thinker. This device actually has its own SDK that allows you to create a custom firmware for it, but unfortunately the high energy consumption of the radio meant it would chew through batteries too quickly unless it had a little extra help.

Not wanting to have to change the batteries every couple months, [Zak] added a ATtiny402 to handle the notifier’s power management needs. By using a P-MOSFET to completely cut power to the A9G, the notifier can save an incredible amount of energy by only activating the cellular connection once it actually needs to send a notification; which in this case takes the form of an HTTP request that eventually works its way to a Telegram group chat.

To cut a long story short, testing seems to indicate that the notifier can fire off approximately 800 requests before needing its 10440 lithium battery recharged. Given how often [Zak] usually receives mail, he says that should last him around five years.

The A9G module, the ATtiny402, a BME280 environmental sensor (because, why not?), the battery, and all the ancillary support hardware are on a very professional looking PCB. That goes into a relatively rugged enclosure that’s designed to keep the electronics from shorting out on the mailbox’s metal case as well as keeping any particularly weighty parcels from crushing it.

If you’ve got the freedom so mount whatever you want outside, then you can certainly build a more technically impressive mailbox. But considering the limitations [Zak] had to work around, we think he did an excellent job.

Quick And Dirty: Operate An Intercom Via Telegram

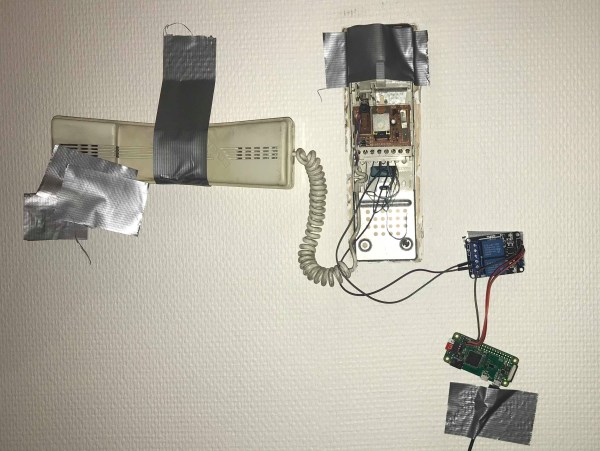
Never underestimate the quick and dirty hack. It’s very satisfying to rapidly solve a real problem with whatever you have on hand, and helps to keep your hacking skills sharp for those big beautifully engineered projects. [Guillaume M] needed a way to remotely open his apartment building door for deliveries, so he hacked the ancient intercom to be operated via Telegram, to allow packages to be deposited safely inside his mailbox inside the building’s front too.

[Guillaume] needed to complete the hack in a way that would allow him to return the intercom to its original state when he moves out. Opening the 30-year-old unit, he probed a row of screw terminals and identified a 13V supply, ground, and the connection to the buildings’ door lock. He connected the lock terminals to a relay, which is controlled by a Raspberry Pi Zero W that waits for the “open” command to be sent to a custom Telegram Bot.

To power the Pi, [Guillaume] connected it to the 13V supply on the intercom via a voltage divider circuit. Voltage dividers usually make lousy power supplies, since the output voltage will fluctuate as the load changes, but it looks as though it worked well enough for [Guillaume]. The intercom had a lot of empty space inside, so after testing everything was packed inside the housing.

If you want to achieve the same with an ESP8266, there’s a library for that. Just keep in mind that being dependent on web servers to open critical doors might get you locked out.

Routing IP Over Instant Messages Is Possible Yet Impractical

Telegram is an instant messaging app, well known for its focus on security and encryption. It’s used by government officials, journalists, and the paranoid, and can also handle VoIP calls, in addition to its text messaging capability. [PiMaker] wondered if all this encryption could be put to good use, and decided to try and route IP over Telegram, as you do.

The project is called Teletun, and it works! It uses telgram-cli, a command line interface for the instant messaging network. The actual IP routing is handled with a Python script, and [PiMaker] recommends that in use, the user should “pray to the gods for mercy”. Reports are that bandwidth is limited, but latency can go as low as 100ms, which suggests Telegram is indeed a fairly instant messenger.

Tunneling over instant messaging services is good practice for any aspiring hacker, but likely to be unwieldy for any practical purpose. If you can think of one, other than irritating the intelligence agents tapping your communications, throw it down in the comments below. Otherwise, consider other oddball ways to (ab)use Telegram.

A Different Way To Privately Chat Over Telegram

If you’ve had the need to send secure, private messages in recent times, you might have considered using Telegram. However, using such a service means that, if discovered, it’s well known what manner of encryption you’re using, and there’s a third party involved to boot. [Labunsky] walks a different path, and built a covert channel within Telegram itself.

[Labunsky] likens their process to the process used in the film Seventeen Moments of Spring, in which a flower placed in an apartment windows indicates a spy has failed their mission. In this case, instead of a flower in a window, one user blocks another to signal them. By switching the blocked status on and off, messages can be sent, albeit in a slow and convoluted way.

It’s more of a proof of concept than a practical way to message people over Telegram. With that said, it does work, and it might just keep the security services monitoring your chats confused for a few extra weeks. Or, it would, if we hadn’t written an article about it. Perhaps consider using zero-width characters instead.

Talking Telegram With The ESP8266

At this point it’s something of a given that a member of the ESP8266 family is likely your best bet if you want to cobble together a small Internet-connected gadget. Costing as little as $3 USD, this well documented all-in-one solution really can’t be beat. But of course, the hardware is only one half of the equation. Deciding how to handle the software side of your homebrew Internet of Things device is another story entirely.

A simple Telegram ESP8266 switch

It would be fair to say that there’s no clear-cut “right” way to approach the software, and it really depends on the needs or limitations of your particular project. For example [Brian Lough] finds that building Telegram support into his ESP8266 allows him to accomplish his goals with the minimum amount of fuss while at the same time using an environment he’s already comfortable with. He recently wrote in to share one of his Telegram projects with us, and in the video after the break, takes the time to explain some of the things he likes best about controlling his hardware through the encrypted chat platform.

But you don’t have to take his word for it, you can try it yourself. Thanks to the software library that [Brian] has developed to connect his projects to Telegram, the aptly named “Universal Telegram Bot Library”, anyone can easily follow in his footsteps. Adding his Telegram library to your next ESP8266 project is as easy as selecting it in the Arduino IDE. From there the video explains the process for getting a bot ID from Telegram, and ultimately how you use it to receive messages from the service. What you do with those messages is entirely up to you.

According to [Brian], the main downside is that you are beholden to a web service to control your local devices; not ideal if the Internet goes down or you would rather your little hacker projects not talk to the big scary Internet in the first place. If you’d rather keep all your smart things talking within the confines of your own network, perhaps your next project could be setting up a private MQTT server.

Continue reading “Talking Telegram With The ESP8266”

Telegram Your Devices

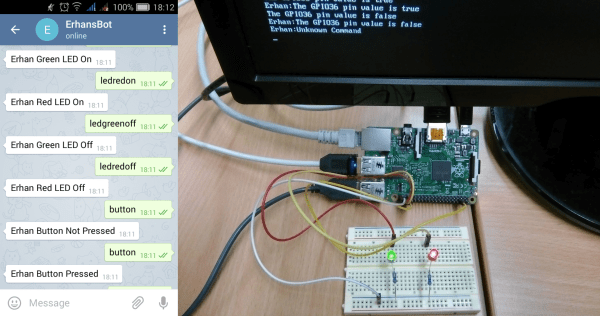
[Erhan] has been playing around with the Telegram instant messaging service. Initially, he worked out how to turn on and off LEDs from his cell phone: he sent commands from the phone through the Telegram bot API, to a computer that’s connected over serial to an MSP430 board that actually controlled the LEDs.

But that’s a little bit complicated. Better to cut out the middleman (err…microcontroller) and implement the Telegram reception and LED blinking on a Raspberry Pi. For a project that’s already using a Pi, using the instant messaging service’s resources is a very simple way to interface to a cellphone.

The code for both the standalone RPi project and the MSP430-based microcontroller application are available at [Erhan]’s GitHub. You’re going to be installing Node.js for their telegram-bot-api and jumping through the usual OAuth hoops to get your bot registered with Telegram. But once you’ve done that all on the Raspberry Pi (or target computer of your choice) it’s all just a few lines of fairly high-level code.

We’ve only seen one other Telegram application on Hackaday.io and we’re wondering why. It looks pretty slick, and with the bot’s ability to send a custom “keyboard” to the phone along with the message, it could make cell-phone-based control interfaces a cinch. Anyone else using Telegram for bots?