TI’s CC3000 WiFi Chip Gets A Library

About six months ago, Texas Instruments released a simple, cheap, single-chip WiFi module. At $10 a piece in quantities of 1000, the CC3000 is a much better solution to the problem of an ‘Internet of Things’ than a $50 Arduino Ethernet modules, or even the $30 Electric Imp. All indications, especially the frequent out of stock status for the dev board on TI’s web site, show the CC3000 will be a popular chip, but until now we haven’t seen a CC3000 library for the Arduino or other microcontrollers.

[Chris] just solved that problem for us with a CC3000 WiFi library for the Arduino. He ported TI’s MSP430 CC3000 library to the Arduino, allowing even the bare-bones Arduino Uno to connect to a WiFi network with just a handful of parts. The code itself takes about 12k of Flash and 350 bytes of RAM, giving anyone using the CC3000 enough room left over to do some really interesting stuff. There’s even a slimmed down library that uses somewhere between 2k and 6k of Flash, making an ATtiny-powered web server a reality.

There are a few caveats in using the CC3000 with an Arduino; it’s a 3.3 Volt part, so you’ll need a level shifter or some resistors. Also, the chip draws about 250 mA when it’s being used, so you’ll need a beefy battery if you want your project to last an entire day of use.

Now that the library is out of the way, be on the lookout for a CC3000 breakout board. Here’s one, but expect some more on the market soon.

A Breakout Board For A Tiny WiFi Chip

A few weeks ago, we caught wind of a very tiny, very inexpensive WiFi chip  TI is producing. Everything required of an Internet connection – TCP/IP stack, configuration utilities, and your WEP, WPA, and WPA2 security tools is included in a single tiny chip, making this a very cool device for an Internet-connected microcontroller project. There’s only one problem: TI put this chip in a really, really weird package, and there aren’t any breakout boards for it.

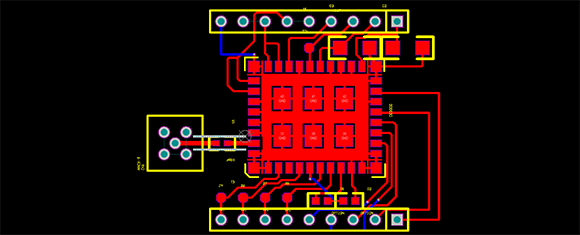
That is, until now. [Vince] was convinced to spend some time in Altium to design a breakout board for this tiny WiFi chip. Now, if you can get your hands on a sample of the CC3000 from TI, you can breadboard out a circuit with the help of [Vince]’s design.

Included in [Vince]’s git are the board files for this breakout board, schematics, and the necessary parts if anyone has the inclination to make an Eagle library. If anyone wants to spin a few of these boards and put them up on a Tindie Fundraiser, that’d be fine by us, and [Vince] would probably appreciate that as well.

Finally, TI Is Producing Simple, Cheap WiFi Modules

Ever responsive to the hobbyist market, Texas Instruments is releasing a very inexpensive, very simple WiFi module specifically designed for that Internet of Things.

The TI SimpleLink TI CC3000 WiFi module is a single-chip solution to putting 802.11b/g WiFi in just about every project you can dream up. Just about everything needed to put the Internet in a microcontroller is included in this chip – there’s a TCP/IP stack included on the chip, along with all the security stuff needed to actually connect to a network.

The inexpensive micocontroller WiFi solutions we’ve seen – including the very cool Electric Imp – had difficult, or at least odd, means of putting WiFi credentials such as the SSID and password onto the device. TI is simplifying this with SmartConfig, an app running on a phone, tablet, or PC that automagically takes care of setting up a link in a wireless network.

Best of all, the CC3000 only costs $10 in quantities of 1000. Compare that to other Internet of Things WiFi solutions, and it looks like we might be seeing and easy and cheap way to connect a project to the internet this year.

Web-based TI Graphing Calculator Emulator

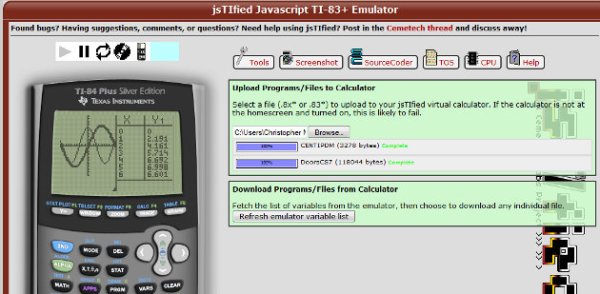
You can leave the TI graphing calculator at home thanks to this web-based TI-83 and TI-84 emulator. As with pretty much all emulators, this depends on a ROM image from the actual hardware to work. But if you have one of the supported calculators (TI-83+, TI-83+ SE, TI-84+, or TI-84+SE) you can dump the image yourself and this should work like a charm.

[Christopher Mitchell] calls the project jsTIfied because he wrote it in JavaScript and HTML5 (that’s where the js comes from) and it’s based on the Texas Instruments line of hardware (hence the capital TI). After agreeing that you’re not getting any ROMs from his site you can choose the file to load on your browser. The image of the calculator has working buttons and will show the boot screen just like the real thing. You can use it like normal but you can load load up programs for the environment. See this demonstrated after the break.

We’ve seen some arguments online about the price of the TI line over the years. Prices haven’t dropped much over the decades even though they’re making pretty much the same hardware. It’s cool to see someone figure out how to emulate the hardware — and on a web interface to boot! But we’re left wondering why TI isn’t selling an equivalent app for iOS and Android or at least leveraging what must be millions in each production run for a lower retail price?

Continue reading “Web-based TI Graphing Calculator Emulator”

Level Converters To Make All Your Hardware (5.5V And Under) Play With Each Other

txb0108-level-converters-ks0108-stellaris-launchpad

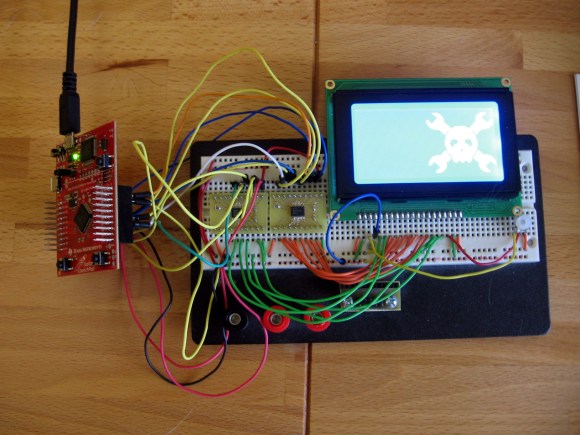
I finally set aside some time for one of my own projects. I have been playing around with ARM microcontrollers a lot lately and wanted to try out my GLCD display that uses the KS0108 protocol. It’s 5V but I had heard that some of these displays will work with 3.3V TTL. But the datasheet tells me otherwise. I tried using a pull-up resistor to 5V and configuring the Stellaris Launchpad pins to open drain, but the low voltage wasn’t getting below the 0.3V threshold needed by my display. My only choice was to use some type of level conversion. I actually ended up driving the KS0108 using a pair of TXB0108 level converters.

I figured this had to have been done before so I check over at Sparkfun. Their offerings are either one-way or have a direction pin that you must drive yourself. I figured there had to be a bi-directional solution and a search over at Mouser led me to the TXB0108. It is exactly what I was looking for and as you can see I etched my own circuit boards to make the TSSOP chips breadboard compatible. I’ve documented the process you can find the code and board files at my post linked above.

Update: one of the Reddit comments mentions this chip is available on a breakout board from Adafruit if you’re interested.

Guide To Developing With The Stellaris Launchpad On A Linux Box

So you picked up your very own Stellaris Launchpad, a TI ARM dev board which can be in your hands for just five bones. They do distribute several free IDEs which are not size-limited but perhaps you’re more of a text editor and command line sort of person. Well you’re in luck. There’s now a guide to show you how to code for and program the Stellaris Launchpad from a Linux box with using one of the IDEs.

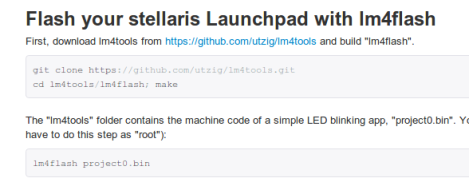
There are two main things that are needed to accomplish this. The first is a cross-compiling toolchain for the ARM architecture; something that has been readily available for quite some time. The second is a way to talk to the in-built Stellaris programmer from a Linux machine. The hardware uses the ICDI protocol, and as we reported last week the lm4tools project can be used for this purpose. The guide also covers building the StellarisWare package. It’s not a requirement, but it makes using the peripherals much easier and provides names for the I/O pins, etc.

Our favorite for debugging microcontroller projects is OpenOCD. From this thread post it looks like there is now ICDI support in the development branch of the software if you don’t mind compiling from source.

Hands On The Stellaris Launchpad

We just got our hands on a Stellaris Launchpad. We had placed an order when the preorder was originally announced, but the marketing folks at TI reached out an offered to send us one a bit sooner and took them up on it. We’ve embedded a quick unboxing video after the break but read on for some info that didn’t make it into that clip.

The look and feel of the board and its packaging are almost exactly the same as the MSP430 version of the Launchpad. But why not? After all it worked so well the first time. This board hosts an ARM Cortex-M4 processor. The two buttons on the bottom are user buttons, the one on the upper right is a reset button. The top of the board is the programmer, with a micro USB port for connectivity. The kit also includes about a 2′ cable for this connection. Next to that jack is a switch that selects a power source. You’ll also notice a USB port to the left, this because the processor includes USB functionality, with a free library available from TI. Power can come from the programmer/debugger USB port, or from this device USB port. There are dual pin headers to either side on the face of the board, and pin sockets on the back which break out pins of the processor. Just below the reset button is a RGB LED, and a clock crystal has also been populated just above the chip.

When plugged in via the programmer’s USB port the PWR LED lights up as does the RGB LED. The firmware that ships on the device fades through a range of colors and the user buttons scroll through a set of predefined colors. The device enumerates as: “Bus 002 Device 005: ID 1cbe:00fd Luminary Micro Inc.” on our machine. But if you connect it via the device USB jack it enumerates as: “Bus 001 Device 015: ID 04e8:689e Samsung Electronics Co., Ltd GT-S5670 [Galaxy Fit]”. Interesting.

We have no idea if there are programming tools for flashing the board using a Linux box, but we’ll be trying to figure it out. If you have some info please share it in the comments.

Continue reading “Hands On The Stellaris Launchpad”