Embossing Leather With A Pipe Bender And 3D Printed Tooling

Embossed leather belts can be deliciously stylish. However, the tooling for making these fashionable items is not always easy to come by, and it rarely comes cheap. What do we do when a tool is expensive and obscure? We 3D print our own, as [Myth Impressions] demonstrates.

The build is based around a Harbor Freight pipe bender. However, instead of the usual metal tooling, it’s been refitted with a printed embossing ring specifically designed for imprinting leather. The tool features raised ridges in an attractive pattern, and the pipe bender merely serves as a straightforward device for rolling the plastic tooling over a leather belt blank. Once cranked through the machine, the leather belt comes out embossed with a beautiful design.

It’s a neat project, and the 3D printed tooling works surprisingly well. The key is that leather is relatively soft, so it’s possible to use plastic tools quite effectively. With that said, you can even form steel with printed tooling if you use the right techniques.

We’ve seen some other neat leatherworking hacks before, like this nicely-modified Singer sewing machine.

Continue reading “Embossing Leather With A Pipe Bender And 3D Printed Tooling”

Locate Faults With The Leakseeker-89R

Have you ever needed to hunt down a short circuit, but you’ve had no idea where it is or how it’s happening? As it turns out, there are tools to help in that regard. Enter the Leakseeker-89R.

The device is able to help hunt down short circuits that measure anywhere from 0 to 300 ohms. The device is typically used with two leads on a given pair of traces, and it has a display made up of red, yellow and green LEDs. As the leads are moved closer or farther from the short circuit, the display changes to indicate if you’re getting hotter or colder. There’s also a third lead that can be used to allow testing under more challenging conditions when there is a large capacitance in-circuit with the traces you’re testing.

Fundamentally, it’s basically a very accurate resistance meter, finely honed for the purpose of hunting down short circuits. We’ve featured similar tools before. They can be of great use for troubleshooting. Meanwhile, if you’re building your own test tools in your home lab, don’t hesitate to let us know! We’re always dying for hot tips on the best DIY lab equipment for saving time, frustration, and money.

Building A Woodworking Lathe From Scratch

Today, cheap dodgy machine tools are more readily available than ever. Sometimes though, there’s great value in putting a simple and rugged version of your own, as demonstrated by [bartworker]’s woodworking lathe build. 

The core of the build is a hefty wooden base, something that is a core component of any good machine tool. It was built from a large beam sourced from a ship supply house, and originally used to hold a sturdy vice. It eventually gained a motor from a cement mixer when [bartworker] decided it should be converted into a lathe. From there, it was further equipped with a sliding support for larger workpieces, allowing [bartworker] to lathe some seriously big stock.

The lathe is very much an ever-evolving thing, and [bartworker] has used it to share the joys of woodworking with his family and friends. As a demonstration of its abilities, the lathe was able to produce a handsome handle for [bartworker]’s axe.

As this story shows, the only thing better than a tool you build yourself is one that your friends get to enjoy too! Meanwhile, if you’ve been whipping up your own machinery, don’t hesitate to drop us a line!

Printable One-Way Driver Skips Ratchet For A Clutch

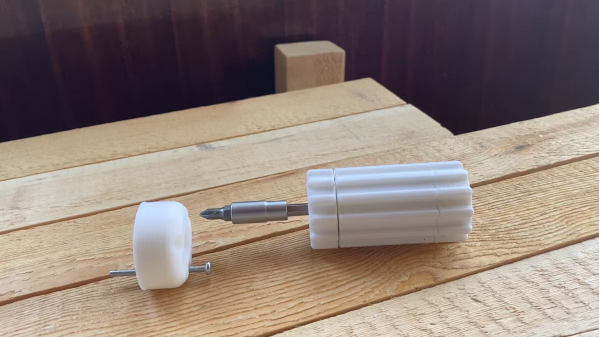
Ratcheting screwdrivers can help you work faster, even if their bulk means they’re not the best option for working in tight spaces. [ukman] decided to build a similar device of his own, relying on a slightly different mechanism — an overrunning clutch.

The design is similar to a freewheel used on a bicycle, allowing free movement in one direction while resisting it in the other. As the screwdriver is turned in one direction, the shaft is wedged by a series of cylinders that lock it in place. However, the geometric shape of the clutch allows the shaft to turn in the other direction without getting wedged in place. The result is a screwdriver that can be turned, rolled back, and turned further. Thus, screws can be tightened without loosening one’s grip on the tool.

With its 3D printed construction, it’s probably not the best tool for heavy-duty, high-torque jobs, but it looks more than capable of handling simple assembly tasks. We’ve seen some other nifty screwdrivers around these parts, too.

Continue reading “Printable One-Way Driver Skips Ratchet For A Clutch”

Angled Drill Guide Helps You With Those Tricky Holes

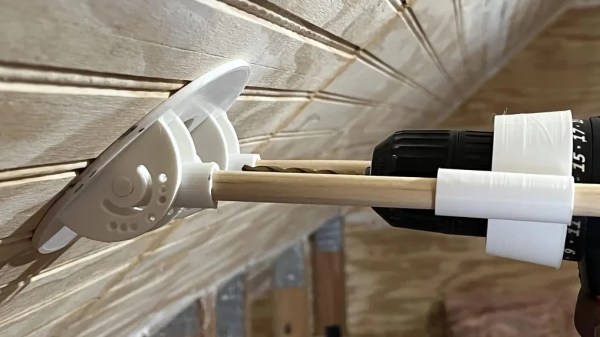
If you’ve ever tried to drill a hole on an angle with a power drill, you’ve probably drilled some pretty shocking holes. To do it right, you really need some mechanical assistance, and this jig from [Kartik_Nandrui] should do the trick.

The device uses a guide that sits on the surface to be drilled, with a pair of angled connectors that fit two wooden dowels. These connect the guide to a corresponding sleeve that fits around the drill body. The sleeve then slides up and down the dowels, allowing the drill to move in a straight line towards the targeted area.

It’s a useful hack, but we can see room for some improvements that would take it to the next level. Having a way to lock the angle of the guide base would be great for accuracy. As it’s 3D printed, it would also be simple to create a version with a curved guide base that could fit over pipes, or other designs to fit complex geometries like roof sheeting or other corrugated materials.

Sometimes the most interesting hacks are the ones that get us thinking about our own potential projects. If you’ve got any creative tool hacks you’ve been brewing up in the lab, be sure to let us know!

Vise Tripod Lets You Put The Tool Where You Need It

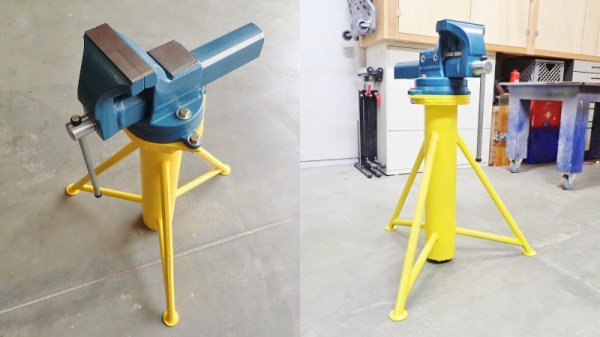
Vises are useful things for holding whatever you’re working on, but too often they’re stuck to a bench. [seamster] has experienced the glory of having a more portable solution, however, and has shared his design for a heavy duty vise tripod that provides just that.

The trick is that to be useful, the design must be heavy and stout enough to hold the vise without tipping over. For this build, [seamster] selected a fat steel pipe with 1/4″ thick walls, some solid bars and some 3/8″ thick plate. Legs and arms where then fabbed up from the bar material and welded up to form the tripod. A stout plate for the vise was then welded on top of the pipe, and the vise mounted pride of place on top.

It’s not a particularly difficult build, but it’s a smart idea that gets you a vise you can easily drag to where it’s needed. If you don’t have the vise itself, consider this hydraulic build. Meanwhile, if you’ve been whipping up your own useful workshop hacks, let us know!

Building Your Own Filing Machine From A Kit

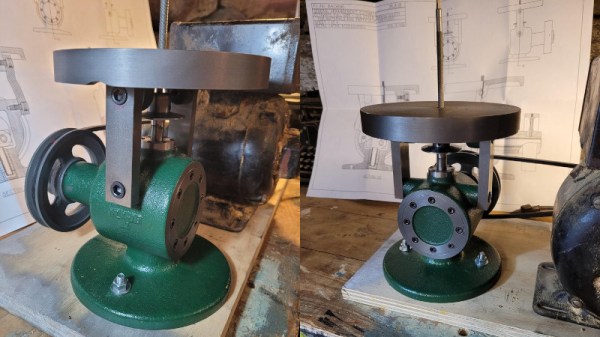
Files are a very useful important tool if you’re machining your own parts. They can do plenty of shaping themselves on smaller parts in particular. Powering such a tool just makes sense, and a die filer or filing machine is essentially just that, reciprocating a file up and down for you. They’re highly prized amongst clockmakers and model builders, and [jeanluc83] decided to build one at home.

The design chosen was the MLA-18 filing machine, for which castings and parts can be purchased from a company called Metal Lathe Accessories. However, it’s far from a simple screw-together kit. [jeanluc83] goes through the full process of painting, machining, and assembling the kit, which takes quite a bit of work to do properly.

Notably, the design is quite old fashioned in that it does not include its own power source. Instead, the MLA-18 filing machine is fitted with a pulley, such that it can be driven from a motor on a bench. A 1/4 horsepower motor running at roughly 1725 RPM is recommended for best results.

Filing machines aren’t exactly something you’ll find at every hardware store or Harbor Freight, so you might find building your own is the right way to go. Hackaday is, after all, full of examples of hackers building their own tools!