The TRS-80 Model 100 was an amazing piece of kit when it was released. Able to run for a week with just four AA batteries and smaller than some laptops today, this portable version of the TRS-80 saw action with war correspondents covering the Falklands invasion. A pedigree a MacBook Pro will never be able to live up to, it seems.
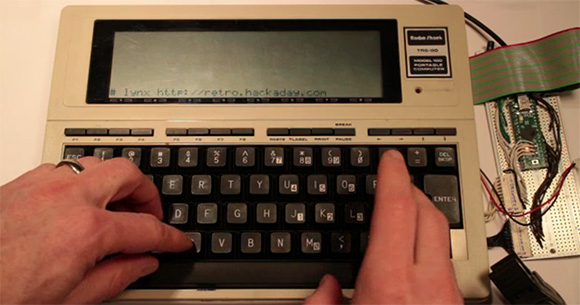
[Hudson] picked up a non-functioning Model 100 with the express goal of replacing the 30-year-old electronics inside with an updated motherboard – and also pull up our retro site in the process. Armed with a Teensy++, [Hudson] pried open his ancient computer and set to work interfacing the display and keyboard to his AVR dev board.
The LCD display in the Model 100 has a resolution of 240×64, driven by ten Hitachi HD44102 display drivers. Each of these display drivers are responsible for the pixels in a 50×32 rectangle on the screen and are interfaced with a 30-bit wide bus consisting of chip select lines, and 8-bit data bus, and a few other random control lines. [Hudson] plugged this 30 pin header into his Teensy++ and after a bit of ingenuity regarding the strange electrical requirements of the LCD, was able to control every pixel on this 30-year-old display.
The next order of business was interfacing the keyboard with a modern microcontroller. The keyboard is laid out in a normal matrix, but with a few oddities: characters like ~, |, and curly brackets aren’t present on the Model 100. After working these problems out, [Hudson] set to work on a VT100 terminal emulator. This allowed him to run vi and lynx, enabling him to pull up the Hackaday retro site in a wonderful forty-column text mode.
Future improvements to this redesign include designing a proper PCB to replace the current protoboard design. The original Model 100 included a text editor and programming language, and adding a Forth implementation isn’t out of [Hudson]’s grasp. It’s an awesome build, and an excellent improvement that will allow [Hudson]’s Trash-80 to see another 30 years of use.