This Joy-Con Grip Steers Its Way To Sweaty Victory

Here at Hackaday we’re always exited to see hacks that recycle our favorite childhood consoles into something new and interesting. In that context, it’s not so uncommon to see mods which combine new and unusual control methods with old devices in ways that their manufacturers never intended. What [Mike Choi] has built with the Labo Fit Adventure Kit is the rare hack that combines radically new control schemes with a modern console: without actually modifying any hardware.

Face button pusher in blue

In short, the Labo Fit Adventure Kit lets the player play Mario Kart on the Nintendo Switch by riding a stationary exercise bike, steering with a wheel, and squeezing that wheel to use items. The Fit Kit combines the theme of Labo, Nintendo’s excellent cardboard building kit for the Nintendo Switch with the existing Ring-Con accessory for the unrelated Nintendo game Ring Fit Adventure plus a collection of custom hardware to tie it all together. That hardware senses cadence on the stationary bike, watches for the user to squeeze the handheld wheel controller, and translates those inputs to button presses on the controller to play the game.

Shoulder button pusher in green

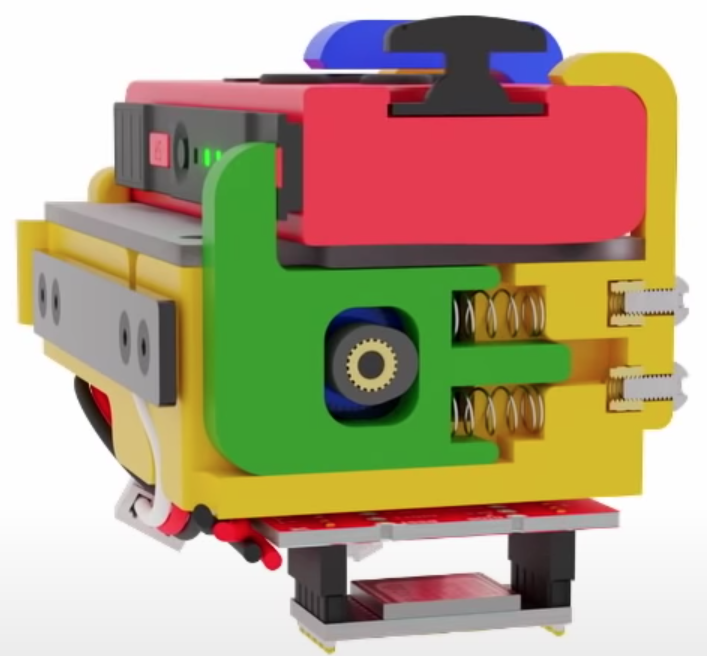
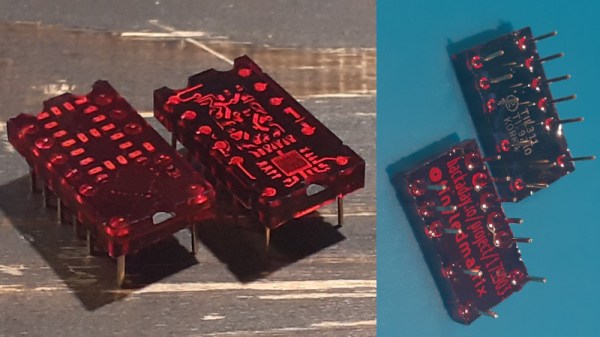
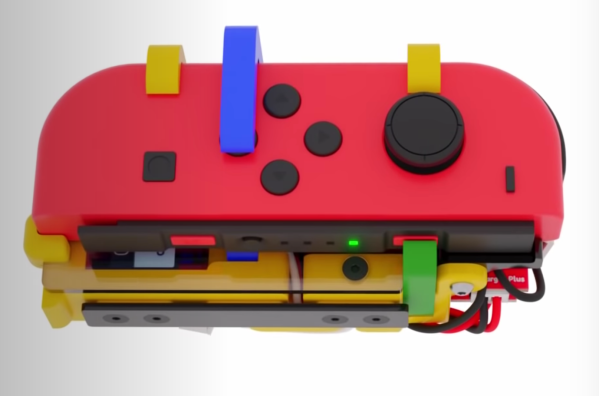
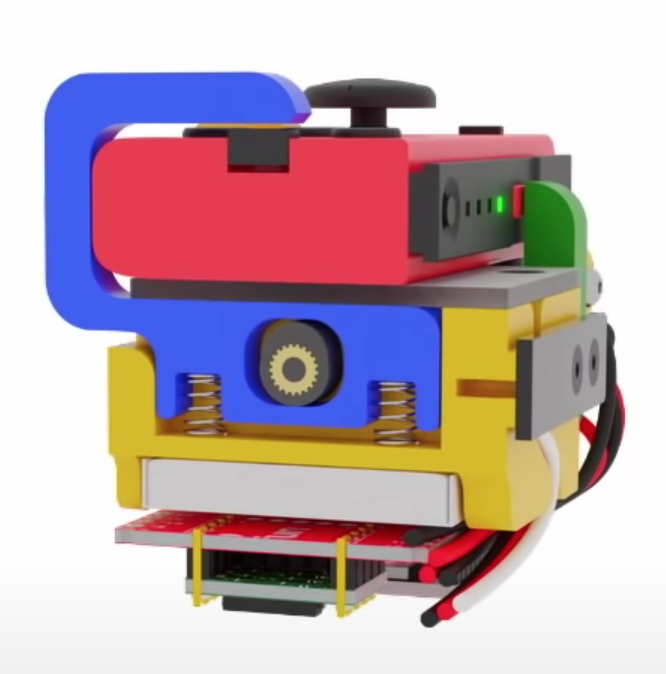
The most fascinating element of this project is the TAPBO module which adapts the Joy-Con controller to remote input. The module includes electronics, actuators, and a clever mechanical design to allow it to be mounted to the Ring-Con in place of an unmodified Joy-Con. Electrically the components will be familiar to regular Hackaday readers; there is a breakout board for a Teensy which also holds an XBee module to receive inputs remotely and drive a pair of servos. The entire module is described in detail starting at 4:42 in the video.

Mechanically the TAPBO relies on a pair of cam-actuated arms which translate rotational servo motion into linear action to press shoulder or face buttons. The module directly measures flex of the Ring-Con with an added flexible resistor and receives cadence information from another module embedded in the stationary bike via Zigbee. When these inputs exceed set thresholds they drive the servos to press the appropriate controller buttons to accelerate or use an item.

We’ve focused pretty heavily on the technical aspects of this project, but this significantly undersells the level of polish and easy to understand documentation [Mike] has produced. It includes a TAPBO Amiibo in customized packaging, and more. Check out the full video to get the complete scope of this project.

Continue reading “This Joy-Con Grip Steers Its Way To Sweaty Victory”

Building A Cheap Kubernetes Cluster From Old Laptops

Cluster computing is a popular choice for heavy duty computing applications. At the base level, there are hobby clusters often built with Raspberry Pis, while the industrial level involves data centers crammed with servers running at full tilt. [greg] wanted something cheap, but with x86 support – so set about building a rig his own way.

The ingenious part of [greg]’s build comes in the source computers. He identified that replacement laptop motherboards were a great source of computing power on the cheap, with a board packing an i7 CPU with 16GB of RAM available from eBay for around £100, and with i5 models being even cheaper. With four laptop motherboards on hand, he set about stacking them in a case, powering them, and hooking them up with the bare minimum required to get them working. With everything wrapped up in an old server case with some 3D printed parts to hold it all together, he was able to get a 4-node Kubernetes cluster up and running for an absolute bargain price.

We haven’t seen spare laptop motherboards used in such a way before, but we could definitely see this becoming more of a thing going forward. The possibilities of a crate full of deprecated motherboards are enticing for those building clusters on the cheap. Of course, more nodes is more better, so check out this 120 Pi cluster to satiate your thirst for raw FLOPs.

Recreating The Mac SE Logic Board

When [Kai Robinson] found himself faced with the difficult task of saving as many Mac SE’s as he possibly could, the logical but daunting answer was to recreate the Mac SE logic board for machines that would otherwise be scrapped. These machines are over 30 years old and the PRAM battery often leaks, destroying parts and traces. Given that the logic board is a simple through-hole two four-layer board, how hard could it be?

The first step was to get some reference photos so [Kai] set to desoldering everything on the board. The list of components and the age of solder made this an arduous task. Then a composite image was produced by merging images together using a scanner and some Inkscape magic. in graphics software.

Rather than simply putting the pins in the right place and re-routing all the netlists, [Kai] elected instead to do a copy, trace for trace of the original SE board. [Kai] and several others on the forum have been testing the boards and tracking down the last few bugs and kinks in the design. An unconnected pin here and an improperly impedance matched resistor there. Hopefully, soon they’ll have Gerbers and design files ready for anyone should they need a new logic board PCB.

It’s no secret that we love the Macintosh SE here at Hackaday. We’ve seen new custom cases for it and now new PCBs for it. It does cause the mind to ponder though and wonder, what’s next?

Thanks [Toru173] for sending this one in!

VESA Arm Turned Low-Cost Overhead Camera Rig

Whether you’re live streaming builds or just want to take your project photography to the next level, you can’t beat an overhead camera setup. Unfortunately, they tend to be cumbersome and more often than not quite pricey. Looking for an affordable solution that could easily be moved out of the way when not in use, [Jay Doscher] had the clever idea of adapting a common VESA monitor arm to give his camera a bird’s eye view of the action.

If you think about it, one of these monitor arms is a nearly perfect base for a camera rig. They’re easily mounted to a desk or work bench, can be quickly repositioned by design, and perhaps best of all, you don’t have to spend a lot of money to get a decent one. A camera is also a far lighter and less awkward payload than the arm was designed to hold, so you don’t have to worry about it potentially dropping your expensive gear. Or cheap webcam, as the case may be.

All [Jay] had to do was come up with a way to securely mount his Sony A7R3 on the end of one. While there’s certainly a few ways you could solve this particular problem, he went the extruded plastic route and 3D printed a beefy adapter plate with the standard VESA bolt pattern. His Smallrig camera cage attaches to the plate, and thanks to a pair of press-fit bubble levels from McMaster Carr, he’s able to get everything lined up properly over the bench.

Of course, there’s an excellent chance you don’t have the same camera as [Jay]. But that doesn’t mean you can’t modify the design of his adapter to fit your own gear. To that end, he’s not only shared the final STLs, but he’s provided a link to the TinkerCAD project that you can actually edit right in the browser.

If you’ve got a light enough camera, you could put something similar together with PVC pipes or even an articulated arm intended for a desk lamp. But if you’ve got a DSLR or other full-sized camera, we think it’s more than worth the $30 USD one of these will cost you on Amazon to make sure your gear doesn’t end up smashing into the deck during a live stream.

A Modern Homage To The TIL311 Display

Back in the 1970s, there were a huge variety of esoteric LED displays on the market. One of those was the DIP-packaged TIL311 from Texas Instruments, capable of displaying hexadecimal, from 0-9 and A-F. While these aren’t readily available anymore, the deep red plastic packages had some beauty to them, so [Alex] set about making a modern recreation.

The build consists of a small PCB fitted with 20 LEDs, and a STM8S microcontroller to run the show. This can be used to emulate the original decoder logic on the TIL311, or programmed with other firmware in order to test the display or enable other display functions. Where the project really shines however is in the visual presentation. [Alex] has been experimenting with potting the hardware in translucent red resin to properly emulate the look of the original parts, which goes a long way to getting that cool 70s aesthetic. Attention to detail is top notch, with [Alex] going so far as to carefully select pins that most closely match the square-cut design on the original TIL311 part.

It’s a fun build that could be useful for a project when you can’t get working new old stock. We’ve seen similar efforts for Nixie tubes in the past. Video after the break.

Continue reading “A Modern Homage To The TIL311 Display”

Getting Ready For Mars: The Seven Minutes Of Terror

For the past seven months, NASA’s newest Mars rover has been closing in on its final destination. As Perseverance eats up the distance and heads for the point in space that Mars will occupy on February 18, 2021, the rover has been more or less idle. Tucked safely into its aeroshell, we’ve heard little from the lonely space traveler lately, except for a single audio clip of the whirring of its cooling pumps.

Its placid journey across interplanetary space stands in marked contrast to what lies just ahead of it. Like its cousin and predecessor Curiosity, Perseverance has to successfully negotiate a gauntlet of orbital and aerodynamic challenges, and do so without any human intervention. NASA mission planners call it the Seven Minutes of Terror, since the whole process will take just over 400 seconds from the time it encounters the first wisps of the Martian atmosphere to when the rover is safely on the ground within Jezero Crater.

For that to happen, and for the two-billion-dollar mission to even have a chance at fulfilling its primary objective of searching for signs of ancient Martian life, every system on the spacecraft has to operate perfectly. It’s a complicated, high-energy ballet with high stakes, so it’s worth taking a look at the Seven Minutes of Terror, and what exactly will be happening, in detail.

Continue reading “Getting Ready For Mars: The Seven Minutes Of Terror”

Finishing Your Projects Hack Chat With Zack Freedman

Join us on Wednesday, February 10 at noon Pacific for the Finishing Your Projects Hack Chat with Zack Freedman!

Try as we might, some of us are much better at starting projects than finishing them. Our benches — or all too often, our notebooks — are graveyards of good attempts, littered with the scraps of ideas that really sounded good at the time and clouded by a miasma of good intentions and protestations that “This time, it’ll be different.” Spoiler alert: no, it won’t.

Trying to pin the cause of this painfully common problem on something specific is probably a fool’s errand, especially when given the fact that some people mysteriously don’t suffer from it, it would appear brain chemistry plays a role. Maybe some people just really like the dopamine hit of starting something new, which gives them the rush of excitement while the idea is still fresh, only to have it wane rapidly as the project enters the churn.

Whatever it is, if you suffer from it, chances are good you’ve looked for a way out at least once. If so, you’ll want to hop into this Hack Chat, where “very serious hacker” Zack Freedman, proprietor of the Voidstar Labs channel on YouTube, will share his thoughts on project follow-through. We’ve enjoyed Zack’s projects for a while now, and covered a few, from his in-your-face (on-your-wrist?) smartwatch to his video editing keypad. He gets stuff done, perhaps in part due to his workshop organization, but however he does it, we’re eager to hear about it. Join us as we discuss the art of follow-through and getting stuff done.

join-hack-chatOur Hack Chats are live community events in the Hackaday.io Hack Chat group messaging. This week we’ll be sitting down on Wednesday, February 10 at 12:00 PM Pacific time. If time zones have you tied up, we have a handy time zone converter.

Click that speech bubble to the right, and you’ll be taken directly to the Hack Chat group on Hackaday.io. You don’t have to wait until Wednesday; join whenever you want and you can see what the community is talking about.

Continue reading “Finishing Your Projects Hack Chat With Zack Freedman”