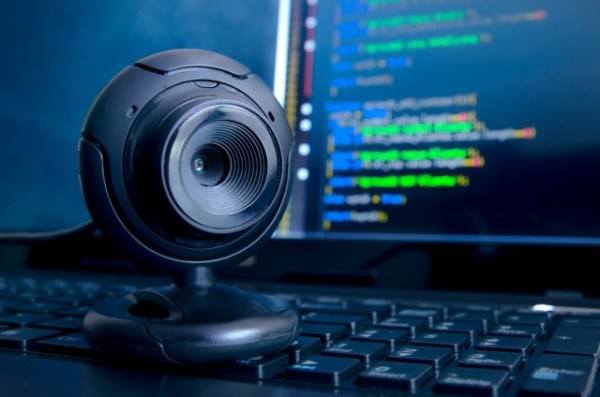
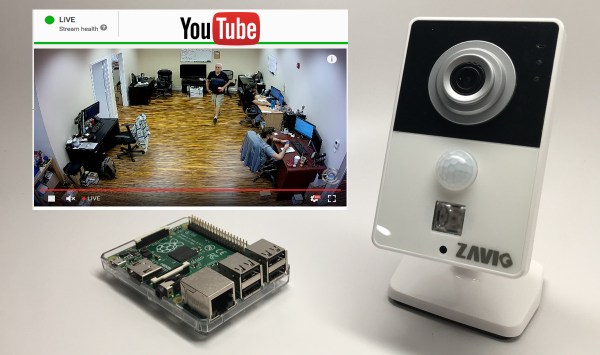
Listen To The Rain, Raspberry Pi Style

There’s an old proverb algebra teachers often recite: You have to use what you know to find out what you don’t know. The same could be said about sensors. For example, analog to digital converters use something computers are good at finding (like time) and use it to determine something they aren’t good at finding (like voltage). So how do you detect rainfall? If you are [lowflyerUK], you use the microphone in your web camera and a Raspberry Pi.

The idea was to reduce irrigation usage based on rainfall, so an exact measurement isn’t necessary. The Python code that analyzes the audio input is calibrated with three configuration parameters and attempts to remove wind noise. Even so, it needs to be in a room that gets a lot of noise from rainfall and ambient noise can throw the reading off.

The weather service is never going to adopt this system. Still, it is a great example of taking something you know and using it to get something you don’t know. If you want a more complete weather station, we have a few options for you.

Head Gesture Tracking Helps Limited Mobility Students

There is a lot of helpful technology for people with mobility issues. Even something that can help people do something most of us wouldn’t think twice about, like turn on a lamp or control a computer, can make a world of difference to someone who can’t move around as easily. Luckily, [Matt] has been working on using webcams and depth cameras to allow someone to do just that.

[Matt] found that using webcams instead of depth cameras (like the Kinect) tends to be less obtrusive but are limited in their ability to distinguish individual users and, of course, don’t have the same 3D capability. With either technology, though, the software implementation is similar. The camera can detect head motion and control software accordingly by emulating keystrokes. The depth cameras are a little more user-friendly, though, and allow users to move in whichever way feels comfortable for them.

This isn’t the first time something like a Kinect has been used to track motion, but for [Matt] and his work at Beaumont College it has been an important area of ongoing research. It’s especially helpful since the campus has many things on network switches (like lamps) so this software can be used to help people interact much more easily with the physical world. This project could be very useful to anyone curious about tracking motion, even if they’re not using it for mobility reasonsContinue reading “Head Gesture Tracking Helps Limited Mobility Students”

A Non-Infinite But Arbitrariliy Large Number Of Video Feeds

It’s pretty common to grab a USB webcam when you need something monitored. They’re quick and easy now, most are plug-and-play on almost every modern OS, and they’re cheap. But what happens when you need to monitor more than a few things? Often this means lots of cameras and additional expensive hardware to support the powerful software needed, but [moritz simon geist] and his group’s Madcam software can now do the same thing inexpensively and simply.

Many approaches were considered before the group settled on using PCI to handle the video feeds. Obviously using just USB would cause a bottleneck, but they also found that Ethernet had a very high latency as well. They also tried mixing the video feeds from Raspberry Pis, without much success either. Their computer is a pretty standard AMD with 4 GB of RAM running Xubuntu as well, so as long as you have the PCI slots needed there’s pretty much no limit to what you could do with this software.

At first we scoffed at the price tag of around $500 (including the computer that runs the software) but apparently the sky’s the limit for how much you could spend on a commercial system, so this is actually quite the reduction in cost. Odds are you have a desktop computer anyway, and once you get the software from their Github repository you’re pretty much on your way. So far the creators have tested the software with 10 cameras, but it could be expanded to handle more. It would be even cooler if you could somehow incorporate video feeds from radio sources!

Continue reading “A Non-Infinite But Arbitrariliy Large Number Of Video Feeds”

EddiePlus, The Edison Based Balancing Robot

[Renee] dropped a tip to let us know about EddiePlus, her balancing robot creation. As its name might imply, EddiePlus is controlled by an Intel Edison processor. More specifically, [Renee] is using several of Sparkfun’s Edison Blocks to create Eddie’s brain. EddiePlus’ body is 3D printed, while his movement comes from two Pololu DC motors with wheels and encoders. The full build instructions are available as a PDF from [Renee’s] Google drive.

Eddie is able to balance and drive around on two wheels, much like a Segway. Sensor data for balance comes from Sparkfun’s LSM9DS0 based Inertial Measurement Unit (IMU) block. In this new “plus” version of Eddie, [Renee] has added encoders to the robot’s wheels. This makes it easier for him to adapt to changing loads – such as pumping iron (or banana plugs as the case may be). The encoders also help with varying terrain, as [Renee] demonstrates by tilting a board as Eddie drives on it. Eddie’s code is written in C, and available on Github.  Controlling Eddie is as easy as sending simple commands via UDP.

As you might imagine, the Intel Edison still has plenty of cycles left over after computing Eddie’s balance. [Renee] uses some of these with a webcam based teleoperation mode.

Click past the break to see Eddie in action!

Continue reading “EddiePlus, The Edison Based Balancing Robot”

"Stomach Shot" lets you see through your zombie corpse.

“Stomach Shot” Halloween Costume

Halloween may have come and gone, but [Luis] sent us this build that you’ll want to check out. An avid Walking Dead fan, he put in some serious effort to an otherwise simple bloody t-shirt and created this see-through “stomach shot” gunshot wound.

The project uses a Raspi running the Pi Camera script to feed video from a webcam on the back of his costume to a 7″ screen on the front. [Luis] attached the screen to a GoPro chest harness—they look a bit like suspenders—to keep it centered, then built up a layer of latex around the display to hide the hard edges and make it more wound-like. Power comes from a 7.4V hobby Lipo battery plugged into a 5V voltage converter.

After ripping a small hole in the back of his t-shirt for the webcam and a large hole in the front for the screen, [Luis] applied the necessary liberal amount of fake blood to finish this clever shotgun blast effect.

IP camera hack

How To Backup And Restore Your IP Camera Firmware

[Filipe] has been playing around with custom firmware for inexpensive IP cameras. Specifically, he has been using cameras based on a common HI3815 chip. When you are playing around with firmware like this, a major concern is that you may end up bricking the device and rendering it useless. [Filipe] has documented a relatively simple way to backup and restore the firmware on these cameras so you can hack to your heart’s content.

The first part of this hack is hardware oriented. [Filipe] cracked open the camera to reveal the PCB. The board has labeled serial TX and RX pads. After soldering a couple of wires to these pads, [Filipe] used a USB to serial dongle to hook his computer up to the camera’s serial port.

Any terminal program should now be able to connect to the camera at 115200 baud while the camera is booting up. The trick is to press “enter” during the boot phase. This allows you to log in as root with no password. Next you can reset the root password and reboot the camera. From now on you can simply connect to the phone via telnet and log in as root.

From here, [Filipe] copies all of the camera’s partitions over to an NFS share using the dd command. He mentions that you can also use FTP for this if you prefer. At this point, the firmware backup is completed.

Knowing how to restore the backup is just as important as knowing how to create it. [Filipe] built a simple TFTP server and copied the firmware image to it in two chunks, each less than 5MB. The final step is to tell the camera how to find the image. First you need to use the serial port to get the camera back to the U-Boot prompt. Then you configure the camera’s IP address and the TFTP server’s IP address. Finally, you copy each partition into RAM via TFTP and then copy that into flash memory. Once all five partitions are copied, your backup is safely restored and your camera can live to be hacked another day.

Recording Time Lapse Of Endangered Reptiles Hatching

The tuatara is a reptile native to New Zealand, and thanks to the descendants of stowaway rats on 17th century ships, these little lizards are critically endangered. [Warren] was asked if he could film one of these hatchlings being born and pulled out a Raspberry Pi to make it happen.

[Warren] constructed a small lasercut box to house the incubating egg, but he hit a few snags figuring out how to properly focus the Raspi camera board. The original idea was to use a Nikkor macro lens, without any kind of adapter between it and the camera board. A bit of googling lead [Warren] to this tutorial for modifying the focus on the Raspi camera, giving him a good picture.

The incubator had no windows and thus no light, making an IR LED array the obvious solution to the lighting problem. Time was of the essence, so an off-the-shelf security camera provided the IR illumination. After dumping the video to his computer, [Warren] had a video of a baby tuatara hatching. You can check that out below.

Continue reading “Recording Time Lapse Of Endangered Reptiles Hatching”