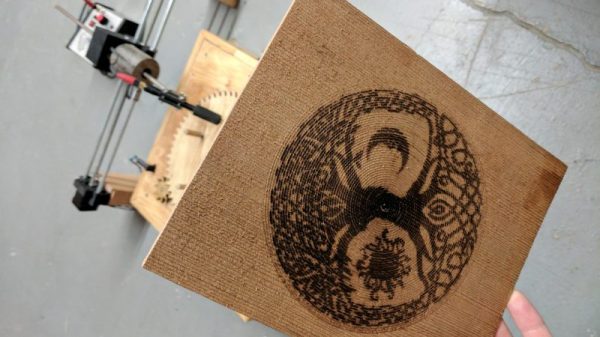
Building A Custom Branding Iron With Swappable Date Blocks

Branding can be done on wood with just about any old bit of hot metal, but if you want to do it well, properly-crafted tooling will go a long way. [Wesley Treat] has built just that with this modular branding iron design.

The branding tooling itself is machined out of brass on an X-Carve CNC router, using [Wesley]’s own logo. The part is sanded after machining to remove tooling marks. A smaller brass slug is then machined with the numerals for various years with which [Wesley] may wish to stamp his projects.

Rather than hacking something sloppy together, the iron itself is assembled with a beautifully wood-turned handle of his own creation and a steel backing plate to hold the tooling. The date is separately removable from the main logo itself for easy changes in future. Naturally, the tool graphics are done in reverse so as to register the right way around when burned onto wood.

The tool is used with a torch to heat the brass up such that it can leave its impression on wooden surfaces. The final results are solid, if not quite perfect; getting the temperature across the tool perfectly matched would be key to getting the cleanest results. An electric heating element running in closed loop could be a way to achieve this.

Fundamentally, it’s a tidy way to mark your wooden projects in a hurry. We’ve seen wood burning reach even greater heights, too, such as with this CNC pyrography machine. Video after the break.

Continue reading “Building A Custom Branding Iron With Swappable Date Blocks”

DIY Pyrography Power Supply

Ever wanted to try your hand at wood burning? If you already threw away your first soldering iron—you know the one: plugged straight in to the wall, no temperature control, came with a thick piece of tin foil to rest it on—don’t despair. Pyrography pens don’t cost that much. The variable power supply they plug into, though: that’s another story. Those cost more than they probably should.

[td0g] took the plunge into pyrography a while back, and wanted to build his own controller from an old ATX power supply. Why not? It should be more than capable of doing the job. Even the most heavy-duty pyrography pens only draw 10A, and the 3.3V line showed to be rated for 30A. All [td0g] had to do was add a PWM with a MOSFET and a ‘Tiny85.

The project nearly became Fail of the Week fodder after [td0g] saw huge voltage spikes across the MOSFET. A 47kΩ resistor took care of those, and a heat sink salvaged from the junk bin will prolong the transistor’s life. [td0g] added a push button that cycles through five heat settings, and an LED to show the status. After that, all he had to do was add a male RCA input to connect the pens he already has.

Okay, so you wouldn’t be caught dead dropping money on some fancy power supply for this new hobby. Don’t want to buy pens, either? Roll your own from a plasma arc lighter.

Turning And Burning With A CNC Pyrography Machine

With CNC machines, generally the more axes the better. Three-axis machines with a vertical quill over a rectangular workspace are de rigueur, and adding an axis or two can really step up the flexibility of a machine. But can only two axes be of any use? Sure can, as witnessed by this two-axis CNC wood burning machine.

As [tuckershannon] tells the tale, this was a newbie build aided by the local hackerspace. Axis one is a rotary table of laser-cut wood gears powered by a stepper. Axis two is just a stepper and lead screw sitting on a couple of blocks of wood. A Raspberry Pi under the hood controls the motors and cycles the pyrography pen on and off as it scans across a piece of wood on the rotary table, burning a spiral pattern that makes for some interesting art. Hats off to [tuckershannon] for figuring out the math needed to adapt to the changing speed of the pen over the wood as the diameter gets bigger.

We love this build, can’t help but wonder if some clever gearing could eliminate the need for the second stepper. And perhaps an upgrade from the standard resistive wood burner to an arc lighter pyrography pen would improve resolution. Still, it’s hard to argue with results, and this is a great hack.

[via r/raspberrypi]

Thanks to [Liz] for the tip!

Arc Lighter Become Plasma Pyrography Pen

Wood burning can be quite a striking art form, but who wants to be stuck using an old-fashioned resistive heating element to char wood? You could go with laser engraving, of course, but that seems to take too much of the human touch out of it. So why not try a mini plasma pen and blow torch powered by a fancy cigarette lighter?

Arc lighters are rechargeable electronic lighters that look like a tiny stun-gun, and [NightHawkInLight] has been coming up with some interesting hacks for them. In this case, he extended the electrode leads out and mounted them to a wooden handle. The spark gap is only about 2mm, but the resulting arc is plenty hot enough to char wood with considerable precision. You’ve got to work fast, though, or the high voltage will start finding interesting paths through the char, producing Lichtenberg figures. And if a micro-scale blow torch is a tool you need, [NightHawkInLight] has got that covered too – a small brass tube with a pinched-off nozzle hooked to an aquarium pump provides the pressure for that.

Might there be other applications for this beyond pyrography? Maybe soldering or desoldering? Of non-ESD sensitive components, naturally.

Continue reading “Arc Lighter Become Plasma Pyrography Pen”

Sudden Death Night Light Sounds Scary, Is Sweet

We have to admit that we were mislead by the title “Sudden Death: Wall Sign + Night Light”. This naturally conjured up images of deadly night lights, but the truth turned out to be a lot less fatal: [Smerfj] had two weeks to make a present for a friend’s wedding. The project was either a go or a no-go depending on the deadline — that sort of sudden death. But as we all know, deadlines have a way of bringing the motivation out of us that’s not always bad.

The night light in question is a bunch of hand-made circuits, each stuffed into a wooden slice with a letter burned on the face, spelling out [Smerfj]’s friend’s name. But to really appreciate it, you have to dig through the build details.

55461447189465844We didn’t know how to burn precise lettering into wood. [Smerfj] covered the wood in metal foil tape, then cut the letters out of the foil. Now applying the torch blackens only the part of the logs that have tape removed. Slick.

To get accurate lettering cut into the aluminum tape, [Smerfj] made an impromptu projector out of a cell phone taped to a chandelier (approximately a point light source) and a stencil suspended somewhere between the chandelier and the wood target. Naturally, this is best done in a darkened room under tight deadline pressure.

The battery holders are fantastic. Springs from commercial battery holders were soldered to enamel wire and placed in holes drilled just the width of AA batteries. With the length of the battery taken into account, channels were drilled into the wood and copper wires jammed through, holding the batteries in place, and providing the other electrical contact. Brilliant.

And finally, the free-form night light circuits are great. Fine-tuned to draw the minimum current, they’re adjusted to the specific LEDs and phototransistors that [Smerfj] had on hand. Bespoke free-form electronics in hand-blackened wood. That’s a nice gift.

Now [Smerfj] just needs nice packaging to present them in. We’re thinking DIY laser-cut boxes with interior lighting, naturally.

Making Lichtenberg Figures In Wood

Ever heard of a Lichtenberg Figure? It’s the branching electrical discharge you can sometimes see on an insulating material… That’s right — when the voltage is high enough — it’ll find a way. Using one of our favorite low-cost high voltage transformers from a microwave, [TheBackYardScientist] shows us how to make our own Lichtenberg Figures!

It’s actually pretty easy. All you need is an old microwave, some plywood, and water with baking soda mixed in. First, you’ll need to take the transformer out of the microwave — a simple hack we’ve covered many times before — you’ll need to wire it in a way that allows you to get a few thousand volts out of it.

Then by mixing baking soda in water, you can increase the conductivity — let the wood soak it up overnight, and now you’re ready to go! By attaching the leads to either side of the wood, it’s now conductive enough to allow the electricity to branch across the wood, burning awesome patterns as it goes — just take a look at the following video!

Continue reading “Making Lichtenberg Figures In Wood”

High Voltage, Wood And Resin Result In Fractal Art

Wood burning, which goes by pyrography when it’s feeling fancy, has been an art form for centuries. [PapaJ06] puts a new twist on it by using a microwave oven transformer to generate fractal patterns in wood. We’ve seen these Lichtenberg figures before, but generally as electric discharges in acrylic sheets or crystal balls using multi-mega-electron volt accelerators. [PapaJ06]’s technique is considerably simpler and well within the reach of most would-be fractal artists, relying as it does on a transformer salvaged from a $20 Craigslist microwave.

But the extra twist that really brings the wow factor to the fractal patterns burned into the wood is the addition of some phosphorescent resin to fill the valleys carved by the electric discharge. [PapaJ06] carefully prepares the wood, fills the burns with glow powder mixed with epoxy resin, and finishes with a little sanding, linseed oil and polyurethane. The contrast between the charred and intact wood, and the way the resin fills the voids really brings out the fractal nature of the Lichtenberg figures.

[PapaJ06] doesn’t really show us too much about his process, but luckily [TheBackyardScientist] recently posted a video of his process for riding the lightning. Check it out after the break.

Continue reading “High Voltage, Wood And Resin Result In Fractal Art”