Massively Parallel CPU Processes 256 Shades Of Gray

256

The 1980s were a heyday for strange computer architectures; instead of the von Neumann architecture you’d find in one of today’s desktop computers or the Harvard architecture of a microcontroller, a lot of companies experimented with strange parallel designs. While not used much today, at the time these were some of the most powerful computers of their day and were used as the main research tools of the AI renaissance of the 1980s.

Over at the Norwegian University of Science and Technology a huge group of students (13 members!) designed a modern take on the massively parallel computer. It’s called 256 Shades of Gray, and it processes 320×240 pixel 8-bit grayscale graphics like no microcontroller could.

The idea for the project was to create an array-based parallel image processor with an architecture similar to the Goodyear MPP formerly used by NASA or the Connection Machine found in the control room of Jurassic Park. Unlike these earlier computers, the team implemented their array processor in an FPGA, giving rise to their Lena processor this processor is in turn controlled by a 32-bit AVR microcontroller with a custom-build VGA output.

The entire machine can process 10 frames per second of 320×240 resolution grayscale video. There’s a presentation video available (in Norwegian), but the highlight might be their demo of The Game of Life rendered in real-time on their computer. An awesome build, and a very cool experience for all the members of the class.

Taking The Pain Out Of Making Custom Eagle Parts

eagle

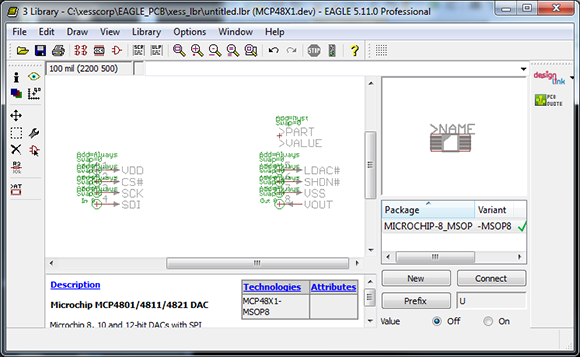
Cadsoft’s Eagle is a great tool for the independent maker. It’s a relatively easy to use PCB layout program with a ton of part libraries available for just about any project. If you’re using a part this isn’t included in these libraries, though, creating them by hand is a pain. [Dave] sent in a project he’s been working on that makes parts for Eagle with a Perl script, allowing for easy creation of custom parts that aren’t included in any library.

One thing that’s really convenient for custom Eagle parts is that most components are DIPs or some sort of leaded SMD component. [Dave]’s script takes the dimensional data from any chip’s datasheet and creates a custom outline for each part. The inputs and outputs can also be ripped directly from the datasheet and assigned to the footprint, making for a relatively automated process that creates custom parts in Eagle. Now for someone to use this script with a little OCR to make a ‘create Eagle part from PDF’ app…

Giving 3D Printed Parts A Shiny Smooth Finish

No matter how good a 3D printer gets, you’re always going to have visible print layers. Even with very high-quality prints with sub-0.1mm layer height, getting a shiny and smooth finish of injection molded plastic is nearly impossible. That is, of course, until you do some post-print finishing. [Neil Underwood] and [Austin Wilson] figured out a really easy way to smooth out even the jankiest prints using parts you probably already have lying around.

The technique relies on the fact that ABS plastic and acetone don’t get along together very well. We’ve seen acetone used to smooth out 3D printed objects before – either by dunking the parts in an acetone bath or brushing the solvent on – but these processes had mixed results. [Neil] and [Austin] had the idea of using acetone vapor, created in a glass jar placed on top of a heated build plate,

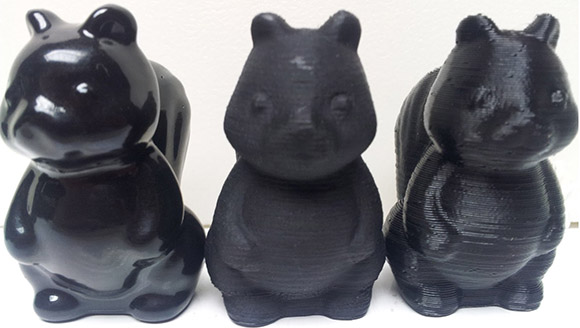
The process is pretty simple. Get a large glass jar, put it on a heated build plate, add a tablespoon of acetone, and crank the heat up to 110C. Acetone vapor will form in the jar and react with any printed part smoothing out those layers. The pic above shows from right to left a 3D printed squirrel at 0.35 mm layer height, 0.1 mm layer height – the gold standard of high-end repraps – and another print with 0.35 layer height that was run through a vapor bath for a few minutes. Amazing quality there, and cheap and easy enough for any 3D printer setup.

You can check out the tutorial video after the break along with a video showing exactly how dangerous this is (it’s not, unless you do something very, very dumb).

Continue reading “Giving 3D Printed Parts A Shiny Smooth Finish”

Hacking The International Space Station With A Toothbrush

nasa-iss-toothbrush-hack

[Douglas Adams] will tell you not to forget your towel when it comes to space travel. But NASA may start mandating that astronauts always carry a toothbrush. That’s because when a recent repair on a critical International Space Station component went wrong it was a toothbrush hack that saved the day.

The culprit here is a bolt that wouldn’t re-seat after replacing a power transfer module that routes electricity from solar cells to the station’s electrical systems. About how many times have you had trouble with bolt threads? Now put yourself in a space suit in orbit for eight hours trying to get the thing to work. Yikes!

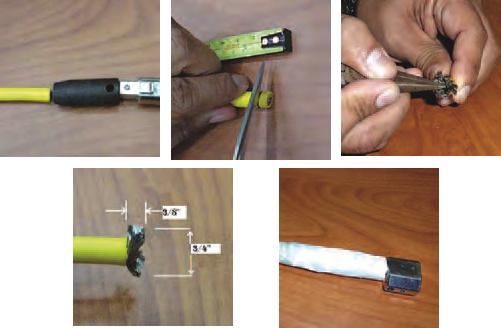
Just like in the movies there was a team of engineers at the ground center which gathered all the supplies available in the ISS. They figured out that metal shavings in the threaded hole needed to be cleaned out and the area lubed for the bolt. One of the two types of tooth brushes on hand would work for the lube, but needed to be stiffened. There was also a brush for cleaning the threads which was made out of a jumper cable. The images seen above are the step-by-step instructions the team uploaded to the astronauts who reproduced their hacked hardware to complete the repairs.

[Thanks G Mob]

Automatic Beer Pourer Was Hacked Together From A Bit Of Everything

beer-conveyor

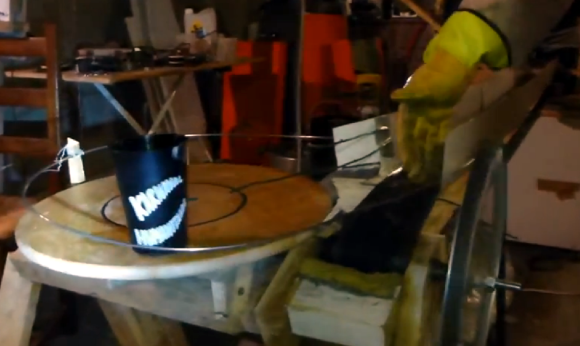
This thing is really remarkable. It’s a beer draft system that automatically fills and distributes to your party guests. The approach is something of an industrial revolution for parties. A hopper feeds cups to the tap; once filled they are whisked off to thirsty guests using a conveyor belt system.

Many of the parts come from a washing machine that the team scrapped for the build — most notably the motor which drives the belt. But pretty much every part of it is salvaged. For instance, the conveyor belt that transports the full glasses was made from gluing sections of bicycle inner tubes together. To help ease the transfer of a cup from the filling station onto that belt a series of very long cable ties were attached to a pole. The tails from those ties act as a brush to stabilize the cup as an arm pushes it onto the conveyor. The best way to see all of this is to watch the entire clip embedded after the jump.

Continue reading “Automatic Beer Pourer Was Hacked Together From A Bit Of Everything”

Laser Kaleidoscope Uses More 3D Printing And Less Scavenging

laser-kaleidoscope

At first we thought that [Pete Prodoehl] was using the wrong term when calling his project a Laser Kaleidoscope. We usually think of a kaleidoscope as a long tube with three mirrors and some beads or glass shards in one end. But we looked it up and there’s a second definition that means a constantly changing pattern. This fits the bill. Just like the laser Spirograph from last week, it makes fancy patterns using spinning mirrors. But [Pete] went with several 3D printed parts rather than repurposing PC fans.

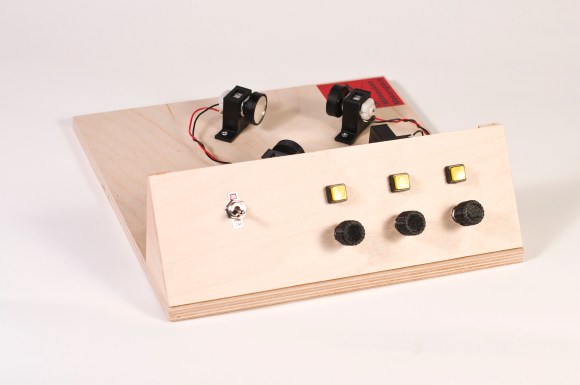
In the foreground you can see the potentiometers which adjust the motor speeds. The knobs for these were all 3D printed. He also printed the mounting brackets for the three motors and the laser diode. A third set of printed parts makes mounting the round mirrors on the motor shaft quite easy. All of this came together with very tight tolerances as shown by the advanced shapes he manages to produce in the video after the break. Continue reading “Laser Kaleidoscope Uses More 3D Printing And Less Scavenging”

Critter Cam Hacked From An Old Cellphone.

critter-cam-hacked-from-old-cellphone

[Art Barrios] kept having night-time visitors who were raiding his dog’s food storage bin. It’s a plastic tub with a lid that latches but the critters were knocking it over and popping that lid off. He wanted to find out which animal was the culprit so he hacked together an automatic camera system using an old cellphone.

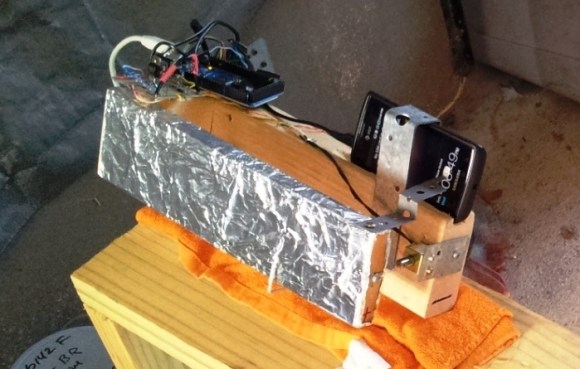
You can see the majority of the hardware he used in the image above. There’s an Arduino on the left. This monitors a switch which he added to the lid of the food storage container. It triggers the system when opened, switching on an LED light and snapping pictures.

The touchscreen button is used to trigger the shutter. That’s what all of that tin foil is about. Some experiments led [Art] to realize that a metal ‘finger’ could register on the screen if there was enough foil attached. To move the metal bracket he uses a solenoid. The last problem he faced was keeping the cellphone screen awake. He figured out that power cycling the charger does the trick. The Arduino manages this using a mains-rated relay.

The system successfully captured images of a family of raccoons feasting on the tasty morsels.