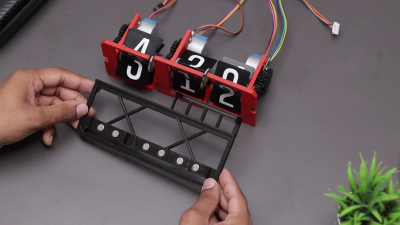
A DIY split-flap clock in red, black, and white.

Split-Flap Clock Uses Magnets Everywhere

While split-flap alarm clocks once adorned heavy wood nightstands in strong numbers, today the displays are most commonly found in train stations and airports. Hey, at least they’re still around, right? Like many of us, [The Wrench] has always wanted to make one for themselves, but they actually got around to doing it.

A DIY split-flap clock and its magnetic base.This doesn’t seem like a beginner-friendly project, but [The Wrench] says they were a novice in 3D design and so used Tinkercad to design all the parts. After so many failures, they settled on a design for each unit that uses a spool to attach the flaps, which is turned by a stepper motor.

A small neodymium magnet embedded in the primary gear and a Hall effect sensor determine where the stepper motor is, and in turn, which number is displayed. Everything is handled by an Arduino Nano on a custom PCB.

Aside from the sleek, minimalist look, our favorite part is that [The Wrench] used even more magnets to connect each display segment to the base. You may have noticed that there are only three segments, because the hours are handled by a single display that has flaps for 10, 11, and 12. This makes things simpler and gives the clock an interesting look. Be sure to check out the build video after the break.

Want to build a more complicated clock? Try suspending sand digits in the air with persistence of vision.

Continue reading “Split-Flap Clock Uses Magnets Everywhere”

DIY Bimetallic Strip Dings For Teatime

Do you like your cup of tea to be cooled down to exactly 54 C, have a love for machining, and possess more than a little bit of a mad inventor bent? If so, then you have a lot in common with [Chronova Engineering]. In this video, we see him making a fully mechanical chime-ringing tea-temperature indicator – something we’d be tempted to do in silicon, but that’s admittedly pedestrian in comparison.

The (long) video starts off with making a DIY bimetallic strip out of titanium and brass, which it pretty fun. After some math, it is tested in a cup of hot water to ballpark the deflection. Fast-forward through twenty minutes of machining, and you get to the reveal: a tippy cup that drops a bearing onto a bell when the deflection backs off enough to indicate that the set temperature has been reached. Rube Goldberg would have been proud.

OK, so this is bonkers enough. But would you believe a bimetallic strip can be used as a voltage regulator? How many other wacky uses for this niche tech do you know?

Thanks [Itay] for the tip!

The 3D Printed Computer Space Takes Shape

A few weeks ago we brought you news of a project to recreate the flowing lines of the first computerised arcade game, Computer Space, as a full-size 3D printed replica. We left the project with all the parts put together to make a complete but unfinished shell that was very recognizable as a Computer Space cabinet but had neither finishing nor internals. Now we’re very pleased to bring you the conclusion of the project, as it moves from unfinished 3D print to playable cabinet.

The video below the break is a journey of print finishing to a very high standard with that lustrous blue glitter resin, but oddly it’s most interesting to find out about the manufacturing quirks of the original. How the rear door was imprecisely cut from plywood and fixed on with gate hinges, how the ventilation holes differ from cabinet to cabinet, and how the collection vessel for those quarters was an old tin. The monitor is a newer broadcast CRT in this version and the electronics are naturally  modern, but if you didn’t know, you’d be hard pressed to spot that you weren’t playing the real thing.

Finally we see the gameplay which is admittedly frustrating, and a little bit of punditry as to why this wasn’t the commercial success of the following Pong. It’s a fascinating look at the early computer game industry.

Have a look at our coverage of the first episode of this project.

Continue reading “The 3D Printed Computer Space Takes Shape”

Hackaday Podcast Episode 270: A Cluster Of Microcontrollers, A Rocket Engine From Scratch, And A Look Inside Voyager

Join Hackaday Editors Elliot Williams and Tom Nardi as they get excited over the pocket-sized possibilities of the recently announced 2024 Business Card Challenge, and once again discuss their picks for the most interesting stories and hacks from the last week. There’s cheap microcontrollers in highly parallel applications, a library that can easily unlock the world of Bluetooth input devices in your next project, some gorgeous custom flight simulator buttons that would class up any front panel, and an incredible behind the scenes look at how a New Space company designs a rocket engine from the ground up.

Stick around to hear about the latest 3D printed gadget that all the cool kids are fidgeting around with, a brain-computer interface development board for the Arduino, and a WWII-era lesson on how NOT to use hand tools. Finally, learn how veteran Hackaday writer Dan Maloney might have inadvertently kicked off a community effort to digitize rare documentation for NASA’s Voyager spacecraft.

Check out the links below if you want to follow along, and as always, tell us what you think about this episode in the comments!

Download your very own copy of the podcast right about here.

Continue reading “Hackaday Podcast Episode 270: A Cluster Of Microcontrollers, A Rocket Engine From Scratch, And A Look Inside Voyager”

Reflecting On The State Of Game Boy Emulation In 2024

Considering the decades that have passed since Nintendo’s Game Boy was considered the state-of-the-art in mobile gaming, you’d imagine that the community would have pretty much perfected the emulation of the legendary family of handhelds — and on the whole, you’d be right. Today, you can get open source emulators for your computer or even smartphone that can play the vast majority of games that were released between the introduction of the original DMG-1 “brick” Game Boy in 1989 through to the final games published for the Game Boy Advance in the early 2000s.

But not all of them. While all the big name games are handled at this point, there’s still a number of obscure titles (not all of which are games) that require specialized hardware accessories to properly function. To bring the community up to speed on where work is still required, [Shonumi] recently provided a rundown on the emulation status of every commercial Game Boy accessory.

Continue reading “Reflecting On The State Of Game Boy Emulation In 2024”

This Week In Security: TunnelVision, Scarecrows, And Poutine

There’s a clever “new” attack against VPNs, called TunnelVision, done by researchers at Leviathan Security. To explain why we put “new” in quotation marks, I’ll just share my note-to-self on this one written before reading the write-up: “Doesn’t using a more specific DHCP route do this already?” And indeed, that’s the secret here: in routing, the more specific route wins. I could not have told you that DHCP option 121 is used to set extra static routes, so that part was new to me. So let’s break this down a bit, for those that haven’t spent the last 20 years thinking about DHCP, networking, and VPNs.

So up first, a route is a collection of values that instruct your computer how to reach a given IP address, and the set of routes on a computer is the routing table. On one of my machines, the (slightly simplified) routing table looks like:

# ip route
default via 10.0.1.1 dev eth0
10.0.1.0/24 dev eth0

The first line there is the default route, where “default” is a short-hand for 0.0.0.0/0. That indicate a network using the Classless Inter-Domain Routing (CIDR) notation. When the Internet was first developed, it was segmented into networks using network classes A, B, and C. The problem there was that the world was limited to just over 2.1 million networks on the Internet, which has since proven to be not nearly enough. CIDR came along, eliminated the classes, and gave us subnets instead.

In CIDR notation, the value after the slash is commonly called the netmask, and indicates the number of bits that are dedicated to the network identifier, and how many bits are dedicated to the address on the network. Put more simply, the bigger the number after the slash, the fewer usable IP addresses on the network. In the context of a route, the IP address here is going to refer to a network identifier, and the whole CIDR string identifies that network and its size.

Back to my routing table, the two routes are a bit different. The first one uses the “via” term to indicate we use a gateway to reach the indicated network. That doesn’t make any sense on its own, as the 10.0.1.1 address is on the 0.0.0.0/0 network. The second route saves the day, indicating that the 10.0.1.0/24 network is directly reachable out the eth0 device. This works because the more specific route — the one with the bigger netmask value, takes precedence.

The next piece to understand is DHCP, the Dynamic Host Configuration Protocol. That’s the way most machines get an IP address from the local network. DHCP not only assigns IP addresses, but it also sets additional information via numeric options. Option 1 is the subnet mask, option 6 advertises DNS servers, and option 3 sets the local router IP. That router is then generally used to construct the default route on the connecting machine — 0.0.0.0/0 via router_IP.

Remember the problem with the gateway IP address belonging to the default network? There’s a similar issue with VPNs. If you want all traffic to flow over the VPN device, tun0, how does the VPN traffic get routed across the Internet to the VPN server? And how does the VPN deal with the existence of the default route set by DHCP? By leaving those routes in place, and adding more specific routes. That’s usually 0.0.0.0/1 and 128.0.0.0/1, neatly slicing the entire Internet into two networks, and routing both through the VPN. These routes are more specific than the default route, but leave the router-provided routes in place to keep the VPN itself online.

And now enter TunnelVision. The key here is DHCP option 121, which sets additional CIDR notation routes. The very same trick a VPN uses to override the network’s default route can be used against it. Yep, DHCP can simply inform a client that networks 0.0.0.0/2, 64.0.0.0/2, 128.0.0.0/2, and 192.0.0.0/2 are routed through malicious_IP. You’d see it if you actually checked your routing table, but how often does anybody do that, when not working a problem?

There is a CVE assigned, CVE-2024-3661, but there’s an interesting question raised: Is this a vulnerability, and in which component? And what’s the right solution? To the first question, everything is basically working the way it is supposed to. The flaw is that some VPNs make the assumption that a /1 route is a bulletproof way to override the default route. The solution is a bit trickier. Continue reading “This Week In Security: TunnelVision, Scarecrows, And Poutine”

This Typewriter Types Toast

As a writer it’s a pleasure to see one’s work appear from time to time on a physical medium. While newspapers may be shuffling slowly off this mortal coil, there are still a few opportunities to write for printed media. It’s safe to say that no Hackaday scribe has ever managed to have their work published on the medium in this hack though, because it’s a typewriter designed to type on toast.

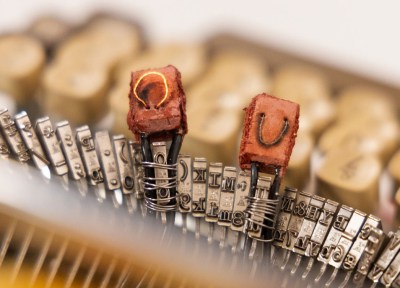
The toaster-typewriter is the work of [Ritika Kedia], and it forms part of her thesis in product design at the Parsons School of Design, New York. It’s written up very much from an artistic rather than a tech perspective, but it’s no less ingenious for that in the way it uses letters formed from hot wire on a clay substrate, mounted on the end of the typewriter arms in front of a toaster.

We’re slightly sad to see that it only has three operable letters at the moment as it’s an artwork rather than a document machine, but we love the idea and wish she had time to develop it further with a full alphabet. You can see a short demo in the video below the break.

Continue reading “This Typewriter Types Toast”