APRS Tracking System Flies Your Balloons

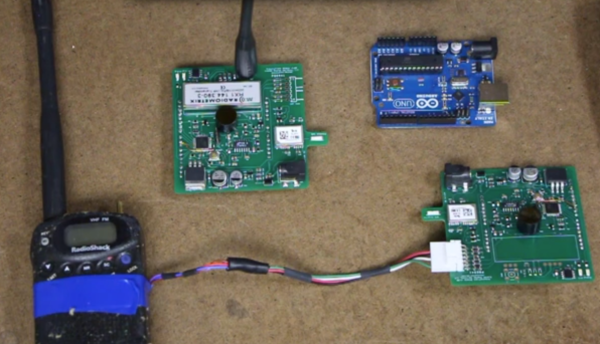
Looking for a way to track your high-altitude balloons but don’t want to mess with sending data over a cellular network? [Zack Clobes] and the others at Project Traveler may have just the thing for you: a position-reporting board that uses the Automatic Packet Reporting System (APRS) network to report location data and easily fits on an Arduino in the form of a shield.

The project is based on an Atmel 328P and all it needs to report position data is a small antenna and a battery. For those unfamiliar with APRS, it uses amateur radio frequencies to send data packets instead of something like the GSM network. APRS is very robust, and devices that use it can send GPS information as well as text messages, emails, weather reports, radio telemetry data, and radio direction finding information in case GPS is not available.

If this location reporting ability isn’t enough for you, the project can function as a shield as well, which means that more data lines are available for other things like monitoring sensors and driving servos. All in a small, lightweight package that doesn’t rely on a cell network. All of the schematics and other information are available on the project site if you want to give this a shot, but if you DO need the cell network, this may be more your style. Be sure to check out the video after the break, too!

Continue reading “APRS Tracking System Flies Your Balloons”

Arduino Lithium Charger Shield

Programmable Lithium Charger Shield For Arduino

Surely you need yet another way to charge your lithium batteries—perhaps you can sate your desperation with this programmable multi (or single) cell lithium charger shield for the Arduino?! Okay, so you’re not hurting for another method of juicing up your batteries. If you’re a regular around these parts of the interwebs, you’ll recall the lithium charging guide and that rather incredible, near-encyclopedic rundown of both batteries and chargers, which likely kept your charging needs under control.

That said, this shield by Electro-Labs might be the perfect transition for the die-hard-‘duino fanatic looking to migrate to tougher projects. The build features an LCD and four-button interface to fiddle with settings, and is based around an LT1510 constant current/constant voltage charger IC. You can find the schematic, bill of materials, code, and PCB design on the Electro-Labs webpage, as well as a brief rundown explaining how the circuit works. Still want to add on the design? Throw in one of these Li-ion holders for quick battery swapping action.

[via Embedded Lab]

Undershield, DIY Arduino Battery Shield

Battery Shield Mounts Underneath The Arduino

So, what do you do when your Arduino project needs to operate in a remote area or as a portable device? There are LiPo battery shields available, and although they may work well, recharging requires access to a USB port. You can also go the 9v battery route plugged into the on-board regulator of the Arduino but the low mAh rating of a 9v won’t allow your project to stay running for very long. [AI] needed a quick-change battery option for his Arduino project and came up with what he is calling the AA Undershield.

As the name implies, AA sized batteries are used in the project, two of them actually. Yes, two AA batteries at 1.5v each would equal only 3 volts when connected in series. The Arduino needs 5v so [AI] decided to use a MAX756 DC-to-DC step-up regulator to maintain a steady stream of 5v. This article has some nice graphs showing the difference in performance between a 9v battery being stepped down to 5v verses two AA’s being bumped up to 5v.

The ‘under’ in Undershield comes from this shield being mounted underneath the Arduino, unlike every other shield on the planet. Doing so allows use of a standard 0.100″-spaced prototype PCB and is an easy DIY solution to that odd-sized space between the Arduino’s Digital 7 and 8 pins. The Arduino mounts to the Undershield via its normal mounting holes with the help of some aluminum stand offs.

[AI] did a great job documenting his build with schematics and lots of photos so that anyone that is interested in making one for themselves can do so with extreme ease.

Open-source BLDC motor driver

Brushless Motor Controller Shield For Arduino

Brushless motors are ubiquitous in RC applications and robotics, but are usually driven with low-cost motor controllers that have to be controlled with RC-style PWM signals and don’t allow for much customization. While there are a couple of open-source brushless drivers already available, [neuromancer2701] created his own brushless motor controller on an Arduino shield.

[neuromancer2701]’s shield is a sensorless design, which means it uses the back-EMF of the motor for feedback rather than hall effect sensors mounted on the motor. It may seem strange to leave those sensors unused but this allows for less expensive sensorless motors to work with the system. It also uses discrete FETs instead of integrated driver ICs, similar to other designs we have covered. Although he is still working on the back-EMF sensing in his firmware, the shield successfully drives a motor in open-loop mode.

The motor controller is commanded over the Arduino’s serial interface, and will support a serial interface to ROS (Robot Operating System) in the future. This shield could be a good alternative to hobby RC controllers for robots that need a customizable open-source motor controller. The PCB design and source code are available on GitHub.

Continue reading “Brushless Motor Controller Shield For Arduino”

Using Arduino Shields With The Raspi

With hundreds of Arduino shields available for any imaginable application, it’s a shame they can’t be used with the Raspberry Pi. Breaking out the Raspi GPIO pins to Arduino-compatible headers would allow makers and tinkerers to reuse their shields with a far more capable computing platform.

The folks over at Cooking Hacks realized a Raspi to Arduino shield bridge would be an awesome device, so they made their own, complete with a software library that allows you to port your Arduino code directly to the Raspberry Pi.

There are a few limitations with the Raspberry Pi’s GPIO headers; the Raspi doesn’t have analog inputs, so the Cooking Hacks team added an 8-channel ADC. Along with analog inputs and the headers required to pop a shield on the board, there’s also a socket for an XBee module.

The software library contains most of the general Arduino functions such as digitalWrite() and digitalRead(). There Serial, Wire, and SPI libraries are also implemented, allowing any device that communicates through UART, I2C, or SPI to talk directly to the Raspberry Pi.

While the Raspi Arduino bridge doesn’t allow for PWM in the same capacity as an Arduino, you’re always welcome to whip up a servo or LED shield for this neat little adapter.

Using Arduino Shields With The Raspberry Pi

Since the Arduino was launched years ago, many ‘shields’ or add-on boards providing additional functionality have been released. There are hundreds of different shields, from video capture shields to touch screen shields. Now that the Raspberry Pi is out in the wild, it was only a matter of time before a RasPi to Arduino shield bridge was created.

[Omer] calls his bridge ‘Ponte’ and it allows Arduino shields to be used with the incredible  horsepower of an embedded Linux system. While [Omer] originally expected to write the RasPi to Arduino software converter himself, but found WiringPi halfway through the build. Of course this build comes just a day after we saw a tutorial on controlling the GPIO pins on the RasPi, and we expect to see similar GPIO-hacking builds in the future.

Right now, the Ponte only supports Arduino Uno-sized shield, so the possibility of an all-in-one RepRap controller using the RAMPS motor driver is impossible for now. We expect that to change very quickly as more people get their RasPis delivered.

Fully Loaded Electronics Lab Makes Your Projects A Breeze

There’s really nothing special about this hack. [Craig Hollabaugh] needed an Arduino shield for hosting a Pololu motor driver and making connections to external hardware. What really caused us to spend way too much time reviewing his posts is that [Craig’s] narrative style of documenting the project is delightful, and we’re envious of his electronics lab. That link points to the first of four project pages. The next page is linked at the bottom of each page, or you can find the collection after the break.

[Craig] starts by designing a single-sided shield in Eagle. It’s been years since he made his own PCB, and it takes him about four tries to get the toner transfer right (we’ve also been victim to the wrong mirroring of the resist!). When it comes time to drill for the pin headers [Craig] uses his 3D printer to make a bracket allowing the Dremel to mount to the drill press. There’s a good tip here about buying carbide bits from Harbor Freight; we thought eBay was the only place to get these. Many of us would need to put in a parts order, but this workshop has a well-organized stock of everything he needs. He also has the solder paste and PID outfitted toaster oven to reflow the board. Oh, and when he forgets to add a resistor it’s off the rework station to add one.

See what we mean… one can never have too many tools.

Continue reading “Fully Loaded Electronics Lab Makes Your Projects A Breeze”