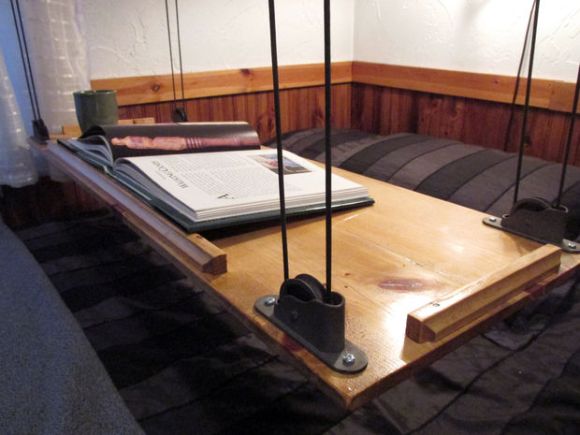
Built-in Coffee Table Lightbox

diydollarstorelightbox

[Flyingpuppy] sent us this tip about her cleverly-concealed pull-out lightbox drawer. Her resolution for the new year was to make more art, so she filled this coffee table with art supplies and decided she’d draw while relaxing in front of the television. She also wanted a lightbox nearby, which originally involved hacking the entire tabletop with some acrylic, but she eventually opted for a simpler build: and it’s portable, too! The drawer’s lights are battery-powered, so you can pull the entire thing out of the table and drag it onto your lap, if that makes drawing more comfortable.

[Flyingpuppy] sourced seven inexpensive LED units from her local dollar store, which she mounted to the back of the drawer with some screws. The rest of the drawer was lined with white foam board, the bottom section angled to bounce light up onto the acrylic drawing surface. Because she needs to open the case to manually flip on the lights, she secured the acrylic top magnetically, gluing a magnet to the underside of the foam board and affixing a small piece of steel to the acrylic. A simple tug on the steel bit frees the surface, providing access underneath. Stick around for a video below.

Continue reading “Built-in Coffee Table Lightbox”

Hackaday Links: September 15, 2013

hackaday-links-chain

First a quick announcement. We changed our “Kickstarter” category to “Crowd Funding“. We get a huge number of tips about crowd funding projects. We’re always interested in details. If you’re trying to get your crowd funding campaign on our front page make sure you’ve shared as many gritty project details (development process, problems/successes along the way, etc.) as possible . We usually prefer if this is done in a separate blog post from the campaign page itself.

Here’s a peephole hack that purportedly cost four grand. It uses a full on DSLR for the peephole hardware. Add a motion sensor and maybe you’ll be able to learn the faces of the neighbors who live on your floor. [via Gizmodo]

[Matthias] tells us that support for Rigol DS1052E oscilloscopes has been included in the 3.11 version of the Linux Kernel. Prior to this, getting the hardware to work on Linux was a hack, and a buggy one at that. For what it’s worth, here’s confirmation that support was added.

A post about reverse engineering the FitBit Aria Wi-Fi scale was sent in by [Christopher]. This makes us wonder if you could patch into a digital scale, using your own electronics to spoof the FitBit version?

We always keep our paperboard six-pack carriers so that we have a way to transport our homebrew beer. But rolling into a party with this laser-cut beer caddy which [Daniel] designed looks a lot cooler.

Texas Instruments has an MSP430 Selection Guide (PDF) which we found interesting. The first nine pages or so are pretty much just marketing, but several pages of parametric tables found after that make for a great collection of data on the hardware families. [via Dangerous Prototypes]

[Antoine] spared no expense building a coffee table that showcases his old motherboards. The illuminated glass and wood art piece rang in at around $400 in materials. We’re a little more minimalist with our home decor. We still want something along the lines of this LED matrix version.

Speaking of LED matrices, [Mario] dropped off a link to his LED Space Invaders game in the comments of last week’s Game of Light post. What we can’t figure out is why so many people hesitate to send in a tip about their awesome projects?

Coffee Table Arcade Hides Its Controls

arcade-coffee-table-with-self-hiding-controls

[Hoogen] did a fantastic job of building arcade hardware into this Ikea coffee table. Sound familiar? We just looked at another Ikea coffee table arcade, but this one goes quite a different route. It uses a Ramvik table which has a very deep drawer in the end where the controls are located. The image to the left shows that you’re going to have a problem with the joystick when you try to close it. [Hoogen] came up with a clever mechanism to overcome this issue.

This is not an emulated system. It uses a JAMMA board called the iCade 60-in-1 to bring sixty classic arcade games to the build. To interface with this hardware [Hoogen] included a JAMMA full cabinet wiring harness. The inset image on the right is pretty small, but it shows the speaker mounted in the back of the drawer, as well as the control surface angled down. This tilting surface is what allows the controls to move out of the way when closing the drawer. This happens automatically as described by [Hoogen] in his write-up.

Coffee Table Arcade Cabinet

ikea-arcade-gaming

Get some Pac-Man fever while sitting on this couch thanks to the arcade rig built inside of the coffee table. The controls are a bit more sparse than more dedicated MAME rigs, but you should still be able to play most of the classics with four buttons and a joystick. After all, you need to reserve some room to put your feet up when you’re not gaming.

[Manny Flores] started the project with a Lack table from Ikea. The top is anything but solid. After tracing the outline of his LCD screen and cutting through the surface he discovered this is more of a beefed of cardboard than it is wood. The honeycomb of paperboard inside the surface of the table makes it really easy to clear out some space. In fact, when it came time to add the arcade buttons he just used a utility knife to cut the openings. Inside you’ll find a Raspberry Pi which interfaces with the buttons and joystick via an iPac USB controller board. A set of powered speakers mounted on the underside complete the design.

[via Adafruit]

A Concrete Table With A Little Blinky Built In

concrete-table-with-led-inlay

Members of the Warp Zone hackerspace wanted a coffee table that was beyond ordinary. They ended up pouring a concrete base for the glass top (translated). There were several things to address during the design. First off, they wanted to integrate LEDs in the concrete sides. Some consideration had to be made for portability as concrete is very heavy. The final piece of the puzzle was deciding what kind of hardware to place beneath the frosted glass.

The legs were designed with a large cut-out area to keep them as light weight as possible. The cross piece has a set of voids spelling out the name of the hackerspace with some green LEDs. This was accomplished by placing foam cut-outs of each letter in the forms before for concrete was poured. They sealed around each letter with silicone, but still had some seepage most likely caused when jostling the form to help remove air bubbles. Straws were placed in the foam to allow a cable pass through for the electronics. After everything was in place they filled the voids with hot glue to act as a diffuser.

There aren’t a lot of details about the RGB LEDs under the frosted glass. But you can see the light show they produce in the clip after the break.

Continue reading “A Concrete Table With A Little Blinky Built In”

Turning The Raspberry Pi Into A Cocktail MAME Coffee Table

Ah, the cocktail arcade cabinet. With the right design, its able to blend right in to any living room decor, much more than any traditional stand-up cabinet, at least. [graham] over on Instructables didn’t tear apart a 30-year-old arcade cabinet for his new coffee table. Instead, he built one from scratch, connected it to a Rasberry Pi, and brought hundreds of arcade classics right in front of his couch.

The build began by cutting up some wood to house the 24″ LCD screen, Raspi, and arcade controls. The LCD screen is supported with a rather clever system of cross braces screwed into the VESA mount, and of course a piece of perspex protects the screen from the inevitable spills and scratches.

The joystick two blue ‘player’ buttons and the player 1 and player two buttons are wired directly to the GPIO pins of the Raspberry Pi. The Raspi boots up into a selection of MAME games, but there’s also an option for opening up the window manager and browsing the web.

It’s a very neat build that’s a lot smaller (and easier to build) than a traditional cocktail cabinet. As [graham] is using it for a coffee table, it might get more use than a regular MAME build, to boot.

Zen Rock Garden Table Uses Magnets And Sand

[Nick] is working on a prototype of a coffee table sand plotter that draws patterns in sand a lot like a zen rock garden.

[Nick]’s zen rock garden uses a magnet to draw a ball bearing across the sand in interesting patterns. The build uses 3D printed gears and laser cut parts to rotate the table around and move the magnet along a radius of the circle. During the first test of the prototype, the ball bearing jerked around but this problem was solved by adding a piece of foam under the sand. Power is supplied through a slip ring in the base, and the table is controlled through Bluetooth.

Speaking of magnet-and-ball-bearing zen coffee tables, we ran across this video of a more professional-looking prototype that was the basis for a successful Kickstarter campaign. Like [Nick]’s prototype, the entire build relies on magnets and a ball bearing to move sand around in patterns. Because this zen table uses an XY axis instead of [Nick]’s polar setup, drawing logos is a lot easier math-wise, lthough it doesn’t look quite as cool as a circular rock garden.

After the break you can see these zen rock garden coffee tables in action.

Continue reading “Zen Rock Garden Table Uses Magnets And Sand”