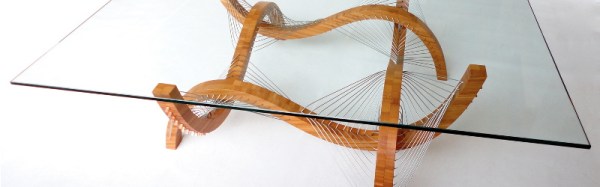
Cityscape Infinity Table

Redditor [ squishy0eye] lacked a coffee table and wanted an infinity mirror. So, in a keen combination of the two, she built an infinity mirror table the resembles a nighttime cityscape.

Skimming over many of table’s build details, [squishy0eye] paused to inform the reader that an MDF base was used underneath the mirrors, with a hole drilled for the future power cable. For the top pane, she overlaid privacy screen mirror film onto tempered glass, turning it into a one-way mirror. The bottom pane is acrylic plastic due to the need to drill holes to hide the cables for each ‘building’ — the same mirror film was applied here as well. Wood was cut into rectangles for the building shapes and super glued around the holes and in the corresponding spots underneath to prevent any bowing in the acrylic. A small gap was left in each ‘building’ to run the 5050 non-waterproof LED strips around and back into the hole for power.

Continue reading “Cityscape Infinity Table”

Pong In Real Life, Mechanical Pong

[Daniel Perdomo] and two of his friends have been working on a mechanical version of Pong for the past two years. We can safely say that the final result is beautiful. It’s quite ethereal to watch the pixe–cube move back and forth on the surface.

[Daniel] has worked in computer graphics for advertising for more than 20 years. However, he notes that neither he nor his friends had any experience in mechanics or electronics when they began. Thankfully, the internet (and, presumably, sites like Hackaday) provided them with the information needed.

The pong paddles and and pixel (ball?) sit onto of a glass surface. The moving parts are constrained to the mechanics with magnets. Underneath is a construction not unlike an Etch A Sketch for moving the ball while the paddles are just on a rail with a belt. The whole assembly is made from V-groove extrusion.

Our favorite part of the build is the scroll wheel for moving the paddle back and forth. For a nice smooth movement with some mass behind it, what’s better than a hard-drive platter? They printed out an encoder wheel pattern and glued it to the surface. The electronics are all hand-made. The brains appear to be some of the larger Arduinos. The 8-bit segments, rainbow LEDs, etc were build using strips glued in place with what looks like copper foil tape connecting buses. This is definitely a labor of love.

It really must be seen to be understood. The movement is smooth, and our brains almost want to remove a dimension when watching it. As for the next steps? They are hoping to spin it up into an arcade machine business, and are looking for people with money and experience to help them take it from a one-off prototype to a product. Video after the break.

Continue reading “Pong In Real Life, Mechanical Pong”

slab flattener

Router Jig Makes Quick Work Of Flattening Irregular Shaped Wood

[Nick Offerman] is a pretty serious wood worker. He likes to make crazy stuff including organic looking tables out of huge chunks of wood. Clearly, the wood doesn’t come out of the ground shaped like the above photo, it has to be intensely worked. [Nick] doesn’t have a huge saw or belt sander that can handle these massive blocks of wood so he built something that could. It’s a jig that allows him to use a standard wood router to shave each side down flat.

The process starts by taking a piece of tree trunk and roughing it into shape with a chainsaw. Once it is flat enough to not roll around, it’s put into a large jig with 4 posts. Horizontal beams are clamped to the posts and support a wooden tray which a wood router can slide back and forth in. The router’s cutting bit sticks out the bottom of the tray and slowly nibbles the surface flat. Once one side is flat, the block is rotated and the flat side is used as a reference to make all the other sides square to the first. After flattening, sanding and finishing the block results in a pretty sweet piece of functional artwork.

Brother Builds “Zerg-Berg” Coffee Table Media Server – 38(!) USB Drives

After [Travis]’s media server died a couple months ago, his brother [Nick] secretly plotted to replace it for Christmas. Admitting it to be an “asinine Rube Goldberg” arrangement, [Nick] wanted something custom and remarkable for his sibling. Rather than go the normal SATA route, 38 USB hot-swap laptop drives were clustered together inside a custom leather enclosure with a bronzed glass top.

[Nick] picked up 45 of the 500GB drives for only $350 and designed the project around those. He spent $1000 on matching metal docks for each of them, powered by $800 worth of PCIe quad independent USB controllers – no hubs. A $550 Xeon motherboard with 14 USB ports, 16GB of RAM, a basic video card and a 1000W power supply rounded out the electronics.

Under Windows 8.1 all drives are arranged in a single giant array under Storage Spaces, no raid.

Everything was built into a wood-framed coffee table wrapped in high-end leather that [Nick] spent 65 hours hand stitching himself. Fancy brass corner braces hold the frame square. All the wires were run underneath the table so the visible surfaces are clean and clear. The table structure is lifted up on legs made from half-inch square barstock bent into a hairpin and bolted to the underside.

All together [Travis]’s Zerg-Berg media server cost in the range of $4500. [Nick] intends it to be something that lasts him a very long time.

See the video below for [Nick]’s rationalization explanation of the hardware and methods chosen.

Continue reading “Brother Builds “Zerg-Berg” Coffee Table Media Server – 38(!) USB Drives”

EPROM Coffee Table

Either in need of a coffee table or suffering a severe lack of upscaled electronics, [Darren] just finished up a great build for his living room. It’s a huge, scaled up version of a UV erasable EPROM with an infinity mirror in place of the fused quartz window.

[Darren]’s coffee table was inspired by an earlier build by the geniuses at Evil Mad Scientist. A few years ago, they built a 555 footstool that was scaled up about 30 times its normal size. Even at footstool scale, the 555 is still relatively tiny.

[Darren] is using a similar construction technique by forming the legs of the EPROM out of laminated plywood. Since this build is significantly larger, building the entire device out of solid, laminated plywood would result in an unwieldy and expensive piece of furniture. Instead, [Darren] constructed the legs and sides out of plywood laminations, covering the ends, top, and bottom with plywood panels. The result is a hollow EPROM/coffee table that’s still structurally sound.

If you’re a bit confused after counting the number of pins on the coffee table, you’re in good company. This is technically a scaled-up version of a 16-pin 0.600″ PDIP, something that a quick googling suggest isn’t historically accurate. Maybe there was an EPROM with a 4-bit wide data bus somewhere in the annals of electronics history, but we’re happy with saying that a completely accurate scaled-up ROM would be far too big for [Darren]’s living room.

Continue reading “EPROM Coffee Table”

A Wooden LED Matrix Coffee Table

[johannes] writes in with a pretty impressive LED table he built. The table is based around WS2801 serially addressable LEDs which are controlled by a Raspberry Pi. The Pi serves up a node.js-driven web interface developed by [Andrew Munsell] for a room lighting setup. The web interface controls the pattern shown on the display and the animation speed.

[johannes] built a wooden coffee table around the LED matrix, which includes a matte glass top to help diffuse the lighting. An outlet to plug in a laptop and two USB charging ports are panel-mounted on the side of the enclosure, which are a nice touch. The power supply for the LEDs is also inside the enclosure, eliminating the need for an external power brick.

While [johannes] hasn’t written any software of his own yet, he plans on adding music synchronization and visualizations for weather and other data. Check out the video after the break to see the table in action.

Continue reading “A Wooden LED Matrix Coffee Table”

Hanging Table Makes Room For Activities

F2N02EOHS18CAZE.MEDIUM

[Matt Silver] usually enjoys a cup of tea in the evening. Unfortunately, this habit can be frustrating and dangerous while sitting in bed. He rectified the problem by building this awesome space-saving table, which can be stored on the ceiling of all places! Depending on the supplies you might already have, this could be a relatively cheap build of about $40 or less. [Matt’s] using pine board for everything, but notes you could save time and money by re-purposing an existing coffee table. You will, however, need to make the ceiling frame to support it.

At the heart of this build is our favorite rope—Paracord 550. [Matt] used a single piece to tie the whole thing together, which can cause the table to lower crooked, but [Matt] found he can keep it level by putting a hand on it while it descends. You also get mechanical advantage from the pulleys this way! If you’re not crazy about the potential unevenness, you could redesign the pulley and eyelet layout to allow for four ropes to ensure a reliably horizontal surface.

Why not pair this idea with the portable electronics lab we shared a few days ago? You could have a full series of drop-down tool labs in your workshop. Think of all the space saving opportunities!