Here’s something that’s a little late to celebrate the fact that all the events in Back to the Future have happened in the past, but that’s what time machines are for, right? [Deater] created Pi-powered time circuits and a flux capacitor. He might not have a DeLorean, but he does have the equipment to turn a DeLorean into a cool car.
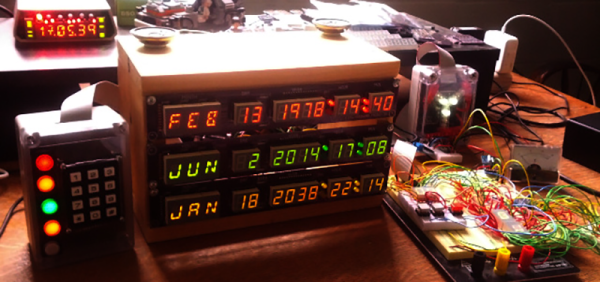
The ‘time circuits’ shown on-screen in Back to the Future actually weren’t very complex; the times were just cutouts with lights and gels; no real electronics wizardry necessary. Of course the BttF DeLorean has since been remodeled and refurbished with time circuits that look and act the part, and [Deater]’s time circuits have everything you would expect: a display of the destination, current, and last time, sound effects, numeric keypad, flux capacitor, and a speedometer.
While it doesn’t simulate the time circuits from the movie exactly, that’s not necessarily a bad thing. The movie time circuits were colored gels, and wouldn’t exactly be practical for a Raspberry Pi-based prop. It’s a great build, and one that would look great in either a ’98 Nissan Altima or a DeLorean
Continue reading “Raspberry Pi-Powered Back To The Future Time Circuits”
 After a careful bit of research, it appears the Hyundai Accent (GLS) has both a higher top speed and faster 0-60 time than a DeLorean, and that’s before the installation of time circuits, a flux capacitor, and plutonium reactor. [docbrownjr] and [Jennifer] decided their Accent was the perfect vehicle for a time machine conversion and
  After knocking his head on a toilet, [Beamsjr] came up with a great idea –
  Honestly, we’d be a bit disappointed if this contest didn’t have a BTTF time circuit build entry. Luckily for us, [atheros] and [bwa] are on top of things


