Answers.hackaday.com Is LIVE

Quick, go to answers.hackaday.com and sign up for an account. Ages ago, we announced that we would be bringing a community driven question and answer system to Hackaday. We eventually got tired of waiting for the feature to be provided and improvised. Well, the wait is over. You can now post your own questions and answers. Go nuts, post away, but remember to be respectful. We’re still figuring out this system ourselves, so be patient with us as well.

Be warned, we’re going to be pretty strict on trolling.

It is worth noting that there is a money system integrated into it. This means that you can offer a real reward for answers to your questions. You certainly don’t have to though.

Paintball Graffitti

Paintball as a large format printer? That’s exactly what facade printer is. A paintball gun was mounted with two controllable axes of movement. A computer reads in the image data and prints it out by shooting paintballs to form a dot-matrix display. There’s a couple of wins here, the paintball paint can be washed off, and this will work on coarse or uneven display medium. Check out a video of the printing process after the break.

If you already built your own paintball turret, give the other guys and chance and hack it to print instead of gunning down unsuspecting adversaries.

Continue reading “Paintball Graffitti”

Laser Command Game Uses Laser For Control

[vimeo=http://vimeo.com/10819322]

[Eliji Hayashi’s] project for a class at Carnegie Mellon University is absolutely delightful! It is a game he calls Laser Command because a laser pointer is used as the gaming controller. An 8×8 LED matrix serves as the display, but is also used as an 8×8 light sensor, much the same way as the LED advent project did. The display is rapidly switched between producing light and sensing it. The laser is bright enough that it becomes easy to pick up the voltage generated within the matrix during the sensing periods. The game is programmed on an Arduino mini and the whole thing wraps up into an incredibly small package. Brilliant.

[Thanks Juan]

Print Toner Directly To A PCB

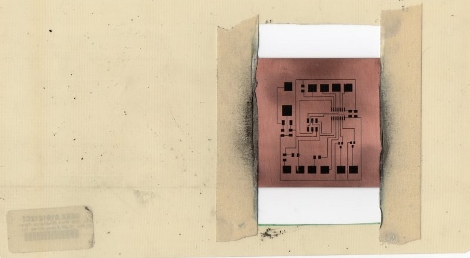
We use the toner transfer method to fabricate printed circuit boards. The most difficult part of this is printing, ironing, and removing the paper from the toner that is used as an etchant resist material. [Mark Lerman] is developing a method to apply toner directly to the copper clad using a laser printer. Each of the photos in his gallery have comments that take us through his process. A laser printer has been modified to negatively charge the copper plate, thereby attracting the positively charged toner to it. Once the toner has been applied, the board is baked in an oven, then run through a laminator. This process can yield 2 mil traces and it looks like the potential for incredibly clean boards is just around the corner. The question is, will this be easier and take less time than using photo resist?

We’ve contacted [Mark] in hopes of getting more details. If you can’t wait for a follow-up, take a look at this thread concerning his work.

[Thanks Komradbob]

QFN Or MLF Soldering Without Solder Paste

[youtube=http://www.youtube.com/v/c_Qt5CtUlqY&hl=en_US&fs=1&]

Take a few minutes to watch this amazingly informative video on how to solder QFN or MLF components without solder paste.  The quality of the video and the information within is quite nice. Even if you don’t intend to work with these parts, you could pick up some tips for soldering with hot air.

EMG Controlled Prosthesis

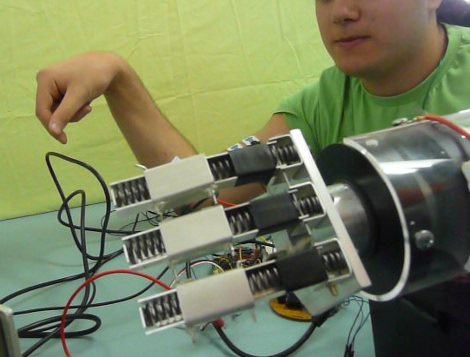
This prosthetic arm is the result of a student project. [Amnon Demri] and his classmates built it with below-the-elbow amputees in mind. It uses electromyography to actuate the fingers and wrist. Four stick-on sensors are placed around the elbow to sense electrical activity there. These signals are interpreted by a PIC 16f877a microcontroller which then controls the servo motors to operate the prosthetic limb. This sounds like a very economical solution and as you can see in the videos after the break, it works fairly well.

Continue reading “EMG Controlled Prosthesis”

POV LED Sphere

[youtube=http://www.youtube.com/watch?v=VF2dI7RiMVQ]

[Csaba Bleuer] has built this really nice POV LED sphere.  Looking at the hand drawn schematic, it appears that he’s using an Atmega8 as the core. The resolution is pretty decent, and even shows fairly well on camera despite the refresh issues. Although much cleaner, it looks like a similar implementation to this one that we covered back in october of last year. He’s still got some polishing to do to match “the orb” though.