LEGO Barcode Scanner

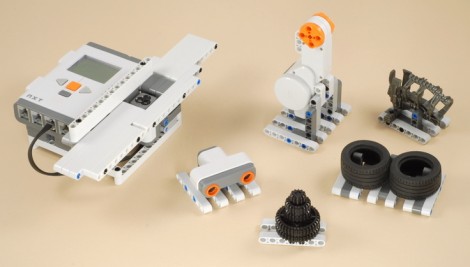
Playing store just got really, really fun because you can now build your own LEGO barcode scanner. As you can see after the break, it works well and it’s fast like a real barcode scanner. Unfortunately it doesn’t scan real barcodes. Or at least not traditional ones. As we learned in the Barcode Challenge, standard barcodes are a set of white and black bars that make up the ones and zeros of the code. This system uses the same white and gray bar system but it seems that it’s only the number of bars that identify an item, not a code created by a particular combination of light and dark. The items above are all scannable because the scanner counts the 2, 3, 4, 5 or 6 white beams on the bottom of each package. Still, it’s incredibly clever and a great toy for the young hackers to build if they have a little help.

Continue reading “LEGO Barcode Scanner”

Hacking A Hack: Disassembly And Sniffing Of IM-ME Binary

It’s fun to pick apart code, but it gets more difficult when you’re talking about binaries. [Joby Taffey] opened up the secrets to one of [Travis Goodspeed’s] hacks by disassembling and sniffing the data from a Zombie Gotcha game binary.

We looked in on [Travis’] work yesterday at creating a game using sprites on the IM-ME. He challenged readers to extract the 1-bit sprites from an iHex binary and that’s what got [Joby] started. He first tried to sniff the LCD data traces using a Bus Pirate but soon found the clock signal was much too fast for the device to reliably capture the signals. After looking into available source code from other IM-ME hacks [Joby] found how the SPI baud rate is set, then went to work searching for that in a disassembly of [Travis’] binary. Once found, he worked through the math necessary to slow down communication from 2.7 Mbit/s to 2400 bps and altered the binary data to match that change. This slower speed is more amenable to the Bus Pirate’s capabilities and allowed him to dump the sprite data as it was sent to the LCD screen.

[Thanks Travis]

Halloween Prop: Mario Bros. With Full Sound Effects

Creativity abounds in putting together this pair of Super Mario Bros. costumes. [Rob] and his wife didn’t stop with a well-assembled troupe of familiar wardrobe items, but decided to go for authentic sound effects as well. It started by finding a few of his favorite Mario sounds on the Internet. From there he grabbed a greeting card that allows you to record several message. He recorded each of the sounds and removed the electronics from the card. From there an Arduino mini was connected to the playback buttons and to a Wii nunchuck. After the break you can see that when the kids press a button, the card plays back the sound of jumping, shooting fireballs, etc. So far it’s the best use of an audio greeting card that we think eclipses its intended use.

Continue reading “Halloween Prop: Mario Bros. With Full Sound Effects”

Magnetic Card Stripe Spoofer

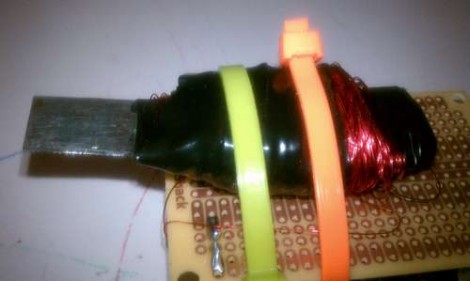
This hodge-podge of components is capable of spoofing the magnetic stripe on a credit card. [Sk3tch] built an electromagnet using a ferrous metal shim wrapped in enameled magnet wire. While he was doing the windings [Sk3tch] connected his multimeter to the metal shim and one end of the wire, setting it to test continuity. This way, if he accidentally scraps the enamel coating and grounds the wire on the metal the meter will sound and alarm and he’ll know about the short immediately. An Arduino takes over from here, actuating the coil to simulate the different data sections of a magnetic stripe.

From his schematic we see that the electromagnet is directly connected to two pins of the Arduino. We haven’t looked into the code but is seems there should be either some current limiting, or the use of a transistor to protect the microcontroller pins (we could be wrong about this).

[Sk3tch’s] realization of this spoofer can be made quickly with just a few parts. Card data must be written in the code and flashed to the Arduino. If you want to see what a more feature-rich version would entail take a look at this spoofer that has a keypad for changing data on the go.

[via Lifehacker]

Augen E-Go Booting Linux

The Augen E-Go is billed as a Netbook that ships with Windows CE. [Moogle] got it to boot the Linux kernel after a bit of hardware snooping. He found a UART connector on the main board and discovered that if you tie the enable pin to ground you can send an ARM bootloader to the device during boot up. His past experience hacking the Didj and the Explorer helped him recognize the processor used in the Augen. This lead to using a zimage from the Didj to boot the Linux kernel. So far the process halts at a kernel panic, but that’s because he hasn’t built the image with a file system for the device yet.

If the E-Go ends up playing nicely with Linux, [Moogle] may have found a suitable replacement for the Zipit.

Update: Looks like we’ve got the wrong version of the E-Go pictured above (and linked below). Check out [Moogle’s] comment for model numbers.

[Augen photo credit: Newegg.com]

Futuristic 3D Mouse Originally Arduino Powered And 3D Printed

We usually shy away from posting about commercial products. Strap on a bib to protect your shirt from the drool, watching the video after the break will show you why we had to post about this. [Valentin Heun] and his cohorts developed this three-dimensional controller using tools common to the hacker community. The patent-pending device uses a sphere for rotational input but can also be nudged for movement on 3 axes.

You may remember that [Valentin] as involved with that 10,000 watt flourescent lamp display. His Arduino skills were honed with that installation and used during the development of this mouse. Also joining in the prototyping fun was a 3D printer used to make the parts. From project to production, we figure the skills you use when hacking are breaking down the barriers that inventors have traditionally faced when looking to marked useful products.

This would be fantastic for 3D cad, modelling, etc. But we think it would also go well with Eagle, like the other 3D mouse hack did.

Continue reading “Futuristic 3D Mouse Originally Arduino Powered And 3D Printed”

Typewriter As I/O; Lets You Play Zork

Okay, for many the fact that this typewriter plays Zork on paper instead of a CRT is the fascinating part of this hack. But we love the implementation that makes the keys of the device an input and output.

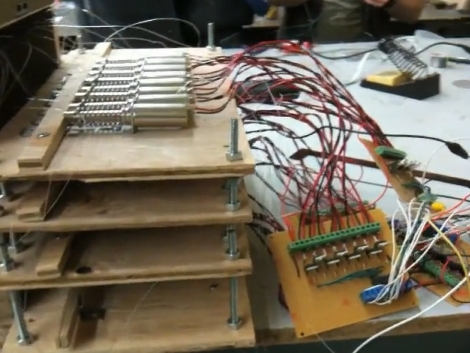
The electric typewriter has been fitted with a solenoid for each key (wow, that’s a lot of work). In the image above you can see they are housed on plywood platforms behind the typewriter and connect using a piece of mono-filament fishing line. This flexible connection means the solenoids have no adverse effect when you want to do the typing instead of the Arduino which drives the solenoids. [Johnathan M. Guberman] took advantage of this, adding a resistor for each key. When depressed the key completes a circuit with the resistor, acting as the input. In this way, you can play Zork with a piece of paper as the monitor, typing for the input, and watching the typewriter magically pound out responses. See it happen after the break.

Continue reading “Typewriter As I/O; Lets You Play Zork”