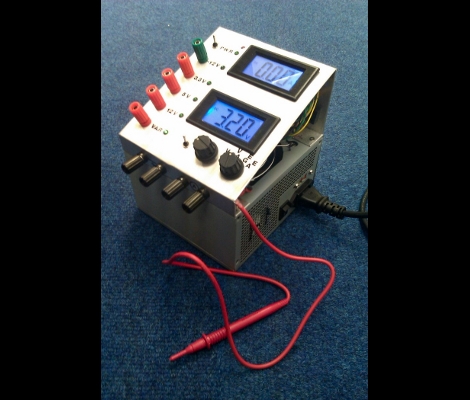
Here’s a fancy way to convert an ATX powers supply into a bench supply. [TG] didn’t just cut off the motherboard connector and add banana plugs, but improved the functionality. Right off the bat you’ll notice that he’s added a control panel. There is an Ammeter and Ohmmeter to let you know what the unit is putting out. He added an MIC29152WT adjustable voltage regulator so that he’s not limited to the fixed voltages of the psu. As a final touch he added an external voltage probe which can be used with the flick of a switch. It’s no replacement for a proper bench supply, especially since it doesn’t have adjustable current limiting, but it’s a nice improvement upon previous psu hacks.
Year: 2010
Quick, Cheap, And Simple Vacuum Tweezers
[Ken] found that using traditional tweezers is a good way to lose tiny surface mount parts and so set out to make his own vacuum tweezers (PDF). He already had a small aquarium pump that he used as a bubbler for etching circuit boards. After opening up the case he found it was possible to connect tubing to the input of the pump to use as the source for the vacuum. The business end of the device is a syringe which he already had for applying oil in tight spaces. A file took off the sharp tip, and a small hole lined with a bit of soft tubing serves as a valve. Put the needle tip in place and plug the hole with your finger to pick it up. Works like a charm and will go well with our next feature, building your own reflow skillet.
We like [Ken’s] work. We just looked in on his copper clad enclosures yesterday.
Designing An RF Transceiver

[William Dillon] is finishing up his degree. His final project as a student was to design an RF transceiver. He decided to work with the Microchip MRF49XA, which runs around $3 but will cost you $20 if you want it in a ready-to-use module. He didn’t find a lot of info on the Internet about communicating with these chips so he’s shared his design, code, and board files. If you’re ever wanted to delve into RF design this is a good primer. [William] talks about building around the example circuit from the datasheet but also includes a discussion of the calculations he made in working with the 434 MHz band, and an AVR-based library for using his module.
Part 2: Help Me Reverse Engineer An LED Light Bulb

Almost a month ago I started trying to reverse engineer an inexpensive LED color changing light bulb. With your help I’ve mapped out the circuit, and taken control of the bulb. But there’s still a few mysteries in this little blinker. Join me after the break to see what I’ve done so far, peruse the schematic and source code, and to help solve the two remaining mysteries.
Continue reading “Part 2: Help Me Reverse Engineer An LED Light Bulb”
Ice Tube Clock, Meet The ChronoDot

[Alex] ramped up the precision of his timepiece by adding a ChronoDot to the Ice Tube Clock. These two items are among our favorites; the Ice Tube Clock for its old-style multi-digit display, and the ChronoDot for combining a DS3231, battery, and components into a nice small package.
There is a schematic link at the very bottom left of [Alex’s] writeup. He mentions that he depopulated the clock crystal and its capacitor pair from the board and patched into the clock input on the AVR. A 100K pull-up resistor is included in the wiring as called for in the DS3231 datasheet. Although not specifically referenced, we assume that [Alex] reprogrammed the ATmega168 clock select fuses to use an external clock signal.
Now he can sit back knowing that the clock will be within 10 seconds per year accuracy.
Home Brew Coffee Machine
There are already a lot of different ways to brew up a decent coffee at home, from the humble saucepan to the elegant vacuum flask. In an office environment the choice of coffee-making technique can have a major impact on workplace harmony—how can people be expected to work happily when the kitchen is filthy with grounds and the coffee is always stale? “Someone have mercy,” [Christian Finger] lamented, “and boil a pot of fresh.”
In the end he took extreme measures, building a machine that grinds whole beans, measures out a dose, brews a cup and self-cleans. He used all sorts of odds and ends to put the thing together, detailed in his long and hilarious build log (english translation—and check out the dude’s sweet ride). Refer to his shockwave animation for a summary of the intended operation.
The end result is an extremely impressive Goldbergian contraption—download the video from the build log. It is pretty noisy and probably energy- and water-hungry, but that wouldn’t stop us from using it every day, if given the chance. Hell, this here could form a major part of your next breakfast machine.
We’re sure that there is further potential in this, because to get the really freshest possible cup of coffee you’d want to roast the coffee beans just before grinding them. Then you’d be well on your way towards something else entirely: a delicious breakfast machine.
Cassette Case Cameraphone Tripod

We see a lot of comments on shaky video asking why that person didn’t use a tripod. [Aatif Sumar] wants to use one when taking pictures and video with his phone but the threaded mounting hole you’d find in most cameras doesn’t come as a feature on smart phones. That didn’t deter him, he used an old cassette case for this phone tripod. The build started with a cheap flexible camera tripod. [Aatif] used a soldering iron to melt a hole in a plastic cassette case. We’re apprehensive about relying on the plastic’s ability to hold threads so we’re recommend epoxy to reinforce the joint. A bit more melting with the iron and he had a cradle on legs with a hole for the camera lens. It’s nothing fancy, but it also cost him next-to-nothing.


